Netty I/O 模型 I/O 模型基本说明 I/O 模型简单理解:就是用什么样的通道进行数据的发送和接收,很大程度上决定了程序通信的性能
Java 共支持三种网络编程模型 I/O 模式:BIO、NIO、AIO
BIO
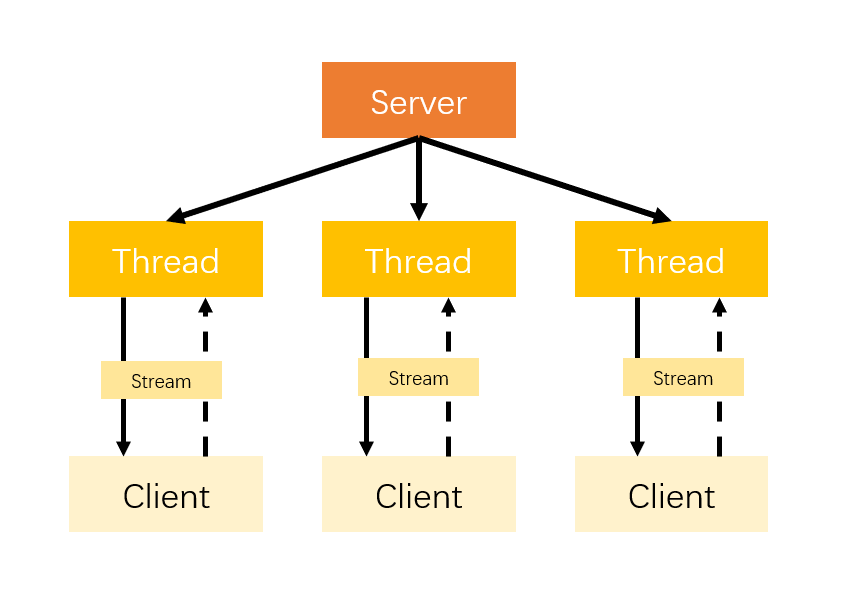
BIO:同步并阻塞,服务器实现模式为一个连接一个线程,即客户端有连接请求时服务器端就需要启动一个线程进行处理,如果这个连接不做任何事情会造成不必要的线程开销,当然可以通过线程池机制改善。
NIO
NIO:非阻塞IO
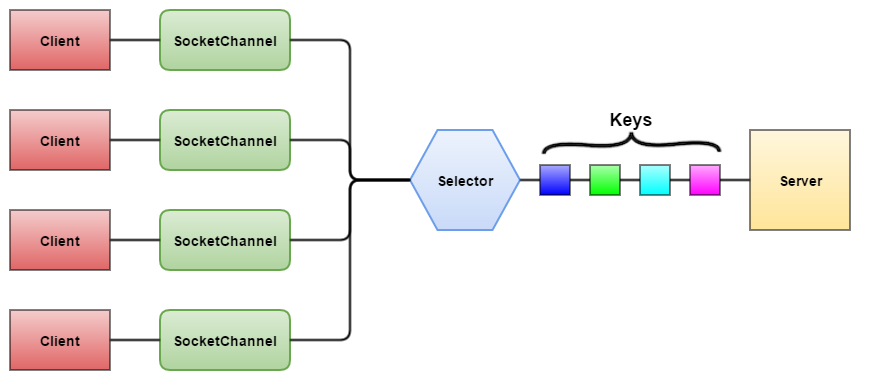
同步非阻塞,服务器实现模式为多个连接一个线程,即客户端发送的连接请求都会注册到多路复用器上,多路复用器轮询到连接有I/O请求时才启动一个线程进行处理。用户进程也需要时不时的询问IO操作是否就绪,这就要求用户进程不停的去询问。
异步阻塞, 此种方式下是指应用发起一个IO操作以后,不等待内核IO操作的完成,等内核完成IO操作以后会通知应用程序,这其实就是同步和异步最关键的区别,同步必须等待或者主动的去询问IO是否完成,那么为什么说是阻塞的呢?因为此时是通过select系统调用来完成的,而select函数本身的实现方式是阻塞的,而采用select函数有个好处就是它可以同时监听多个文件句柄(如果从UNP的角度看,select属于同步操作。因为select之后,进程还需要读写数据),从而提高系统的并发性。
AIO
AIO:异步非阻塞IO,在此种模式下,用户进程只需要发起一个IO操作然后立即返回,等IO操作真正的完成以后,应用程序会得到IO操作完成的通知,此时用户进程只需要对数据进行处理就好了,不需要进行实际的IO读写操作,因为真正的IO读取或者写入操作已经由内核完成了。
零拷贝 Java NIO中提供的FileChannel拥有transferTo和transferFrom两个方法,可直接把FileChannel中的数据拷贝到另外一个Channel,或者直接把另外一个Channel中的数据拷贝到FileChannel。该接口常被用于高效的网络/文件的数据传输和大文件拷贝。在操作系统支持的情况下,通过该方法传输数据并不需要将源数据从内核态拷贝到用户态,再从用户态拷贝到目标通道的内核态,同时也避免了两次用户态和内核态间的上下文切换,也即使用了“零拷贝”,所以其性能一般高于Java IO中提供的方法。
使用FileChannel的零拷贝将本地文件内容传输到网络的示例代码如下所示。
1
2
3
4
5
6
7
8
9
10
11
12
13
14
15
16
public class NIOClient public static void main (String[] args) throws IOException, InterruptedException SocketChannel socketChannel = SocketChannel.open(); InetSocketAddress address = new InetSocketAddress(1234 ); socketChannel.connect(address); RandomAccessFile file = new RandomAccessFile( NIOClient.class.getClassLoader().getResource("test.txt" ).getFile(), "rw" ); FileChannel channel = file.getChannel(); channel.transferTo(0 , channel.size(), socketChannel); channel.close(); file.close(); socketChannel.close(); } }
linux系统的五种网络模型方案
阻塞 I/O(blocking IO) 一直等待
非阻塞 I/O(nonblocking IO)询问等待
I/O 多路复用( IO multiplexing)有人专门询问等待
信号驱动 I/O( signal driven IO)异步通知自己去拿(内核到用户)
异步 I/O(asynchronous IO) 异步有人帮你送来(内核到用户)
NIO 的三核心组件 整个NIO体系包含的类远远不止这几个,但是在笔者看来Channel,Buffer和Selector组成了这个核心的API。其他的一些组件,比如Pipe和FileLock仅仅只作为上述三个的负责类。因此在概览这一节中,会重点关注这三个概念。其他的组件会在各自的部分单独介绍。
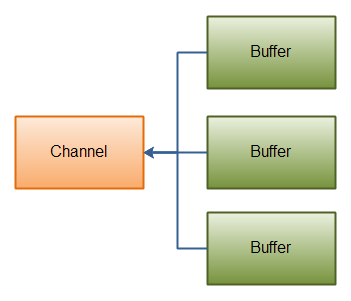
通道(Channels) 通常来说NIO中的所有IO都是从Channel开始的。Channel和流有点类似。通过Channel,我们即可以从Channel把数据写到Buffer中,也可以把数据冲Buffer写入到Channel,下图是一个示意图:
Java NIO: Channels read data into Buffers, and Buffers write data into Channels
有很多的Channel,Buffer类型。下面列举了主要的几种:
FileChannel
DatagramChannel
SocketChannel
ServerSocketChannel
这些channel基于于UDP和TCP的网络IO,以及文件IO。
缓冲区 (Buffers) 下面是核心的Buffer实现类的列表:
ByteBuffer
CharBuffer
DoubleBuffer
FloatBuffer
IntBuffer
LongBuffer
ShortBuffer
这些Buffer涵盖了可以通过IO操作的基础类型:byte,short,int,long,float,double以及characters. NIO实际上还包含一种MappedBytesBuffer,一般用于和内存映射的文件。
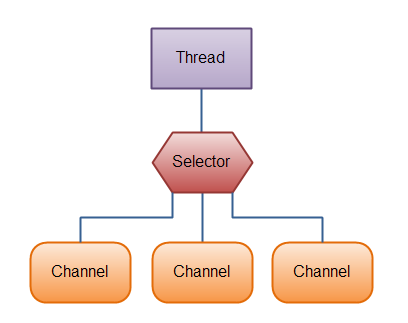
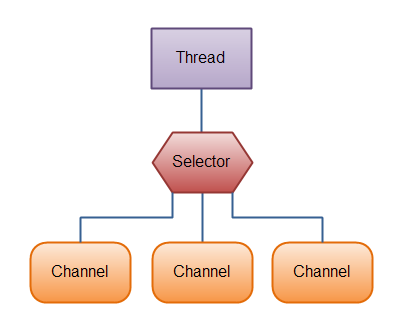
选择器(Selectors) 选择器允许单线程操作多个通道。如果你的程序中有大量的链接,同时每个链接的IO带宽不高的话,这个特性将会非常有帮助。比如聊天服务器。 下面是一个单线程中Slector维护3个Channel的示意图:
Java NIO: A Thread uses a Selector to handle 3 Channel’s
要使用Selector的话,我们必须把Channel注册到Selector上,然后就可以调用Selector的select()方法。这个方法会进入阻塞,直到有一个channel的状态符合条件。当方法返回后,线程可以处理这些事件。
Channels channel 和 Stream 对比 Java NIO Channel通道和流非常相似,主要有以下几点区别:
通道可以读也可以写,流一般来说是单向的(只能读或者写)。
通道可以异步读写。
通道总是基于缓冲区Buffer来读写。
正如上面提到的,我们可以从通道中读取数据,写入到buffer;也可以中buffer内读数据,写入到通道中。
Channel的实现(Channel Implementations) 下面列出Java NIO中最重要的集中Channel的实现:
FileChannel 用于文件的数据读写
DatagramChannel 用于UDP的数据读写
SocketChannel 用于TCP的数据读写
ServerSocketChannel 允许我们监听TCP链接请求,每个请求会创建一个SocketChannel.
Channel的基础示例(Basic Channel Example) 这有一个利用FileChannel读取数据到Buffer的例子:
1
2
3
4
5
6
7
8
9
10
11
12
13
14
15
16
17
18
19
RandomAccessFile aFile = new RandomAccessFile("data/nio-data.txt" , "rw" ); FileChannel inChannel = aFile.getChannel(); ByteBuffer buf = ByteBuffer.allocate(48 ); int bytesRead = inChannel.read(buf);while (bytesRead != -1 ) { System.out.println("Read " + bytesRead); buf.flip(); while (buf.hasRemaining()){ System.out.print((char ) buf.get()); } buf.clear(); bytesRead = inChannel.read(buf); } aFile.close();
注意buf.flip()的调用。首先把数据读取到Buffer中,然后调用flip()方法。接着再把数据读取出来。
FileChannel文件通道 Java NIO中的FileChannel是用于连接文件的通道。通过文件通道可以读、写文件的数据。Java NIO的FileChannel是相对标准Java IO API的可选接口。
FileChannel不可以设置为非阻塞模式,他只能在阻塞模式下运行。
打开文件通道(Opening a FileChannel)
在使用FileChannel前必须打开通道,打开一个文件通道需要通过输入/输出流或者RandomAccessFile,下面是通过RandomAccessFile打开文件通道的案例:
1
2
RandomAccessFile aFile = new RandomAccessFile("data/nio-data.txt", "rw"); FileChannel inChannel = aFile.getChannel();
从文件通道内读取数据(Reading Data from a FileChannel)
读取文件通道的数据可以通过read方法:
1
2
ByteBuffer buf = ByteBuffer.allocate(48); int bytesRead = inChannel.read(buf);
首先开辟一个Buffer,从通道中读取的数据会写入Buffer内。接着就可以调用read方法,read的返回值代表有多少字节被写入了Buffer,返回-1则表示已经读取到文件结尾了。
向文件通道写入数据(Writing Data to a FileChannel)
写数据用write方法,入参是Buffer:
1
2
3
4
5
6
7
8
9
10
11
String newData = "New String to write to file..." + System.currentTimeMillis(); ByteBuffer buf = ByteBuffer.allocate(48); buf.clear(); buf.put(newData.getBytes()); buf.flip(); while(buf.hasRemaining()) { channel.write(buf); }
注意这里的write调用写在了wihle循环中,这是因为write不能保证有多少数据真实被写入,因此需要循环写入直到没有更多数据。
关闭通道(Closing a FileChannel)
操作完毕后,需要把通道关闭:
FileChannel Position
当操作FileChannel的时候读和写都是基于特定起始位置的(position),获取当前的位置可以用FileChannel的position()方法,设置当前位置可以用带参数的position(long pos)方法。
1
2
3
long pos channel.position(); channel.position(pos +123);
假设我们把当前位置设置为文件结尾之后,那么当我们视图从通道中读取数据时就会发现返回值是-1,表示已经到达文件结尾了。 如果把当前位置设置为文件结尾之后,在想通道中写入数据,文件会自动扩展以便写入数据,但是这样会导致文件中出现类似空洞,即文件的一些位置是没有数据的。
FileChannel Size
size()方法可以返回FileChannel对应的文件的文件大小:
1 long fileSize = channel.size();
FileChannel Truncate
利用truncate方法可以截取指定长度的文件:
FileChannel Force
force方法会把所有未写磁盘的数据都强制写入磁盘。这是因为在操作系统中出于性能考虑回把数据放入缓冲区,所以不能保证数据在调用write写入文件通道后就及时写到磁盘上了,除非手动调用force方法。 force方法需要一个布尔参数,代表是否把meta data也一并强制写入。
Channel to Channel Transfers通道传输接口 在Java NIO中如果一个channel是FileChannel类型的,那么他可以直接把数据传输到另一个channel。逐个特性得益于FileChannel包含的transferTo和transferFrom两个方法。
transferFrom()
FileChannel.transferFrom方法把数据从通道源传输到FileChannel:
1
2
3
4
5
6
7
8
9
10
RandomAccessFile fromFile = new RandomAccessFile("fromFile.txt", "rw"); FileChannel fromChannel = fromFile.getChannel(); RandomAccessFile toFile = new RandomAccessFile("toFile.txt", "rw"); FileChannel toChannel = toFile.getChannel(); long position = 0; long count = fromChannel.size(); toChannel.transferFrom(fromChannel, position, count);
transferFrom的参数position和count表示目标文件的写入位置和最多写入的数据量。如果通道源的数据小于count那么就传实际有的数据量。 另外,有些SocketChannel的实现在传输时只会传输哪些处于就绪状态的数据,即使SocketChannel后续会有更多可用数据。因此,这个传输过程可能不会传输整个的数据。
transferTo()
transferTo方法把FileChannel数据传输到另一个channel,下面是案例:
1
2
3
4
5
6
7
8
9
10
RandomAccessFile fromFile = new RandomAccessFile("fromFile.txt", "rw"); FileChannel fromChannel = fromFile.getChannel(); RandomAccessFile toFile = new RandomAccessFile("toFile.txt", "rw"); FileChannel toChannel = toFile.getChannel(); long position = 0; long count = fromChannel.size(); fromChannel.transferTo(position, count, toChannel);
这段代码和之前介绍transfer时的代码非常相似,区别只在于调用方法的是哪个FileChannel.
SocketChannel的问题也存在与transferTo.SocketChannel的实现可能只在发送的buffer填充满后才发送,并结束。
ServerSocketChannel 服务端套接字通道 在Java NIO中,ServerSocketChannel是用于监听TCP链接请求的通道,正如Java网络编程中的ServerSocket一样。
ServerSocketChannel实现类位于java.nio.channels包下面。 下面是一个示例程序:
1
2
3
4
5
6
ServerSocketChannel serverSocketChannel = ServerSocketChannel.open(); serverSocketChannel.socket().bind(new InetSocketAddress(9999)); while(true) { SocketChannel socketChannel = serverSocketChannel.accept(); //do something with socketChannel... }
打开ServerSocketChannel
打开一个ServerSocketChannel我们需要调用他的open()方法,例如:
1 ServerSocketChannel serverSocketChannel = ServerSocketChannel.open();
关闭ServerSocketChannel
关闭一个ServerSocketChannel我们需要调用他的close()方法,例如:
1 serverSocketChannel.close();
监听链接
通过调用accept()方法,我们就开始监听端口上的请求连接。当accept()返回时,他会返回一个SocketChannel连接实例,实际上accept()是阻塞操作,他会阻塞当前去线程直到返回一个连接; 很多时候我们是不满足于监听一个连接的,因此我们会把accept()的调用放到循环中,就像这样:
1
2
3
4
while(true){ SocketChannel socketChannel = serverSocketChannel.accept(); //do something with socketChannel... }
当然我们可以在循环体内加上合适的中断逻辑,而不是单纯的在while循环中写true,以此来结束循环监听;
非阻塞模式
实际上ServerSocketChannel是可以设置为非阻塞模式的。在非阻塞模式下,调用accept()函数会立刻返回,如果当前没有请求的链接,那么返回值为空null。因此我们需要手动检查返回的SocketChannel是否为空,例如:
1
2
3
4
5
6
7
8
9
10
11
12
ServerSocketChannel serverSocketChannel = ServerSocketChannel.open(); serverSocketChannel.socket().bind(new InetSocketAddress(9999)); serverSocketChannel.configureBlocking(false); while(true){ SocketChannel socketChannel = serverSocketChannel.accept(); if(socketChannel != null){ //do something with socketChannel... } }
SocketChannel套接字通道 在Java NIO体系中,SocketChannel是用于TCP网络连接的套接字接口,相当于Java网络编程中的Socket套接字接口。创建SocketChannel主要有两种方式,如下:
打开一个SocketChannel并连接网络上的一台服务器。
当ServerSocketChannel接收到一个连接请求时,会创建一个SocketChannel。
建立一个SocketChannel连接
打开一个SocketChannel可以这样操作:
1
2
SocketChannel socketChannel = SocketChannel.open(); socketChannel.connect(new InetSocketAddress("http://gakkisama.com" , 80 ));
关闭一个SocketChannel连接
关闭一个SocketChannel只需要调用他的close方法,如下:
从SocketChannel中读数据
从一个SocketChannel连接中读取数据,可以通过read()方法,如下:
1
2
3
ByteBuffer buf = ByteBuffer.allocate(48 ); int bytesRead = socketChannel.read(buf);
首先需要开辟一个Buffer。从SocketChannel中读取的数据将放到Buffer中。
接下来就是调用SocketChannel的read()方法.这个read()会把通道中的数据读到Buffer中。read()方法的返回值是一个int数据,代表此次有多少字节的数据被写入了Buffer中。如果返回的是-1,那么意味着通道内的数据已经读取完毕,到底了(链接关闭)。
向SocketChannel写数据
向SocketChannel中写入数据是通过write()方法,write也需要一个Buffer作为参数。下面看一下具体的示例:
1
2
3
4
5
6
7
8
9
10
11
String newData = "New String to write to file..." + System.currentTimeMillis(); ByteBuffer buf = ByteBuffer.allocate(48 ); buf.clear(); buf.put(newData.getBytes()); buf.flip(); while (buf.hasRemaining()) { channel.write(buf); }
仔细观察代码,这里我们把write()的调用放在了while循环中。这是因为我们无法保证在write的时候实际写入了多少字节的数据,因此我们通过一个循环操作,不断把Buffer中数据写入到SocketChannel中知道Buffer中的数据全部写入为止。
非阻塞模式
我们可以把SocketChannel设置为non-blocking(非阻塞)模式。这样的话在调用connect(), read(), write()时都是异步的。
connect()
如果我们设置了一个SocketChannel是非阻塞的,那么调用connect()后,方法会在链接建立前就直接返回。为了检查当前链接是否建立成功,我们可以调用finishConnect(),如下:
1 2 3 4 5 6 socketChannel.configureBlocking(false ); socketChannel.connect(new InetSocketAddress("http://gakkisama.com" , 80 )); while (! socketChannel.finishConnect() ){ }
write()
在非阻塞模式下,调用write()方法不能确保方法返回后写入操作一定得到了执行。因此我们需要把write()调用放到循环内。这和前面在讲write()时是一样的,此处就不在代码演示。
read()
在非阻塞模式下,调用read()方法也不能确保方法返回后,确实读到了数据。因此我们需要自己检查的整型返回值,这个返回值会告诉我们实际读取了多少字节的数据。
Selector结合非阻塞模式
SocketChannel的非阻塞模式可以和Selector很好的协同工作。把一个或多个SocketChannel注册到一个Selector后,我们可以通过Selector指导哪些channels通道是处于可读,可写等等状态的。后续我们会再详细阐述如果联合使用Selector与SocketChannel。
Buffers Buffer 基本用法 利用Buffer读写数据,通常遵循四个步骤:
把数据写入buffer;
调用flip;
从Buffer中读取数据;
调用buffer.clear()或者buffer.compact()
当读取完数据后,需要清空buffer,以满足后续写入操作。清空buffer有两种方式:调用clear()或compact()方法。clear会清空整个buffer,compact则只清空已读取的数据,未被读取的数据会被移动到buffer的开始位置,写入位置则近跟着未读数据之后。
1
2
3
4
5
6
7
8
9
10
11
12
13
14
15
16
17
18
19
RandomAccessFile aFile = new RandomAccessFile("data/nio-data.txt" , "rw" ); FileChannel inChannel = aFile.getChannel(); ByteBuffer buf = ByteBuffer.allocate(48 ); int bytesRead = inChannel.read(buf); while (bytesRead != -1 ) { buf.flip(); while (buf.hasRemaining()){ System.out.print((char ) buf.get()); } buf.clear(); bytesRead = inChannel.read(buf); } aFile.close();
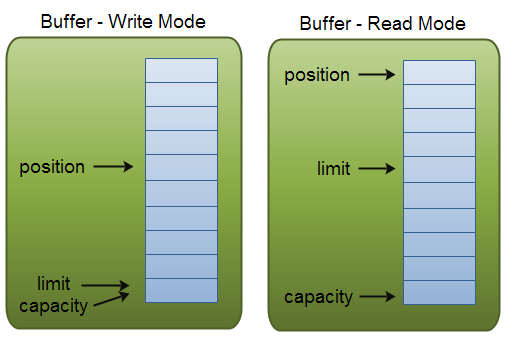
Buffer的容量,位置,上限(Buffer Capacity, Position and Limit) buffer缓冲区实质上就是一块内存,用于写入数据,也供后续再次读取数据。这块内存被NIO Buffer管理,并提供一系列的方法用于更简单的操作这块内存。
一个Buffer有三个属性是必须掌握的,分别是:
capacity容量
position位置
limit限制
position和limit的具体含义取决于当前buffer的模式。capacity在两种模式下都表示容量。
Buffer capacity, position and limit in write and read mode.
容量(Capacity)
作为一块内存,buffer有一个固定的大小,叫做capacity容量。也就是最多只能写入容量值的字节,整形等数据。一旦buffer写满了就需要清空已读数据以便下次继续写入新的数据。
位置(Position)
当写入数据到Buffer的时候需要中一个确定的位置开始,默认初始化时这个位置position为0,一旦写入了数据比如一个字节,整形数据,那么position的值就会指向数据之后的一个单元,position最大可以到capacity-1.
当从Buffer读取数据时,也需要从一个确定的位置开始。buffer从写入模式变为读取模式时,position会归零,每次读取后,position向后移动。
上限(Limit)
在写模式,limit的含义是我们所能写入的最大数据量。它等同于buffer的容量。
一旦切换到读模式,limit则代表我们所能读取的最大数据量,他的值等同于写模式下position的位置。
数据读取的上限时buffer中已有的数据,也就是limit的位置(原position所指的位置)。
Buffer 类型
Buffer Types
Java NIO有如下具体的Buffer类型:
ByteBuffer
MappedByteBuffer
CharBuffer
DoubleBuffer
FloatBuffer
IntBuffer
LongBuffer
ShortBuffer
Buffer的类型代表了不同数据类型,换句话说,Buffer中的数据可以是上述的基本类型;
Buffer 操作
分配一个Buffer(Allocating a Buffer)
为了获取一个Buffer对象,你必须先分配。每个Buffer实现类都有一个allocate()方法用于分配内存。下面看一个实例,开辟一个48字节大小的buffer:
1 ByteBuffer buf = ByteBuffer.allocate(48);
开辟一个1024个字符的CharBuffer:
1 CharBuffer buf = CharBuffer.allocate(1024);
写入数据到Buffer(Writing Data to a Buffer)
写数据到Buffer有两种方法:
从Channel中写数据到Buffer
手动写数据到Buffer,调用put方法
下面是一个实例,演示从Channel写数据到Buffer:
1 int bytesRead = inChannel.read(buf); //read into buffer.
通过put写数据:
put方法有很多不同版本,对应不同的写数据方法。例如把数据写到特定的位置,或者把一个字节数据写入buffer。看考JavaDoc文档可以查阅到更多数据。
翻转(flip())
flip()方法可以吧Buffer从写模式切换到读模式。调用flip方法会把position归零,并设置limit为之前的position的值。 也就是说,现在position代表的是读取位置,limit标示的是已写入的数据位置。
从Buffer读取数据(Reading Data from a Buffer)
从Buffer读数据也有两种方式。
从buffer读数据到channel
从buffer直接读取数据,调用get方法
读取数据到channel的例子:
1
2
//read from buffer into channel. int bytesWritten = inChannel.write(buf);
调用get读取数据的例子:
get也有诸多版本,对应了不同的读取方式。
rewind()
Buffer.rewind()方法将position置为0,这样我们可以重复读取buffer中的数据。limit保持不变。
clear() and compact()
一旦我们从buffer中读取完数据,需要复用buffer为下次写数据做准备。只需要调用clear或compact方法。
clear方法会重置position为0,limit为capacity,也就是整个Buffer清空。实际上Buffer中数据并没有清空,我们只是把标记为修改了。
如果Buffer还有一些数据没有读取完,调用clear就会导致这部分数据被“遗忘”,因为我们没有标记这部分数据未读。
针对这种情况,如果需要保留未读数据,那么可以使用compact。 因此compact和clear的区别就在于对未读数据的处理,是保留这部分数据还是一起清空。
mark() and reset()
通过mark方法可以标记当前的position,通过reset来恢复mark的位置,这个非常像canva的save和restore:
1
2
3
4
5
buffer.mark(); //call buffer.get() a couple of times, e.g. during parsing. buffer.reset(); //set position back to mark.
equals() and compareTo()
可以用eqauls和compareTo比较两个buffer
equals() 判断两个buffer相等 ,需满足:
类型相同
buffer中剩余字节数相同
所有剩余字节相等
从上面的三个条件可以看出,equals只比较buffer中的部分内容,并不会去比较每一个元素。
compareTo也是比较buffer中的剩余元素,只不过这个方法适用于比较排序的。
Java NIO Scatter / Gather Java NIO发布时内置了对scatter / gather的支持。scatter / gather是通过通道读写数据的两个概念。
Scattering read指的是从通道读取的操作能把数据写入多个buffer,也就是sctters代表了数据从一个channel到多个buffer的过程。
gathering write则正好相反,表示的是从多个buffer把数据写入到一个channel中。
Scatter/gather在有些场景下会非常有用,比如需要处理多份分开传输的数据。举例来说,假设一个消息包含了header和body,我们可能会把header和body保存在不同独立buffer中,这种分开处理header与body的做法会使开发更简明。
Scattering Reads
“scattering read”是把数据从单个Channel写入到多个buffer,下面是示意图:
Java NIO: Scattering Read
用代码来表示的话如下:
1
2
3
4
5
6
ByteBuffer header = ByteBuffer.allocate(128 ); ByteBuffer body = ByteBuffer.allocate(1024 ); ByteBuffer[] bufferArray = { header, body }; channel.read(bufferArray);
观察代码可以发现,我们把多个buffer写在了一个数组中,然后把数组传递给channel.read()方法。read()方法内部会负责把数据按顺序写进传入的buffer数组内。一个buffer写满后,接着写到下一个buffer中。
实际上,scattering read内部必须写满一个buffer后才会向后移动到下一个buffer,因此这并不适合消息大小会动态改变的部分,也就是说,如果你有一个header和body,并且header有一个固定的大小(比如128字节),这种情形下可以正常工作。
Gathering Writes
“gathering write”把多个buffer的数据写入到同一个channel中,下面是示意图:
Java NIO: Gathering Write
用代码表示的话如下:
1
2
3
4
5
6
7
8
ByteBuffer header = ByteBuffer.allocate(128); ByteBuffer body = ByteBuffer.allocate(1024); //write data into buffers ByteBuffer[] bufferArray = { header, body }; channel.write(bufferArray);
类似的传入一个buffer数组给write,内部机会按顺序将数组内的内容写进channel,这里需要注意,写入的时候针对的是buffer中position到limit之间的数据。也就是如果buffer的容量是128字节,但它只包含了58字节数据,那么写入的时候只有58字节会真正写入。因此gathering write是可以适用于可变大小的message的,这和scattering reads不同。
Selectors Selector是Java NIO中的一个组件,用于检查一个或多个NIO Channel的状态是否处于可读、可写。如此可以实现单线程管理多个channels,也就是可以管理多个网络链接。
为什么使用Selector(Why Use a Selector?) 用单线程处理多个channels的好处是我需要更少的线程来处理channel。实际上,你甚至可以用一个线程来处理所有的channels。从操作系统的角度来看,切换线程开销是比较昂贵的,并且每个线程都需要占用系统资源,因此暂用线程越少越好。
需要留意的是,现代操作系统和CPU在多任务处理上已经变得越来越好,所以多线程带来的影响也越来越小。如果一个CPU是多核的,如果不执行多任务反而是浪费了机器的性能。不过这些设计讨论是另外的话题了。简而言之,通过Selector我们可以实现单线程操作多个channel。
这有一幅示意图,描述了单线程处理三个channel的情况:
Java NIO: A Thread uses a Selector to handle 3 Channel’s
如何使用selector(How Use a Selector)
创建Selector(Creating a Selector)
创建一个Selector可以通过Selector.open()方法:
1 Selector selector = Selector.open();
注册Channel到Selector上(Registering Channels with the Selector)
为了让Selector监听Channel,我们必须先把Channel注册到Selector上,这个操作使用SelectableChannel.register():
1
2
channel.configureBlocking(false); SelectionKey key = channel.register(selector, SelectionKey.OP_READ);
Channel必须是非阻塞的。所以FileChannel不适用Selector,因为FileChannel不能切换为非阻塞模式。Socket channel可以正常使用。
==注意register的第二个参数==,这个参数是一个“关注集合”,代表我们关注的channel状态,有四种基础类型可供监听:
Connect
Accept
Read
Write
一个channel触发了一个事件也可视作该事件处于就绪状态。因此当channel与server连接成功后,那么就是“连接就绪”状态。server channel接收请求连接时处于“可连接就绪”状态。channel有数据可读时处于“读就绪”状态。channel可以进行数据写入时处于“写就绪”状态。
上述的四种就绪状态用SelectionKey中的常量表示如下:
SelectionKey.OP_CONNECT
SelectionKey.OP_ACCEPT
SelectionKey.OP_READ
SelectionKey.OP_WRITE
如果对多个事件感兴趣可利用位的或运算结合多个常量,比如:
1 int interestSet = SelectionKey.OP_READ | SelectionKey.OP_WRITE;
SelectionKeys
我们利用register方法把Channel注册到了Selectors上,这个方法的返回值是SelectionKeys,这个返回的对象包含了一些比较有价值的属性:
The interest set
The ready set
The Channel
The Selector
An attached object (optional)
这5个属性都代表什么含义呢?下面会一一介绍。
Interest Set
这个“关注集合”实际上就是我们希望处理的事件的集合,它的值就是注册时传入的参数,我们可以用按为与运算把每个事件取出来:
1
2
3
4
5
6
int interestSet = selectionKey.interestOps(); boolean isInterestedInAccept = interestSet & SelectionKey.OP_ACCEPT; boolean isInterestedInConnect = interestSet & SelectionKey.OP_CONNECT; boolean isInterestedInRead = interestSet & SelectionKey.OP_READ; boolean isInterestedInWrite = interestSet & SelectionKey.OP_WRITE;
Ready Set
“就绪集合”中的值是当前channel处于就绪的值,一般来说在调用了select方法后都会需要用到就绪状态,select的介绍在后续文章中继续展开。
1 int readySet = selectionKey.readyOps();
从“就绪集合”中取值的操作类似于“关注集合”的操作,当然还有更简单的方法,SelectionKey提供了一系列返回值为boolean的的方法:
1
2
3
4
selectionKey.isAcceptable(); selectionKey.isConnectable(); selectionKey.isReadable(); selectionKey.isWritable();
Channel + Selector
从SelectionKey操作Channel和Selector非常简单:
1
2
Channel channel = selectionKey.channel(); Selector selector = selectionKey.selector();
Attaching Objects
我们可以给一个SelectionKey附加一个Object,这样做一方面可以方便我们识别某个特定的channel,同时也增加了channel相关的附加信息。例如,可以把用于channel的buffer附加到SelectionKey上:
1
2
3
selectionKey.attach(theObject); Object attachedObj = selectionKey.attachment();
附加对象的操作也可以在register的时候就执行:
1 SelectionKey key = channel.register(selector, SelectionKey.OP_READ, theObject);
从Selector中选择channel(Selecting Channels via a Selector) 一旦我们向Selector注册了一个或多个channel后,就可以调用select来获取channel。select方法会返回所有处于就绪状态的channel。 select方法具体如下:
int select()
int select(long timeout)
int selectNow()
select()方法在返回channel之前处于阻塞状态。 select(long timeout)和select做的事一样,不过他的阻塞有一个超时限制。
selectNow()不会阻塞,根据当前状态立刻返回合适的channel。
select()方法的返回值是一个int整形,代表有多少channel处于就绪了。也就是自上一次select后有多少channel进入就绪。举例来说,假设第一次调用select时正好有一个channel就绪,那么返回值是1,并且对这个channel做任何处理,接着再次调用select,此时恰好又有一个新的channel就绪,那么返回值还是1,现在我们一共有两个channel处于就绪,但是在每次调用select时只有一个channel是就绪的。
selectedKeys()
在调用select并返回了有channel就绪之后,可以通过选中的key集合来获取channel,这个操作通过调用selectedKeys()方法:
1 Set<SelectionKey> selectedKeys = selector.selectedKeys();
还记得在register时的操作吧,我们register后的返回值就是SelectionKey实例,也就是我们现在通过selectedKeys()方法所返回的SelectionKey。
遍历这些SelectionKey可以通过如下方法:
1
2
3
4
5
6
7
8
9
10
11
12
13
14
15
16
17
18
19
20
21
22
23
Set<SelectionKey> selectedKeys = selector.selectedKeys(); Iterator<SelectionKey> keyIterator = selectedKeys.iterator(); while (keyIterator.hasNext()) { SelectionKey key = keyIterator.next(); if (key.isAcceptable()) { } else if (key.isConnectable()) { } else if (key.isReadable()) { } else if (key.isWritable()) { } keyIterator.remove(); }
上述循环会迭代key集合,针对每个key我们单独判断他是处于何种就绪状态。
注意keyIterater.remove()方法的调用,Selector本身并不会移除SelectionKey对象,这个操作需要我们收到执行。当下次channel处于就绪是,Selector任然会吧这些key再次加入进来。
SelectionKey.channel返回的channel实例需要强转为我们实际使用的具体的channel类型,例如ServerSocketChannel或SocketChannel.
wakeUp()
y由于调用select而被阻塞的线程,可以通过调用Selector.wakeup()来唤醒即便此时已然没有channel处于就绪状态。具体操作是,在另外一个线程调用wakeup,被阻塞与select方法的线程就会立刻返回。
close()
当操作Selector完毕后,需要调用close方法。close的调用会关闭Selector并使相关的SelectionKey都无效。channel本身不管被关闭。
举个栗子(Full Selector Example) NIO服务端:
1
2
3
4
5
6
7
8
9
10
11
12
13
14
15
16
17
18
19
20
21
22
23
24
25
26
27
28
29
30
31
32
33
34
35
36
37
38
39
40
41
42
43
44
45
46
47
48
49
50
51
52
public class NIOServer public static void main (String[] args) throws IOException ServerSocketChannel serverSocketChannel =ServerSocketChannel.open(); Selector selector = Selector.open(); serverSocketChannel.socket().bind(new InetSocketAddress(6666 )); serverSocketChannel.configureBlocking(false ); serverSocketChannel.register(selector, SelectionKey.OP_ACCEPT); while (true ){ if (selector.select(1000 )==0 ){ System.out.println("无连接" ); continue ; } Set<SelectionKey> selectionKeys = selector.selectedKeys(); Iterator<SelectionKey> keyIterator = selectionKeys.iterator(); while (keyIterator.hasNext()){ SelectionKey selectionKey = keyIterator.next(); if (selectionKey.isAcceptable()){ System.out.println("有新的连接" ); SocketChannel socketChannel = serverSocketChannel.accept(); socketChannel.configureBlocking(false ); socketChannel.register(selector,SelectionKey.OP_READ, ByteBuffer.allocate(1024 )); } if (selectionKey.isReadable()){ SocketChannel channel = (SocketChannel)selectionKey.channel(); ByteBuffer buffer = (ByteBuffer)selectionKey.attachment(); channel.read(buffer); System.out.println("from客户端:" +new String(buffer.array())); } keyIterator.remove(); } } } }
NIO客户端:
1
2
3
4
5
6
7
8
9
10
11
12
13
14
15
16
17
18
19
20
21
22
23
24
25
public class NIOClient public static void main (String[] args) throws IOException SocketChannel socketChannel = SocketChannel.open(); socketChannel.configureBlocking(false ); InetSocketAddress socketAddress = new InetSocketAddress("127.0.0.1" , 6666 ); if (!socketChannel.connect(socketAddress)){ while (!socketChannel.finishConnect()){ System.out.println("连接中" ); } } String hello = "hello nic" ; ByteBuffer byteBuffer = ByteBuffer.wrap(hello.getBytes()); socketChannel.write(byteBuffer); System.in.read(); } }
selector、poll、epoll Selector
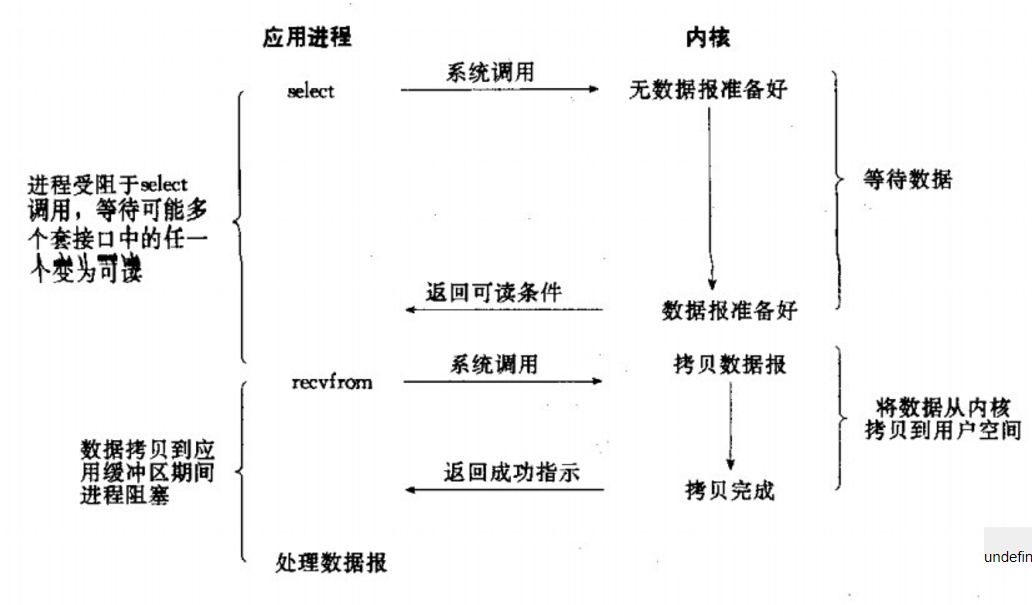
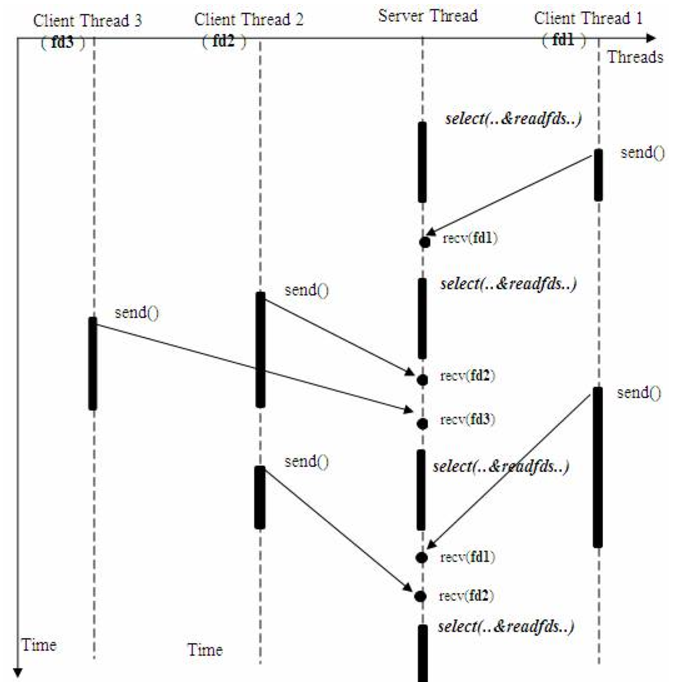
select的工作流程: 单个进程就可以同时处理多个网络连接的io请求(同时阻塞多个io操作)。基本原理就是程序呼叫select,然后整个程序就阻塞了,这时候,kernel就会轮询检查所有select负责的fd,当找到一个client中的数据准备好了,select就会返回,这个时候程序就会系统调用,将数据从kernel复制到进程缓冲区。
下图为select同时从多个客户端接受数据的过程
虽然服务器进程会被select阻塞,但是select会利用内核不断轮询监听其他客户端的io操作是否完成。
poll
poll的原理与select非常相似,差别如下:
描述fd集合的方式不同,poll使用 pollfd 结构而不是select结构fd_set结构,所以poll是链式的,没有最大连接数的限制
poll有一个特点是水平触发,也就是通知程序fd就绪后,这次没有被处理,那么下次poll的时候会再次通知同个fd已经就绪。
==缺点和C10K问题==
根据fd_size的定义,它的大小为32个整数大小(32位机器为32*32,所有共有1024bits可以记录fd),每个fd一个bit,所以最大只能同时处理1024个fd
每次要判断【有哪些event发生】这件事的成本很高,因为select(polling也是)采取主动轮询机制
每一次呼叫 select( ) 都需要先从 user space把 FD_SET复制到 kernel(约线性时间成本) 为什么 select 不能像epoll一样,只做一次复制就好呢? 每一次呼叫 select()前,FD_SET都可能更改变动,而 epoll 提供了共享记忆存储结构,所以不需要有 kernel 与 user之间的数据沟通
然后kernel还要轮询每个fd,约线性时间
假设现实中,有1百万个客户端同时与一个服务器保持着tcp连接,而每一个时刻,通常只有几百上千个tcp连接是活跃的,这时候我们仍然使用select/poll机制,kernel必须在搜寻完100万个fd之后,才能找到其中状态是active的,这样资源消耗大而且效率低下。
epoll
epoll 提供了三个函数:
int epoll_create(int size); 建立一個 epoll 对象,并传回它的id
int epoll_ctl(int epfd, int op, int fd, struct epoll_event *event); 事件注册函数,将需要监听的事件和需要监听的fd交给epoll对象
int epoll_wait(int epfd, struct epoll_event *events, int maxevents, int timeout); 等待注册的事件被触发或者timeout发生
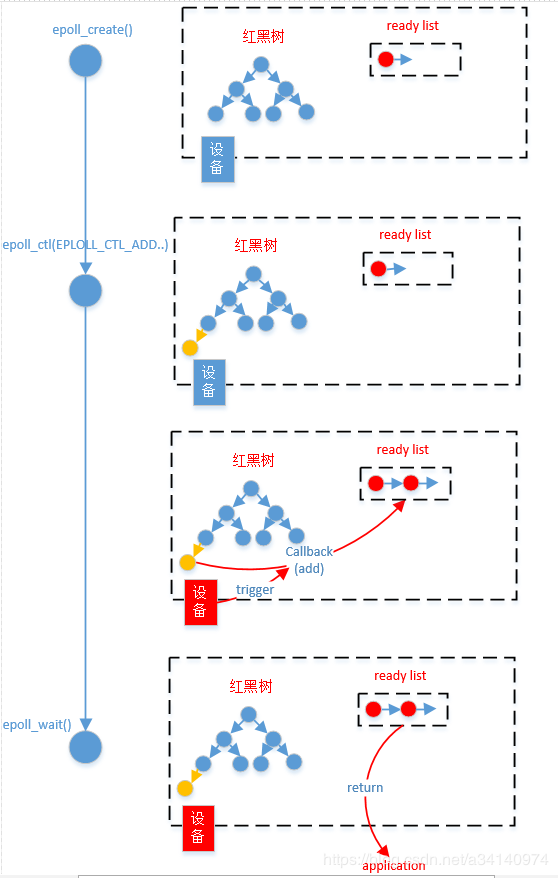
epoll 的内部处理过程主要可以分四个步骤:
调用epoll_create()函数,创建epoll句柄eventpoll。该eventpoll内部包含了:一个红黑树rbtree,一个就绪链表rdlist;
调用epoll_ctl(EPOLL_CTL_ADD…)将所关心fd的关心事件注册到epoll的rbtree上,(当然也有可能是修改或删除),并注册关心事件的回调函数(如add函数,将就绪fd添加到rdlist)
一旦设备(如网卡)有关心事件发生,对应的注册回调函数被触发,就绪fd被添加到rdlist;
用户程序调用epoll_wait(),返回rdlist,并对其中的fd做相应处理。
epoll解决的问题:
epoll没有fd数量限制 epoll没有这个限制,我们知道每个epoll监听一个fd,所以最大数量与能打开的fd数量有关,一个g的内存的机器上,能打开10万个左右
epoll不需要每次都从user space 将fd set复制到内核kernel epoll在用epoll_ctl函数进行事件注册的时候,已经将fd复制到内核中,所以不需要每次都重新复制一次
select 和 poll 都是主动轮循机制,需要访问每一個 FD; epoll是被动触发方式,给fd注册了相应事件的时候,我们为每一个fd指定了一个回调函数,当数据准备好之后,就会把就绪的fd加入一个就绪的队列中,epoll_wait的工作方式实际上就是在这个就绪队列中查看有没有就绪的fd,如果有,就唤醒就绪队列上的等待者,然后调用回调函数。
虽然selector、poll、epoll都需要查看是否有fd就绪,但是epoll之所以是被动触发,就在于它只要去查找就绪队列中有没有fd,就绪的fd是主动加到队列中,epoll不需要一个个轮询确认。 换一句话讲,就是selector和poll只能通知有fd已经就绪了,但不能知道究竟是哪个fd就绪,所以select和poll就要去主动轮询一遍找到就绪的fd。而epoll则是不但可以知道有fd可以就绪,而且还具体可以知道就绪fd的编号,所以直接找到就可以,不用轮询。
Epoll 的两种工作模式
epoll 有 EPOLLLT 和 EPOLLET 两种触发模式,LT是默认的模式,ET是“高速”模式。LT模式下,只要这个fd还有数据可读,每次 epoll_wait都会返回它的事件,提醒用户程序去操作,而在ET(边缘触发)模式中,它只会提示一次,直到下次再有数据流入之前都不会再提示了,无 论fd中是否还有数据可读。所以在ET模式下,read一个fd的时候一定要把它的buffer读光,也就是说一直读到read的返回值小于请求值,或者 遇到EAGAIN错误。
Netty终于来啦!!! Netty介绍
Netty 是由 JBoss 提供的一个 Java 开源框架,现在是 GitHub 上的独立项目。
Netty 是一个异步的、基于事件驱动的网络应用框架,用以快速开发高性能、高可靠的网络 I/O。
Netty 主要针对在 TCP 协议下,面向 Clients端的高并发应用,本质是一个 NIO框架。
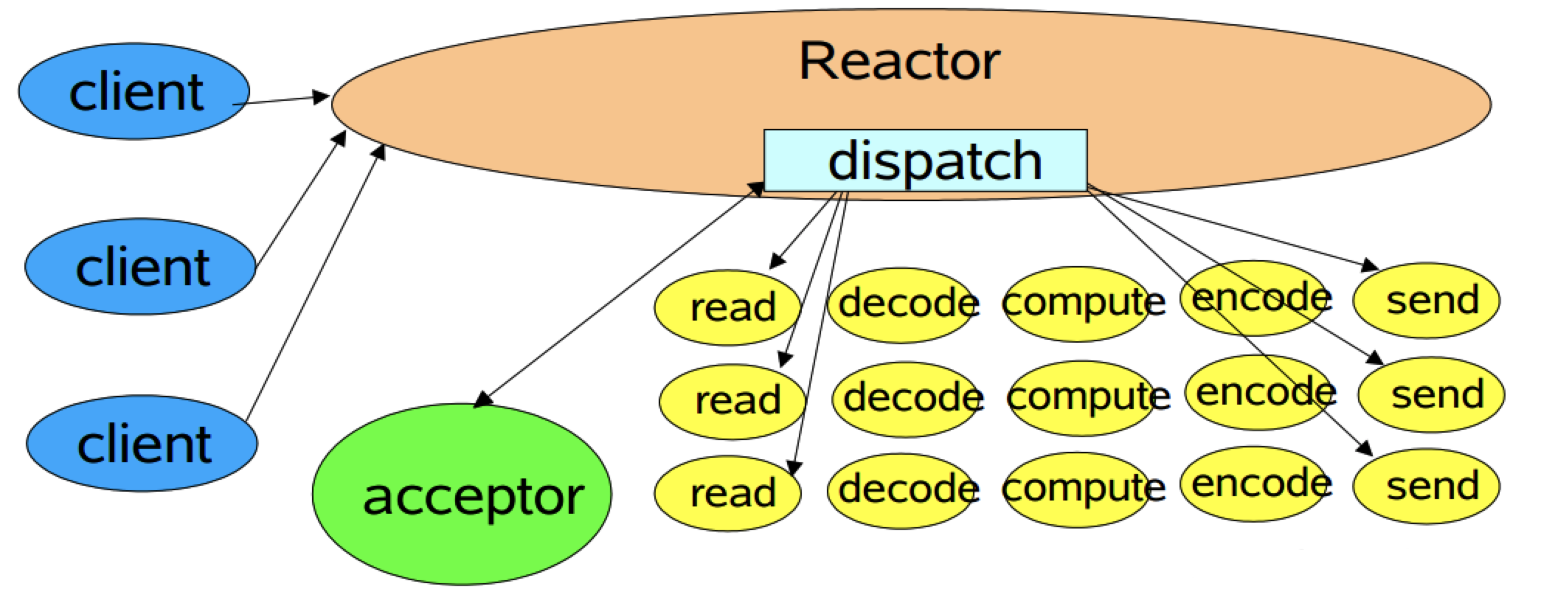
Reactor I/O 模型 经典Reactor模式(单线程模式) 经典的Reactor模式示意图如下所示。
在Reactor模式中,包含如下角色
Reactor Acceptor Handlers
最简单的Reactor模式实现代码如下所示。
1
2
3
4
5
6
7
8
9
10
11
12
13
14
15
16
17
18
19
20
21
22
23
24
25
26
27
28
29
30
31
32
33
34
35
36
37
38
39
40
public class NIOServer private static final Logger LOGGER = LoggerFactory.getLogger(NIOServer.class); public static void main (String[] args) throws IOException Selector selector = Selector.open(); ServerSocketChannel serverSocketChannel = ServerSocketChannel.open(); serverSocketChannel.configureBlocking(false ); serverSocketChannel.bind(new InetSocketAddress(1234 )); serverSocketChannel.register(selector, SelectionKey.OP_ACCEPT); while (selector.select() > 0 ) { Set<SelectionKey> keys = selector.selectedKeys(); Iterator<SelectionKey> iterator = keys.iterator(); while (iterator.hasNext()) { SelectionKey key = iterator.next(); iterator.remove(); if (key.isAcceptable()) { ServerSocketChannel acceptServerSocketChannel = (ServerSocketChannel) key.channel(); SocketChannel socketChannel = acceptServerSocketChannel.accept(); socketChannel.configureBlocking(false ); LOGGER.info("Accept request from {}" , socketChannel.getRemoteAddress()); socketChannel.register(selector, SelectionKey.OP_READ); } else if (key.isReadable()) { SocketChannel socketChannel = (SocketChannel) key.channel(); ByteBuffer buffer = ByteBuffer.allocate(1024 ); int count = socketChannel.read(buffer); if (count <= 0 ) { socketChannel.close(); key.cancel(); LOGGER.info("Received invalide data, close the connection" ); continue ; } LOGGER.info("Received message {}" , new String(buffer.array())); } keys.remove(key); } } } }
为了方便阅读,上示代码将Reactor模式中的所有角色放在了一个类中。
从上示代码中可以看到,多个Channel可以注册到同一个Selector对象上,实现了一个线程同时监控多个请求状态(Channel)。同时注册时需要指定它所关注的事件,例如上示代码中socketServerChannel 对象只注册了OP_ACCEPT 事件,而socketChannel 对象只注册了OP_READ 事件。
selector.select()是阻塞的,当有至少一个通道可用时该方法返回可用通道个数。同时该方法只捕获Channel注册时指定的所关注的事件。
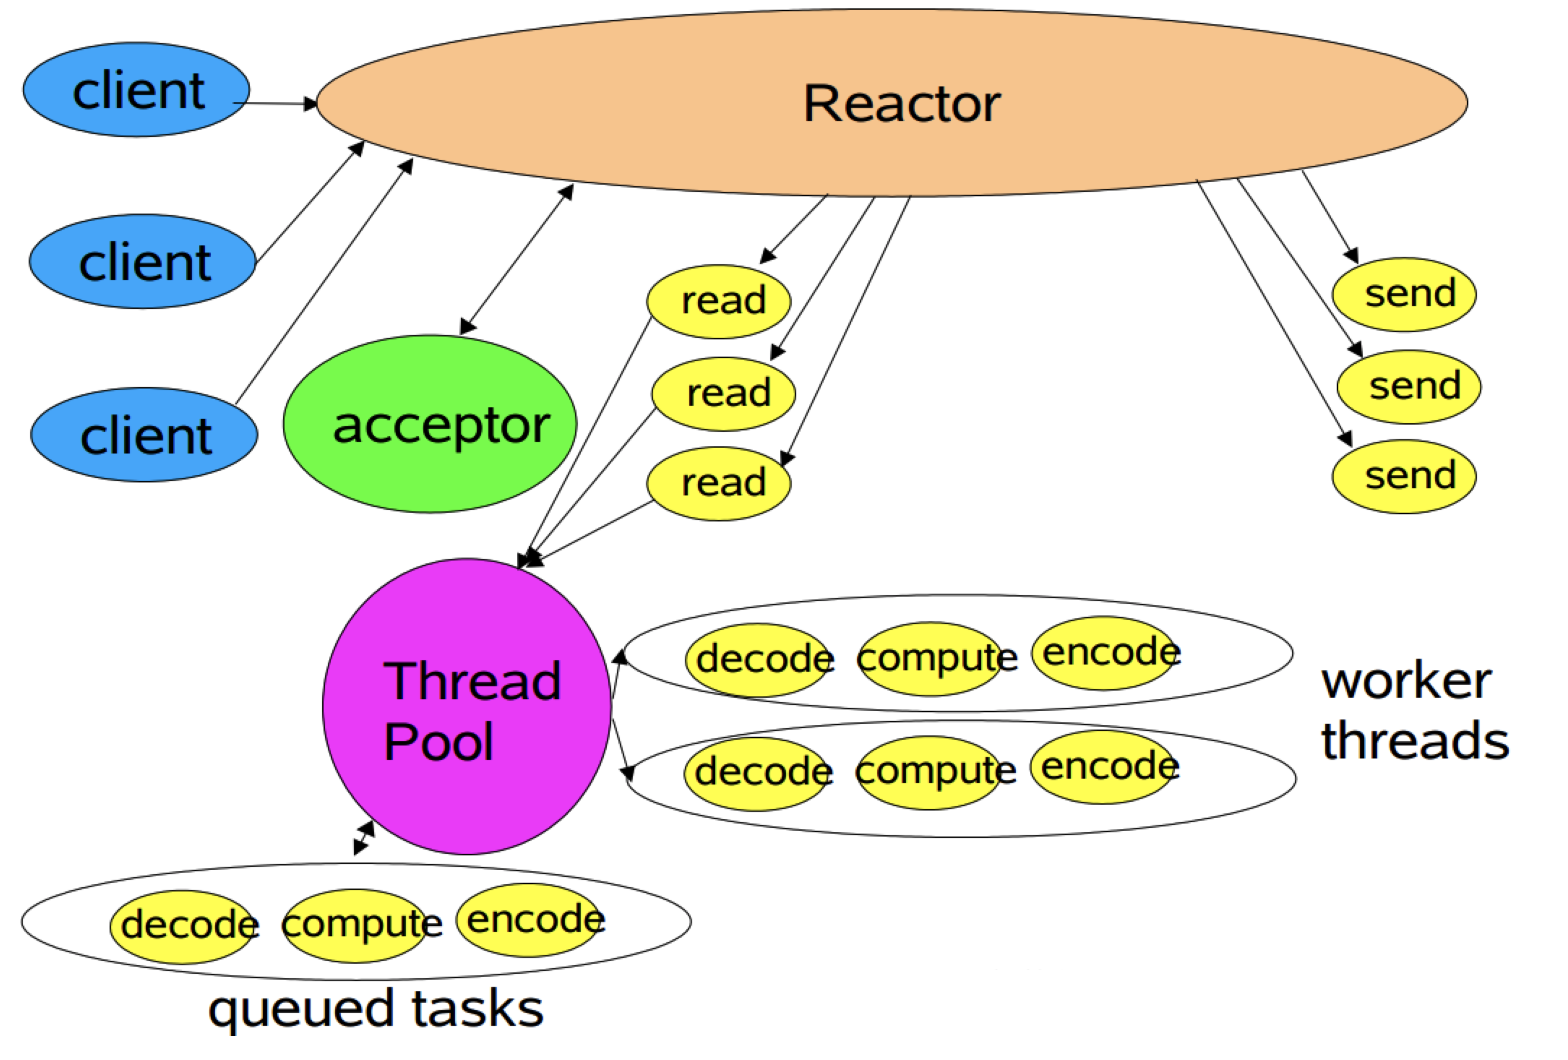
多工作线程Reactor模式 经典Reactor模式中,尽管一个线程可同时监控多个请求(Channel),但是所有读/写请求以及对新连接请求的处理都在同一个线程中处理,无法充分利用多CPU的优势,同时读/写操作也会阻塞对新连接请求的处理。因此可以引入多线程,并行处理多个读/写操作,如下图所示。
多线程Reactor模式示例代码如下所示。
1
2
3
4
5
6
7
8
9
10
11
12
13
14
15
16
17
18
19
20
21
22
23
24
25
26
27
28
29
30
31
32
33
34
35
public class NIOServer private static final Logger LOGGER = LoggerFactory.getLogger(NIOServer.class); public static void main (String[] args) throws IOException Selector selector = Selector.open(); ServerSocketChannel serverSocketChannel = ServerSocketChannel.open(); serverSocketChannel.configureBlocking(false ); serverSocketChannel.bind(new InetSocketAddress(1234 )); serverSocketChannel.register(selector, SelectionKey.OP_ACCEPT); while (true ) { if (selector.selectNow() < 0 ) { continue ; } Set<SelectionKey> keys = selector.selectedKeys(); Iterator<SelectionKey> iterator = keys.iterator(); while (iterator.hasNext()) { SelectionKey key = iterator.next(); iterator.remove(); if (key.isAcceptable()) { ServerSocketChannel acceptServerSocketChannel = (ServerSocketChannel) key.channel(); SocketChannel socketChannel = acceptServerSocketChannel.accept(); socketChannel.configureBlocking(false ); LOGGER.info("Accept request from {}" , socketChannel.getRemoteAddress()); SelectionKey readKey = socketChannel.register(selector, SelectionKey.OP_READ); readKey.attach(new Processor()); } else if (key.isReadable()) { Processor processor = (Processor) key.attachment(); processor.process(key); } } } } }
从上示代码中可以看到,注册完SocketChannel的OP_READ 事件后,可以对相应的SelectionKey attach一个对象(本例中attach了一个Processor对象,该对象处理读请求),并且在获取到可读事件后,可以取出该对象。
注:attach对象及取出该对象是NIO提供的一种操作,但该操作并非Reactor模式的必要操作,本文使用它,只是为了方便演示NIO的接口。
具体的读请求处理在如下所示的Processor类中。该类中设置了一个静态的线程池处理所有请求。而process 方法并不直接处理I/O请求,而是把该I/O操作提交给上述线程池去处理,这样就充分利用了多线程的优势,同时将对新连接的处理和读/写操作的处理放在了不同的线程中,读/写操作不再阻塞对新连接请求的处理。
1
2
3
4
5
6
7
8
9
10
11
12
13
14
15
16
17
18
19
20
21
22
public class Processor private static final Logger LOGGER = LoggerFactory.getLogger(Processor.class); private static final ExecutorService service = Executors.newFixedThreadPool(16 ); public void process (SelectionKey selectionKey) service.submit(() -> { ByteBuffer buffer = ByteBuffer.allocate(1024 ); SocketChannel socketChannel = (SocketChannel) selectionKey.channel(); int count = socketChannel.read(buffer); if (count < 0 ) { socketChannel.close(); selectionKey.cancel(); LOGGER.info("{}\t Read ended" , socketChannel); return null ; } else if (count == 0 ) { return null ; } LOGGER.info("{}\t Read message {}" , socketChannel, new String(buffer.array())); return null ; }); } }
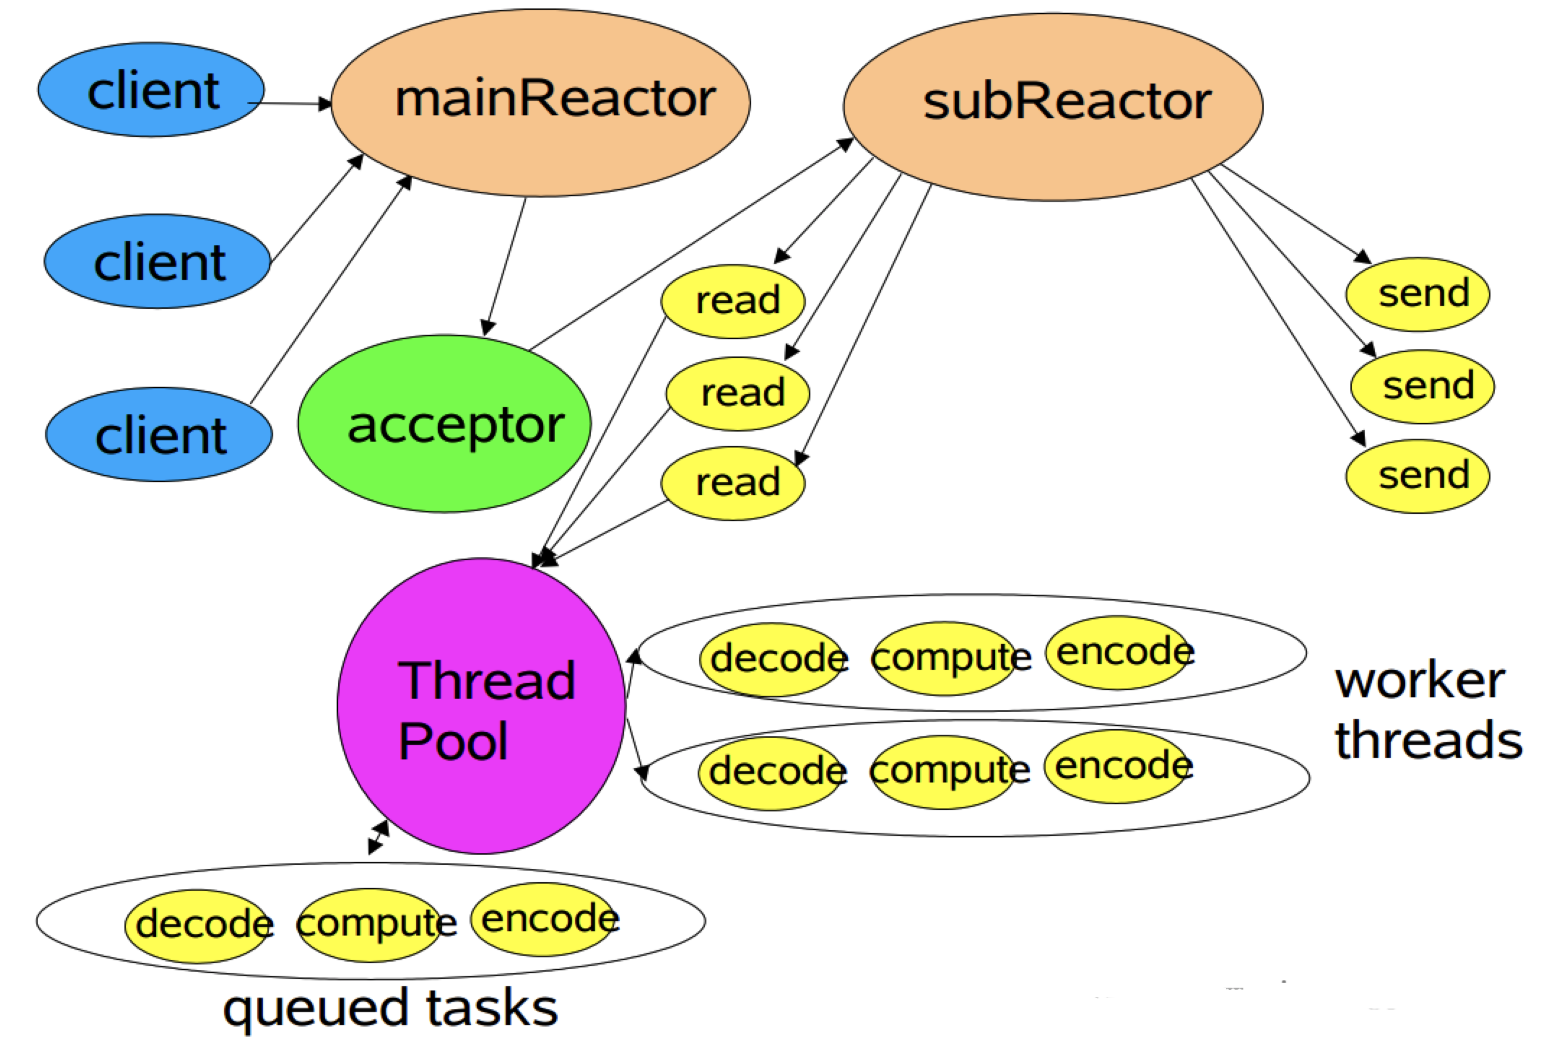
多Reactor Netty中使用的Reactor模式,引入了多Reactor,也即一个主Reactor负责监控所有的连接请求,多个子Reactor负责监控并处理读/写请求,减轻了主Reactor的压力,降低了主Reactor压力太大而造成的延迟。
多Reactor模式示意图如下所示。
多Reactor示例代码如下所示。
1
2
3
4
5
6
7
8
9
10
11
12
13
14
15
16
17
18
19
20
21
22
23
24
25
26
27
28
29
30
31
32
33
34
35
public class NIOServer private static final Logger LOGGER = LoggerFactory.getLogger(NIOServer.class); public static void main (String[] args) throws IOException Selector selector = Selector.open(); ServerSocketChannel serverSocketChannel = ServerSocketChannel.open(); serverSocketChannel.configureBlocking(false ); serverSocketChannel.bind(new InetSocketAddress(1234 )); serverSocketChannel.register(selector, SelectionKey.OP_ACCEPT); int coreNum = Runtime.getRuntime().availableProcessors(); Processor[] processors = new Processor[2 * coreNum]; for (int i = 0 ; i < processors.length; i++) { processors[i] = new Processor(); } int index = 0 ; while (selector.select() > 0 ) { Set<SelectionKey> keys = selector.selectedKeys(); for (SelectionKey key : keys) { keys.remove(key); if (key.isAcceptable()) { ServerSocketChannel acceptServerSocketChannel = (ServerSocketChannel) key.channel(); SocketChannel socketChannel = acceptServerSocketChannel.accept(); socketChannel.configureBlocking(false ); LOGGER.info("Accept request from {}" , socketChannel.getRemoteAddress()); Processor processor = processors[(int ) ((index++) % coreNum)]; processor.addChannel(socketChannel); processor.wakeup(); } } } } }
如上代码所示,本文设置的子Reactor个数是当前机器可用核数的两倍(与Netty默认的子Reactor个数一致)。对于每个成功连接的SocketChannel,通过round robin的方式交给不同的子Reactor。
子Reactor对SocketChannel的处理如下所示。
1
2
3
4
5
6
7
8
9
10
11
12
13
14
15
16
17
18
19
20
21
22
23
24
25
26
27
28
29
30
31
32
33
34
35
36
37
38
39
40
41
42
43
44
45
46
47
48
49
50
51
52
public class Processor private static final Logger LOGGER = LoggerFactory.getLogger(Processor.class); private static final ExecutorService service = Executors.newFixedThreadPool(2 * Runtime.getRuntime().availableProcessors()); private Selector selector; public Processor () throws IOException this .selector = SelectorProvider.provider().openSelector(); start(); } public void addChannel (SocketChannel socketChannel) throws ClosedChannelException socketChannel.register(this .selector, SelectionKey.OP_READ); } public void wakeup () this .selector.wakeup(); } public void start () service.submit(() -> { while (true ) { if (selector.select(500 ) <= 0 ) { continue ; } Set<SelectionKey> keys = selector.selectedKeys(); Iterator<SelectionKey> iterator = keys.iterator(); while (iterator.hasNext()) { SelectionKey key = iterator.next(); iterator.remove(); if (key.isReadable()) { ByteBuffer buffer = ByteBuffer.allocate(1024 ); SocketChannel socketChannel = (SocketChannel) key.channel(); int count = socketChannel.read(buffer); if (count < 0 ) { socketChannel.close(); key.cancel(); LOGGER.info("{}\t Read ended" , socketChannel); continue ; } else if (count == 0 ) { LOGGER.info("{}\t Message size is 0" , socketChannel); continue ; } else { LOGGER.info("{}\t Read message {}" , socketChannel, new String(buffer.array())); } } } } }); } }
在Processor中,同样创建了一个静态的线程池,且线程池的大小为机器核数的两倍。每个Processor实例均包含一个Selector实例。同时每次获取Processor实例时均提交一个任务到该线程池,并且该任务正常情况下一直循环处理,不会停止。而提交给该Processor的SocketChannel通过在其Selector注册事件,加入到相应的任务中。由此实现了每个子Reactor包含一个Selector对象,并由一个独立的线程处理
Netty模型
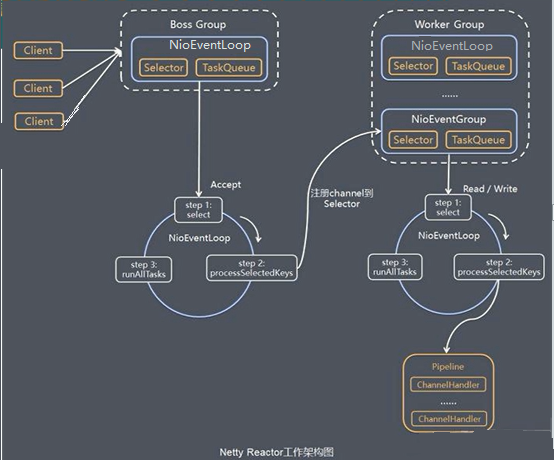
netty 抽象出了两组线程池,BossGroup 专门负责客户端 的连接,WorkerGroup 专门负责网络读写。
BossGroup 和 WorkerGroup 类型都是 NioEventLoopGroup
NioEventLoopGroup 相当于一个事件循环组,这个组中含有多个事件循环,每一个事件循环是一个 NioEventLoop
NioEventLoop 表示一个不断循环的执行处理任务的线程,每个 NioEventLoop 都有一个 selector ,用于监听绑定在其上 socket 网络通信
NioEventLoopGroup 可以有多个线程,即可以含有多个 NioEventLoop
每个 Boss 对应的 NioEvenetLoop 都会执行以下三步:
轮询 accept 事件,
处理 accept 事件,与 client 建立 socket 连接,生成 NioSocketChannel ,并将生成的 NioSocketChannel 注册到某个worker NioEventLoop 上的 selector 上。
处理任务队列中的任务,即 runAllTasks
每个 worker NioEventLoop 循环执行步骤:
轮询 read/write 事件
处理 I/O 事件,即 read ,write 事件,在对应的 NioSocketChannel 处理
处理任务队列中的其它任务
每个 worker NioEventLoop 会使用 PipeLine 管道处理,PipeLine 中包含了 Channel,即通过 PipeLine 可以获取对应的 Channel, 管道中维护了很多的处理器 Handler 。
Netty模型的简单实现
NettyServer
1
2
3
4
5
6
7
8
9
10
11
12
13
14
15
16
17
18
19
20
21
22
23
24
25
26
27
28
29
30
31
32
33
34
35
36
37
38
39
40
41
42
43
44
45
46
47
48
49
50
51
52
53
54
55
56
57
58
59
60
61
62
63
64
65
66
package com.nettypro.nettypro.sample;import io.netty.bootstrap.ServerBootstrap;import io.netty.channel.ChannelFuture;import io.netty.channel.ChannelInitializer;import io.netty.channel.ChannelOption;import io.netty.channel.nio.NioEventLoopGroup;import io.netty.channel.socket.SocketChannel;import io.netty.channel.socket.nio.NioServerSocketChannel;import io.netty.channel.socket.nio.NioSocketChannel;public class NettyServe public static void main (String[] args) throws InterruptedException NioEventLoopGroup bossGroup = new NioEventLoopGroup(); NioEventLoopGroup workerGroup = new NioEventLoopGroup(); try { ServerBootstrap serverBootstrap = new ServerBootstrap() .group(bossGroup,workerGroup) .channel(NioServerSocketChannel.class) .option(ChannelOption.SO_BACKLOG,128 ) .childOption(ChannelOption.SO_KEEPALIVE,true ) .childHandler(new ChannelInitializer<SocketChannel>() { @Override protected void initChannel (SocketChannel ch) throws Exception ch.pipeline().addLast(new NettyServerHandler()); } }); System.out.println("server is ready" ); ChannelFuture cf = serverBootstrap.bind(6668 ).sync(); cf.channel().closeFuture().sync(); }finally { bossGroup.shutdownGracefully(); workerGroup.shutdownGracefully(); } } }
NettyServerHandler
1
2
3
4
5
6
7
8
9
10
11
12
13
14
15
16
17
18
19
20
21
22
23
24
25
26
27
28
29
30
31
32
33
34
35
36
37
38
39
40
41
42
43
44
45
46
47
48
49
50
51
52
53
54
55
56
57
58
package com.nettypro.nettypro.sample;import io.netty.buffer.ByteBuf;import io.netty.buffer.Unpooled;import io.netty.channel.ChannelHandlerContext;import io.netty.channel.ChannelInboundHandlerAdapter;import io.netty.util.CharsetUtil;public class NettyServerHandler extends ChannelInboundHandlerAdapter @Override public void channelRead (ChannelHandlerContext ctx, Object msg) throws Exception System.out.println("server cxt:" + ctx); ByteBuf buf = (ByteBuf)msg; System.out.println("client request:" + buf.toString(CharsetUtil.UTF_8)); System.out.println("client address:" + ctx.channel().remoteAddress()); } @Override public void channelReadComplete (ChannelHandlerContext ctx) throws Exception ctx.writeAndFlush(Unpooled.copiedBuffer("hello client" ,CharsetUtil.UTF_8)); } @Override public void exceptionCaught (ChannelHandlerContext ctx, Throwable cause) throws Exception ctx.close(); } }
NettyClient
1
2
3
4
5
6
7
8
9
10
11
12
13
14
15
16
17
18
19
20
21
22
23
24
25
26
27
28
29
30
31
32
33
34
35
36
37
38
39
40
41
42
43
44
45
46
47
48
49
50
package com.nettypro.nettypro.sample;import io.netty.bootstrap.Bootstrap;import io.netty.channel.ChannelFuture;import io.netty.channel.ChannelInitializer;import io.netty.channel.EventLoopGroup;import io.netty.channel.nio.NioEventLoopGroup;import io.netty.channel.socket.SocketChannel;import io.netty.channel.socket.nio.NioSocketChannel;import sun.applet.Main;public class NettyClient public static void main (String[] args) throws InterruptedException EventLoopGroup eventLoopGroup = new NioEventLoopGroup(); try { Bootstrap bootstrap = new Bootstrap() .group(eventLoopGroup) .channel(NioSocketChannel.class) .handler(new ChannelInitializer<SocketChannel>() { @Override protected void initChannel (SocketChannel ch) throws Exception ch.pipeline().addLast(new NettyClientHandler()); } }); System.out.println("client is ready" ); ChannelFuture channelFuture = bootstrap.connect("127.0.0.1" , 6668 ).sync(); channelFuture.channel().closeFuture().sync(); }finally { } } }
NettyClientHandler
1
2
3
4
5
6
7
8
9
10
11
12
13
14
15
16
17
18
19
20
21
22
23
24
25
26
27
28
29
30
31
32
33
34
35
36
37
38
39
40
41
42
43
44
45
46
47
48
49
50
51
52
53
package com.nettypro.nettypro.sample;import io.netty.buffer.ByteBuf;import io.netty.buffer.Unpooled;import io.netty.channel.ChannelHandlerContext;import io.netty.channel.ChannelInboundHandlerAdapter;import io.netty.util.CharsetUtil;public class NettyClientHandler extends ChannelInboundHandlerAdapter @Override public void channelActive (ChannelHandlerContext ctx) throws Exception System.out.println("client ctx:" +ctx); ctx.writeAndFlush(Unpooled.copiedBuffer("hello Server" ,CharsetUtil.UTF_8)); } @Override public void channelRead (ChannelHandlerContext ctx, Object msg) throws Exception ByteBuf buf = (ByteBuf)msg; System.out.println("server response:" +buf.toString(CharsetUtil.UTF_8)); System.out.println("server address:" + ctx.channel().remoteAddress()); } @Override public void exceptionCaught (ChannelHandlerContext ctx, Throwable cause) throws Exception cause.printStackTrace(); ctx.close(); } }
Netty模型总结:
Netty抽象出两组线程池,BossGroup 负责接收客户端连接,WorkerGroup 负责处理网络读写操作
NIOEventLoop 表示一个不断循环处理任务的线程,每个 NIOEventLoop 都有一个 Selector ,用于监听绑定在上面的 channel
内部采用串行化设计,从消息读取、解码、执行、编码、发送都是由 NIOEventLoop 完成。
每个 NIOEventLoopGroup 下包含多个 NIOEventLoop
每个 NIOEventLoop 里有一个 Selector 和 TaskQueue
每个 NIOEventLoop 上的 Selector 可以注册多个 Channel
每个 Channel 只会绑定在唯一一个 NIOEventLoop 上
每个 Channel 都绑定一个自己的 Pipeline
Netty异步模型
简介
Netty中的 I/O 操作是异步的, 包括 Bind、Write、Connect 等操作会简单的返回一个ChannelFuture。
调用者不能立刻获得结果, 而是通过Future-Listener 机制, 用户可以方便的主动获取或者通过通知机制获得IO操作结果。
Netty的异步模型是建立在future和callback之上的。callback就是回调。
Future的核心思想是: 假设一个方法func(), 其计算过程可能很耗时, 等待func()返回不合适。那么就可以在调用func()的时候, 立马返回一个Future, 后续可以通过Future去监控方法func()的处理过程(即: Future-Listener机制)
Future 说明
表示异步的结果, 可以通过它提供的方法来检测执行是否完成, 比如检索计算等。
ChannelFuture是一个继承了Future类的接口, public interface ChannelFuture extends Future {}。可以添加监听器, 当监听的事件发生时, 就会通知到监听器。
栗子:
1 2 3 4 5 6 7 8 ChannelFuture cf = serverBootstrap.bind(6668 ).sync(); cf.addListener((ChannelFutureListener) future -> { if (future.isSuccess()){ System.out.println("bind port 6668 is success" ); } });
工作原理
inBound: 入栈
outBound: 出栈
说明:
在使用Netty进行编程时, 拦截操作和转换出入栈数据只需要提供callback 或 利用future即可。
这使得链式操作简单、高效, 并有利于编写可重用的、通用的代码。
Netty 框架的目标就是让你的业务逻辑从网络基础应用编码中分离出来。
ChannelFuture类注释
1
2
3
4
5
6
7
8
9
10
11
12
13
14
15
16
17
18
19
20
21
22
23
24
25
26
27
28
29
30
31
32
33
34
35
36
37
38
39
40
41
42
43
44
45
46
47
48
49
50
51
52
53
54
55
56
57
58
59
60
61
62
63
64
65
66
67
68
69
70
71
72
73
74
75
76
77
78
79
80
81
82
83
84
85
86
87
88
89
90
91
92
93
94
95
96
97
98
99
100
101
102
103
104
105
106
107
108
109
110
111
112
113
114
115
116
117
118
119
120
121
122
123
124
125
126
127
128
129
130
131
132
133
134
135
136
137
138
139
140
141
142
143
144
145
146
147
148
149
150
151
152
153
154
155
156
157
158
159
160
161
162
163
164
165
166
167
168
169
170
171
172
173
174
175
176
177
178
179
180
181
182
183
184
185
186
187
188
189
190
191
192
193
194
195
196
197
198
199
200
Netty 实现 HTTP 服务 ``//TODO`
Netty 核心组件 Bootstrap 和 ServerBootstrap ServerBootstrap和Bootstrap都是Netty的启动类,他们的主要作用就是配置相关参数(IP,端口等)并启动整个Netty服务,不同的是ServerBootstrap用于服务端服务启动,Bootstrap用于客户端。
常用方法
1 2 3 4 5 6 7 8 9 10 11 12 13 14 15 16 17 18 19 20 21 22 23 public ServerBootstrap group (EventLoopGroup parentGroup, EventLoopGroup childGroup) ,public B group (EventLoopGroup group) ,public B channel (Class<? extends C> channelClass) ,public <T> B option (ChannelOption<T> option, T value) ,public <T> ServerBootstrap childOption (ChannelOption<T> childOption, T value) ,public ServerBootstrap childHandler (ChannelHandler childHandler) , public ChannelFuture bind (int inetPort) ,public ChannelFuture connect (String inetHost, int inetPort)
EventLoopGroup 和其实现类 NioEventLoopGroup 1 2 3 4 5 6 7 8 9 EventLoopGroup bossGroup = new NioEventLoopGroup(1 ); EventLoopGroup workerGroup = new NioEventLoopGroup();
EventLoopGroup 是一组 EventLoop 的抽象,Netty 为了更好的利用多核 CPU 资源,一般会有多个 EventLoop 同时工作,每个 EventLoop 维护着一个 Selector 实例。
EventLoopGroup 提供 next 接口,可以从组里面按照一定规则获取其中一个 EventLoop 来处理任务。在 Netty 服 务 器 端 编 程 中 , 我 们 一 般 都 需 要 提 供 两 个 EventLoopGroup , 例 如 : BossEventLoopGroup 和 WorkerEventLoopGroup。
通常一个服务端口即一个 ServerSocketChannel 对应一个 Selector 和一个 EventLoop 线程。BossEventLoop 负责 接收客户端的连接并将 SocketChannel 交给 WorkerEventLoopGroup 来进行 IO 处理,如下图所示
常用方法
1 2 3 4 public NioEventLoopGroup () public Future<?> shutdownGracefully () ,
Selector
Netty 基于 Selector 对象实现 I/O 多路复用,通过 Selector 一个线程可以监听多个连接的 Channel 事件。
当向一个 Selector 中注册 Channel 后, Selector 内部的机制就可以自动不断地查询(Select) 这些注册的 Channel 是否有已就绪的 I/O 事件(例如可读,可写,网络连接完成等),这样程序就可以很简单地使用一个 线程高效地管理多个 Channel
任务队列TaskQueue 为了防止非常耗时的任务造成阻塞,任务队列中的 Task 有三种典型使用场景
1 2 3 4 5 6 7 8 9 10 11 12 13 14 15 16 17 18 19 20 21 @Override public void channelRead (ChannelHandlerContext ctx, Object msg) throws Exception Thread.sleep(10 * 1000 ); System.out.println("this is a long time event" ); System.out.println("server cxt:" + ctx); ByteBuf buf = (ByteBuf)msg; System.out.println("client request:" + buf.toString(CharsetUtil.UTF_8)); System.out.println("client address:" + ctx.channel().remoteAddress()); }
用户自定义的普通任务。
1 2 3 4 5 6 7 8 9 10 ctx.channel().eventLoop().execute(()-> { try { Thread.sleep(10 * 1000 ); System.out.println("this is a long time event" ); } catch (InterruptedException e) { e.printStackTrace(); } });
taskQueue是线程队列,会按照入栈顺序执行。
用户自定义定时任务。
1 2 3 4 5 6 7 8 9 10 ctx.channel().eventLoop().schedule(()->{ try { Thread.sleep(10 * 1000 ); System.out.println("this is a long time event" ); } catch (InterruptedException e) { e.printStackTrace(); } },5 , TimeUnit.SECONDS);
非当前 Reactor 线程调用 channel 的各种方法。
Channel
Netty 网络通信的组件,能够用于执行网络 I/O 操作。
通过 Channel 可获得当前网络连接的通道的状态
通过 Channel 可获得 网络连接的配置参数 (例如接收缓冲区大小)
Channel 提供异步的网络 I/O 操作(如建立连接,读写,绑定端口),异步调用意味着任何 I/O 调用都将立即返 回,并且不保证在调用结束时所请求的 I/O 操作已完成
调用立即返回一个 ChannelFuture 实例,通过注册监听器到 ChannelFuture 上,可以 I/O 操作成功、失败或取 消时回调通知调用方
支持关联 I/O 操作与对应的处理程序
不同协议、不同的阻塞类型的连接都有不同的 Channel 类型与之对应,常用的 Channel 类型:
NioSocketChannel,异步的客户端 TCP Socket 连接。
NioServerSocketChannel,异步的服务器端 TCP Socket 连接。
NioDatagramChannel,异步的 UDP 连接。
NioSctpChannel,异步的客户端 Sctp 连接。
NioSctpServerChannel,异步的 Sctp 服务器端连接,这些通道涵盖了 UDP 和 TCP 网络 IO 以及文件 IO。
Future、ChannelFuture Netty 中所有的 IO 操作都是异步的,不能立刻得知消息是否被正确处理。但是可以过一会等它执行完成或者直接注册一个监听,具体的实现就是通过 Future 和 ChannelFutures,他们可以注册一个监听,当操作执行成功 或失败时监听会自动触发注册的监听事件
常用方法
1 2 3 4 5 Channel channel () , ChannelFuture sync () ,
ChannelHandler 及其实现类
ChannelHandler 是一个接口,处理 I/O 事件或拦截 I/O 操作,并将其转发到其 ChannelPipeline(业务处理链) 中的下一个处理程序。
ChannelHandler 本身并没有提供很多方法,因为这个接口有许多的方法需要实现,方便使用期间,可以继承它 的子类
ChannelHandler主要子接口:
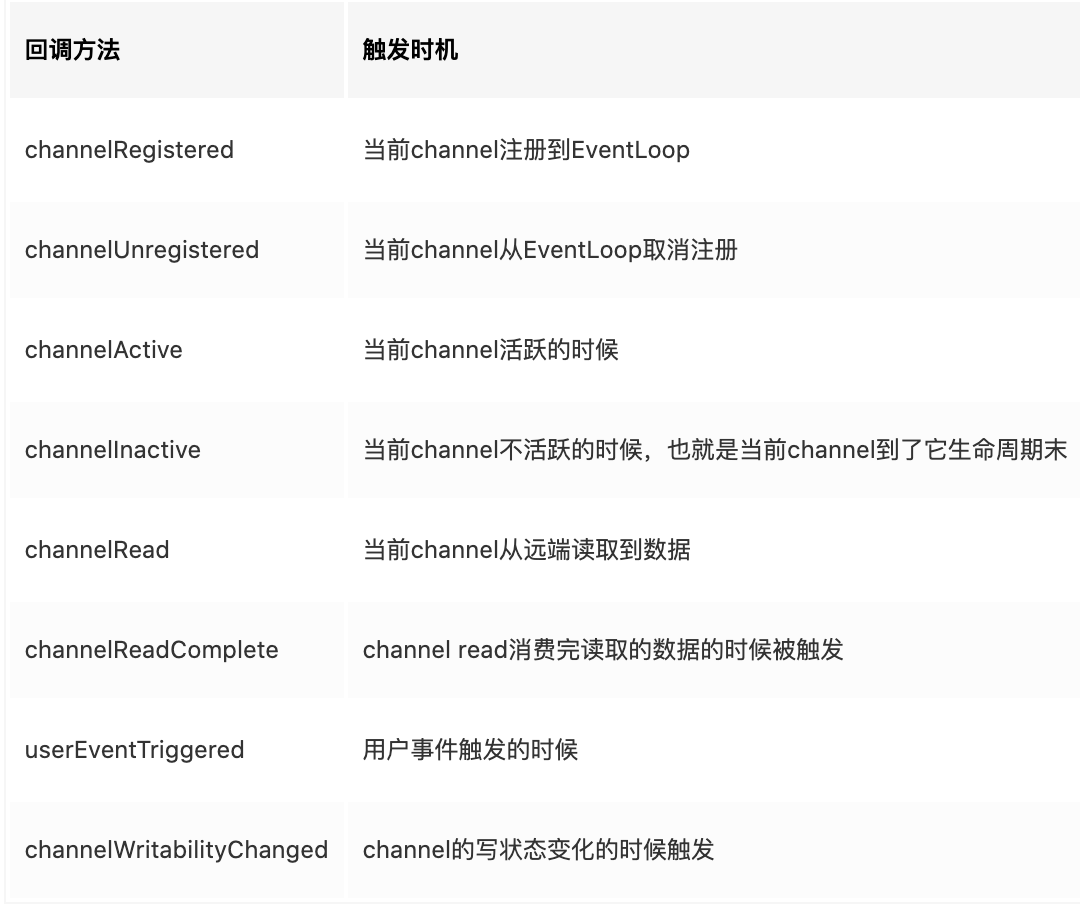
ChannelInboundHandler 入栈处理子接口
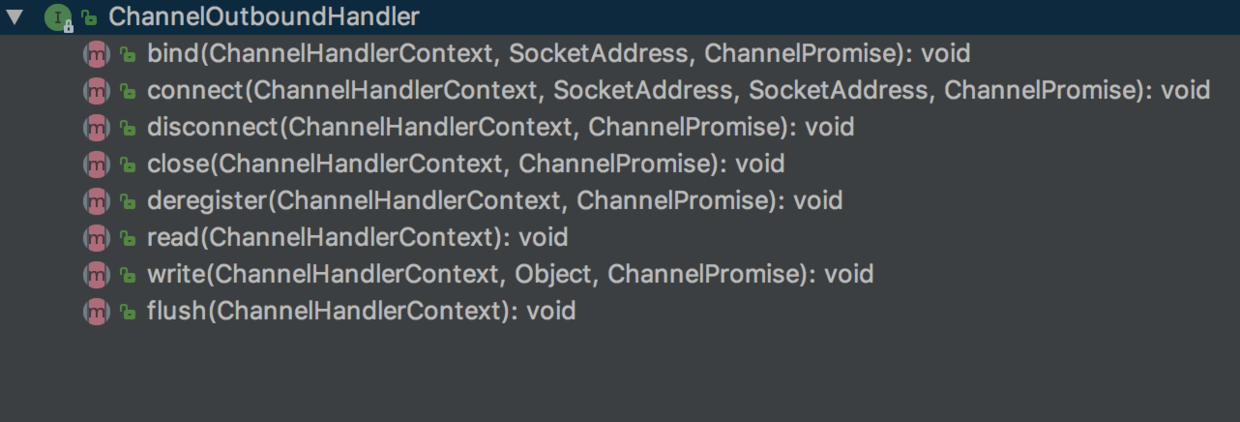
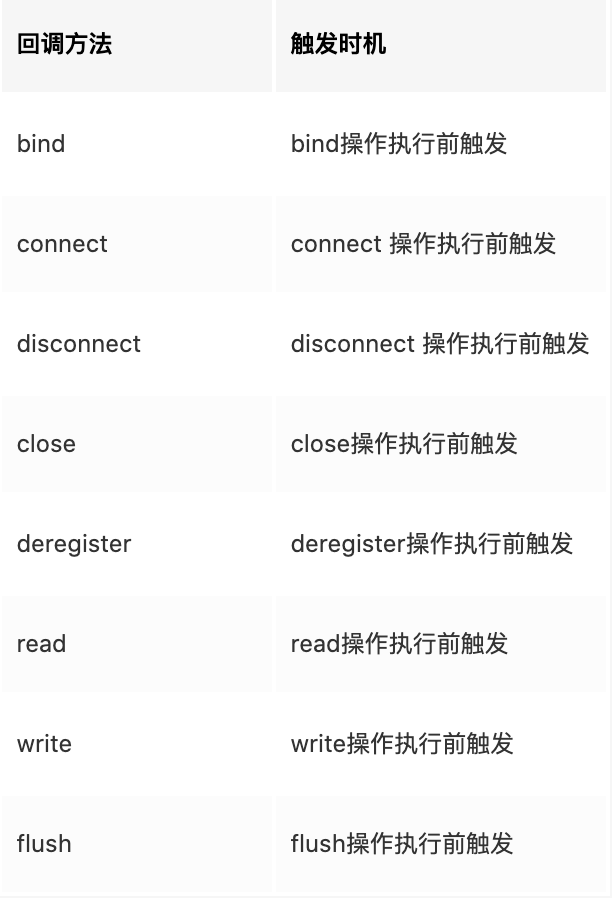
ChannelOutboundHandler 出栈处理子接口
为了便利,框架提供了ChannelInboundHandlerAdapter,ChannelOutboundHandlerAdapter和ChannelDuplexHandler这三个适配类提供一些默认实现,在使用的时候只需要实现你关注的方法即可
注意到一些回调方法有ChannelPromise这个参数,我们可以调用它的addListener注册监听,当回调方法所对应的操作完成后,会触发这个监听 下面这个代码,会在写操作完成后触发,完成操作包括成功和失败
1 2 3 4 5 6 7 8 9 10 11 12 public void write (ChannelHandlerContext ctx, Object msg, ChannelPromise promise) throws Exception ctx.write(msg,promise); System.out.println("out write" ); promise.addListener(new GenericFutureListener<Future<? super Void>>() { @Override public void operationComplete (Future<? super Void> future) throws Exception if (future.isSuccess()){ System.out.println("OK" ); } } }); }
ChannelInboundHandler 和 ChannelOutboundHandler 的区别
个人感觉in和out的区别主要在于ChannelInboundHandler的channelRead和channelReadComplete回调和ChannelOutboundHandler的write和flush回调上,ChannelOutboundHandler的channelRead回调负责执行入栈数据的decode逻辑,ChannelOutboundHandler的write负责执行出站数据的encode工作。其他回调方法和具体触发逻辑有关,和in与out无关。
ChannelHandlerContext 1 2 3 4 5 6 7 8 9 10 @Override public void channelReadComplete (ChannelHandlerContext ctx) throws Exception ctx.writeAndFlush(Unpooled.copiedBuffer("hello, 客户端~(>^ω^<)喵" , CharsetUtil.UTF_8)); }
保存 Channel 相关的所有上下文信息,同时关联一个 ChannelHandler 对象
即 ChannelHandlerContext 中 包 含 一 个 具 体 的 事 件 处 理 器 ChannelHandler , 同 ChannelHandlerContext 中也绑定了对应的 pipeline 和 Channel 的信息,方便对 ChannelHandler 进行调用.
常用方法
==每个ChannelHandlerContext之间形成双向链表==
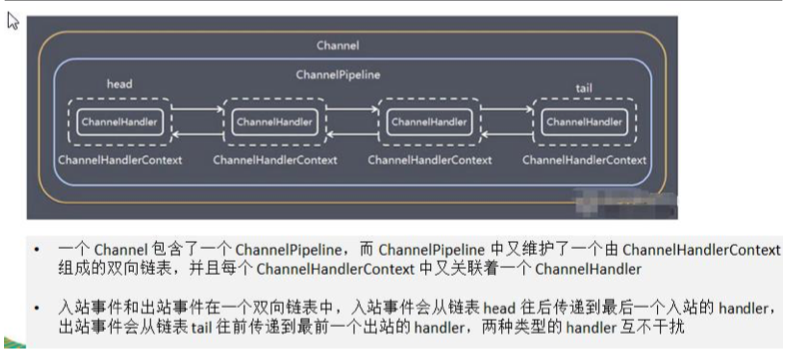
Pipeline 和 ChannelPipeline ==ChannelPipeline== 是一个重点:
ChannelPipeline 是一个 Handler 的集合,它负责处理和拦截 inbound 或者 outbound 的事件和操作,相当于 一个贯穿 Netty 的链。(也可以这样理解:ChannelPipeline 是 保存 ChannelHandler 的 List,用于处理或拦截 Channel 的入站事件和出站操作)
ChannelPipeline 实现了一种高级形式的拦截过滤器模式,使用户可以完全控制事件的处理方式,以及 Channel 中各个的 ChannelHandler 如何相互交互
在 Netty 中每个 Channel 都有且仅有一个 ChannelPipeline 与之对应,它们的组成关系如下
从上面可以看到这就是一个链条,也可以说是业务经过这一系列的handler的处理。
常用方法
1 2 3 4 5 ChannelPipeline addFirst (ChannelHandler... handlers) , ChannelPipeline addLast (ChannelHandler... handlers) ,
代码展示
1 2 3 4 5 6 7 8 9 10 11 12 13 bootstrap.group(bossGroup, workerGroup) .channel(NioServerSocketChannel.class) .option(ChannelOption.SO_BACKLOG, 128 ) .childOption(ChannelOption.SO_KEEPALIVE, true ) .childHandler(new ChannelInitializer<SocketChannel>() { @Override protected void initChannel (SocketChannel ch) throws Exception ch.pipeline().addLast(new NettyServerHandler()); } });
ChannelOption 1 2 3 4 5 6 7 8 9 10 11 12 13 bootstrap.group(bossGroup, workerGroup) .channel(NioServerSocketChannel.class) .option(ChannelOption.SO_BACKLOG, 128 ) .childOption(ChannelOption.SO_KEEPALIVE, true ) .childHandler(new ChannelInitializer<SocketChannel>() { @Override protected void initChannel (SocketChannel ch) throws Exception ch.pipeline().addLast(new NettyServerHandler()); } });
Netty 在创建 Channel 实例后,一般都需要设置 ChannelOption 参数。
ChannelOption 参数如下:
ByteBuf分类及其使用
ByteBuf 简介
在网络上传输的数据形式为Byte,Java NIO提供了ByteBuffer来作为Byte容器,该类有些复杂,而Netty使用ByteBuf作为ByteBuffer的替换方案,其提供了一个更好的API
Netty通过ByteBuf和ByteBufHolder两个组件处理数据,而ByteBuf的API有如下优势
可扩展的用户定义的缓冲区类型
通过内置复合缓冲区类型实现透明零拷贝
容量随着需求可扩大
在读写器模式之间切换不需要调用ByteBuffer的flip()方法
数据读写使用不同的索引
支持方法链
支持引用计数
支持池
ByteBuf 数据结构
首先通过官方给出的结构图直观感受下ByteBuf的内存结构:
1 2 3 4 5 6 +-------------------+------------------+------------------+ | discardable bytes | readable bytes | writable bytes | | | (CONTENT) | | +-------------------+------------------+------------------+ | | | | 0 <= readerIndex <= writerIndex <= capacity
接下来解释一下这些名词:
discardable bytes:已经被读取过的数据,一般情况下可以理解为无效区域。
readable bytes:未读取数据,readable bytes数据区的数据是满的,都是等待读取的数据。
writable bytes:空闲区域,可以往这块区域写数据。
capacity:表示当前内存容量。
readerIndex:读数据起点指针,当需要读数据时,就以当前指针为起点往后读取数据。
writerIndex:写数据起点指针,当需要写数据时,就以当前指针为起点往后写数据。
ByteBuf使用模式
总体分类划分是可根据JVM堆内存来区分的。
堆内内存(JVM堆空间内)
堆外内存(本机直接内存)
复合缓冲区(以上2种缓冲区多个混合)
1.堆内内存
最常用的ByteBuf模式是将数据存储在JVM的堆空间中 。它能在没有使用池化的情况下提供快速的分配和释放。
2.堆外内存
JDK允许JVM实现通过本地调用来分配内存。 主要是为了避免每次调用本地I/O操作之前(或者之后)将缓冲区的内容复制到一个中间缓冲区(或者从中间缓冲区把内容复制到缓冲区)。最大的特点:它的内容将驻留在常规的会被垃圾回收的堆之外。 最大的缺点:相对于堆缓冲区,它的分配和释放都是较为昂贵的。
3.复合缓冲区
常用类:CompositeByteBuf,它为多个ByteBuf提供一个聚合视图,将多个缓冲区表示为单个合并缓冲区的虚拟表示。
ByteBuf 分类
Pooled和Unpooled Heap和Direct: Unsafe和非Unsafe
Unpooled 类 1 2 3 4 5 6 7 8 9 10 @Override public void channelReadComplete (ChannelHandlerContext ctx) throws Exception ctx.writeAndFlush(Unpooled.copiedBuffer("hello, 客户端~(>^ω^<)喵" , CharsetUtil.UTF_8)); }
Netty 提供一个专门用来操作缓冲区(即 Netty 的数据容器)的工具类
常用方法如下所示
举例说明 Unpooled 获取 Netty 的数据容器 ByteBuf 的基本使用 【案例演示】
案例 1
1 2 3 4 5 6 7 8 9 10 11 12 13 14 15 16 17 18 19 20 21 22 23 24 25 26 27 28 29 30 31 32 33 34 35 36 37 38 package com.nettypro.nettypro.groupchart;import io.netty.buffer.ByteBuf;import io.netty.buffer.Unpooled;public class NettyByteBuf01 public static void main (String[] args) ByteBuf buffer = Unpooled.buffer(10 ); for (int i = 0 ; i < 10 ; i++) { buffer.writeByte(i); } System.out.println("capacity=" + buffer.capacity()); for (int i = 0 ; i < buffer.capacity(); i++) { System.out.println(buffer.readByte()); } System.out.println("执行完毕" ); } }
注意:它和NIO的ByteBuffer有区别,它是可以读和写的,不需要flip进行反转的。因为他的读和写下标是分开处理的
Netty 群聊系统简单实现 栗子:
NettyChatServer
1 2 3 4 5 6 7 8 9 10 11 12 13 14 15 16 17 18 19 20 21 22 23 24 25 26 27 28 29 30 31 32 33 34 35 36 37 38 39 40 41 42 43 44 45 46 47 48 49 50 51 52 53 54 55 56 57 58 59 60 61 62 63 64 package com.nettypro.nettypro.groupchart;import io.netty.bootstrap.ServerBootstrap;import io.netty.channel.ChannelFuture;import io.netty.channel.ChannelInitializer;import io.netty.channel.ChannelOption;import io.netty.channel.ChannelPipeline;import io.netty.channel.nio.NioEventLoopGroup;import io.netty.channel.socket.SocketChannel;import io.netty.channel.socket.nio.NioServerSocketChannel;import io.netty.handler.codec.string.StringDecoder;import io.netty.handler.codec.string.StringEncoder;public class NettyChatServer private int port ; public NettyChatServer (int port) this .port = port; } public void run () throws InterruptedException NioEventLoopGroup boss = new NioEventLoopGroup(1 ); NioEventLoopGroup worker = new NioEventLoopGroup(8 ); try { ServerBootstrap bootstrap = new ServerBootstrap(); bootstrap.group(boss,worker) .channel(NioServerSocketChannel.class) .option(ChannelOption.SO_BACKLOG,128 ) .childOption(ChannelOption.SO_KEEPALIVE,true ) .childHandler(new ChannelInitializer<SocketChannel>() { @Override protected void initChannel (SocketChannel ch) throws Exception ChannelPipeline pipeline = ch.pipeline(); pipeline.addLast("decoder" ,new StringDecoder()); pipeline.addLast("encoder" ,new StringEncoder()); pipeline.addLast(new NettyChatServerHandler()); } }); System.out.println("server is running" ); ChannelFuture channelFuture = bootstrap.bind(port).sync(); channelFuture.channel().closeFuture().sync(); }finally { boss.shutdownGracefully(); worker.shutdownGracefully(); } } public static void main (String[] args) throws Exception new NettyChatServer(8888 ).run(); } }
NettyChatServerHandler
1 2 3 4 5 6 7 8 9 10 11 12 13 14 15 16 17 18 19 20 21 22 23 24 25 26 27 28 29 30 31 32 33 34 35 36 37 38 39 40 41 42 43 44 45 46 47 48 49 50 51 52 53 54 55 56 57 58 59 60 61 62 63 64 65 66 67 68 69 70 71 72 73 74 75 76 77 78 79 80 81 82 83 84 85 86 87 88 89 90 91 92 93 94 95 96 97 98 99 100 101 102 103 104 105 106 107 package com.nettypro.nettypro.groupchart;import io.netty.channel.Channel;import io.netty.channel.ChannelHandlerContext;import io.netty.channel.SimpleChannelInboundHandler;import io.netty.channel.group.ChannelGroup;import io.netty.channel.group.DefaultChannelGroup;import io.netty.util.concurrent.GlobalEventExecutor;import javax.lang.model.element.VariableElement;import java.time.LocalDate;import java.time.LocalDateTime;public class NettyChatServerHandler extends SimpleChannelInboundHandler private static ChannelGroup channelGroup = new DefaultChannelGroup(GlobalEventExecutor.INSTANCE); @Override public void handlerAdded (ChannelHandlerContext ctx) throws Exception channelGroup.add(ctx.channel()); channelGroup.writeAndFlush(LocalDateTime.now()+"-[client]" +ctx.channel().remoteAddress()+"is joining" ); } @Override public void channelActive (ChannelHandlerContext ctx) throws Exception System.out.println(LocalDateTime.now()+"-client" +ctx.channel().remoteAddress()+" up" ); } @Override public void channelInactive (ChannelHandlerContext ctx) throws Exception System.out.println(LocalDateTime.now()+"-client" +ctx.channel().remoteAddress()+" down" ); } @Override public void handlerRemoved (ChannelHandlerContext ctx) throws Exception channelGroup.writeAndFlush(LocalDateTime.now()+"-" +ctx.channel().read()+"离开了" ); } @Override protected void channelRead0 (ChannelHandlerContext ctx, Object msg) throws Exception Channel channel = ctx.channel(); channelGroup.forEach(ch ->{ if (ch != channel){ ch.writeAndFlush(LocalDateTime.now()+"-client" +channel.remoteAddress()+" send:" +msg+"\n" ); } else { ch.writeAndFlush(LocalDateTime.now()+"-my send:" +msg+"\n" ); } }); } @Override public void exceptionCaught (ChannelHandlerContext ctx, Throwable cause) throws Exception ctx.close(); } }
NettyChatClient
1 2 3 4 5 6 7 8 9 10 11 12 13 14 15 16 17 18 19 20 21 22 23 24 25 26 27 28 29 30 31 32 33 34 35 36 37 38 39 40 41 42 43 44 45 46 47 48 49 50 51 52 53 54 55 56 57 58 59 60 61 62 63 64 65 66 67 68 69 70 71 72 73 74 75 package com.nettypro.nettypro.groupchart;import io.netty.bootstrap.Bootstrap;import io.netty.channel.*;import io.netty.channel.nio.NioEventLoopGroup;import io.netty.channel.socket.SocketChannel;import io.netty.channel.socket.nio.NioSocketChannel;import io.netty.handler.codec.string.StringDecoder;import io.netty.handler.codec.string.StringEncoder;import java.util.Scanner;public class NettyChatClient private final String host; private final int port; public NettyChatClient (String host, int port) this .host = host; this .port = port; } public void run () throws InterruptedException EventLoopGroup group = new NioEventLoopGroup(); Bootstrap bootstrap = new Bootstrap(); try { bootstrap.group(group) .channel(NioSocketChannel.class) .handler(new ChannelInitializer<SocketChannel>() { @Override protected void initChannel (SocketChannel ch) throws Exception ChannelPipeline pipeline = ch.pipeline(); pipeline.addLast("decoder" ,new StringDecoder()); pipeline.addLast("encoder" ,new StringEncoder()); pipeline.addLast(new NettyChatClientHandler()); } }); ChannelFuture channelFuture = bootstrap.connect(host,port).sync(); Channel channel = channelFuture.channel(); System.out.println("----" +channel.localAddress()+"----" ); Scanner scanner = new Scanner(System.in); while (scanner.hasNextLine()){ String msg = scanner.nextLine(); channel.writeAndFlush(msg); } } finally { group.shutdownGracefully(); } } public static void main (String[] args) throws Exception new NettyChatClient("127.0.0.1" ,8888 ).run(); } }
NettyChatClientHandler
1 2 3 4 5 6 7 8 9 10 11 12 13 14 15 16 17 18 19 package com.nettypro.nettypro.groupchart;import io.netty.channel.ChannelHandlerContext;import io.netty.channel.SimpleChannelInboundHandler;public class NettyChatClientHandler extends SimpleChannelInboundHandler @Override protected void channelRead0 (ChannelHandlerContext ctx, Object msg) throws Exception System.out.println(msg.toString().trim()); } }
Netty心跳检测机制栗子
MyServer
1 2 3 4 5 6 7 8 9 10 11 12 13 14 15 16 17 18 19 20 21 22 23 24 25 26 27 28 29 30 31 32 33 34 35 36 37 38 39 40 41 42 43 44 45 46 47 48 49 50 51 52 53 54 55 56 57 58 59 60 61 62 63 64 65 66 67 68 import java.util.concurrent.TimeUnit;import io.netty.bootstrap.ServerBootstrap;import io.netty.channel.ChannelFuture;import io.netty.channel.ChannelInitializer;import io.netty.channel.ChannelPipeline;import io.netty.channel.EventLoopGroup;import io.netty.channel.nio.NioEventLoopGroup;import io.netty.channel.socket.SocketChannel;import io.netty.channel.socket.nio.NioServerSocketChannel;import io.netty.handler.logging.LogLevel;import io.netty.handler.logging.LoggingHandler;import io.netty.handler.timeout.IdleStateHandler;public class MyServer public static void main (String[] args) EventLoopGroup bossGroup = new NioEventLoopGroup(1 ); EventLoopGroup workerGroup = new NioEventLoopGroup(); try { ServerBootstrap serverBootstrap = new ServerBootstrap(); serverBootstrap.group(bossGroup, workerGroup); serverBootstrap.channel(NioServerSocketChannel.class); serverBootstrap.handler(new LoggingHandler(LogLevel.INFO)); serverBootstrap.childHandler(new ChannelInitializer<SocketChannel>() { @Override protected void initChannel (SocketChannel ch) throws Exception ChannelPipeline pipeline = ch.pipeline(); pipeline.addLast(new IdleStateHandler(13 ,5 ,2 , TimeUnit.SECONDS)); pipeline.addLast(new MyServerHandler()); } }); ChannelFuture channelFuture = serverBootstrap.bind(7000 ).sync(); channelFuture.channel().closeFuture().sync(); } catch (Exception e) { e.printStackTrace(); }finally { bossGroup.shutdownGracefully(); workerGroup.shutdownGracefully(); } } }
MyServerHandler
1 2 3 4 5 6 7 8 9 10 11 12 13 14 15 16 17 18 19 20 21 22 23 24 25 26 27 28 29 30 31 32 33 34 35 36 37 38 39 40 import io.netty.channel.ChannelHandlerContext;import io.netty.channel.ChannelInboundHandlerAdapter;import io.netty.handler.timeout.IdleStateEvent;public class MyServerHandler extends ChannelInboundHandlerAdapter @Override public void userEventTriggered (ChannelHandlerContext ctx, Object evt) throws Exception if (evt instanceof IdleStateEvent) { IdleStateEvent event = (IdleStateEvent) evt; String eventType = null ; switch (event.state()) { case READER_IDLE: eventType = "读空闲" ; break ; case WRITER_IDLE: eventType = "写空闲" ; break ; case ALL_IDLE: eventType = "读写空闲" ; break ; } System.out.println(ctx.channel().remoteAddress() + "--超时时间--" + eventType); System.out.println("服务器做相应处理.." ); } } }
