Java集合 序言 Java集合是我们使用最频繁的工具,也是面试的热点,但我们对它的理解仅限于使用上,而且大多数情况没有考虑过其使用规范。本系列文章将跟随源码的思路,分析实现的每个细节,以期在使用时避免各种不规范的坑。在这里,我们会惊艳于开发者优秀的设计,也会感激先辈们付出的艰辛努力,更重要的是知其所以然,少犯错误,写出优秀的代码。
基础知识概述 对数据的操作,大抵就是增 、删 、改 、查 ,以及在某些时候根据位置 获取数据,有时可能还需要进行排序 。改 和查 又可以理解为一致的操作,因为要修改一条数据需要先找到它,然后替换即可。接下来我们就从增 、删 、查 这三点简要分析下当前使用比较广泛的几种数据结构。
数组 数组在内存中占据一段连续的内存,所有的数据在内存中连续排列。它的大小是固定的,这一特性使得数组对于插入操作并不友好,我们分析ArrayList时就会看到这种操作的复杂。但数组对于位置的访问是极其友好的,它支持所谓RandomAccess特性,这使得基于位置的操作可以迅速完成,其时间复杂度为**O(1)。数组的数据顺序与插入顺序一致,所以查询操作需要遍历,其时间复杂度为 O(n)**。
所以数组最大的优势在于基于位置的访问,在扩展性方面表现无力。
链表 不同于数组,链表是通过指针域来表示数据与数据之间的位置关系的,所以链表在头部或尾部插入数据的复杂度仅为**O(1)。链表不具备RandomAccess特性,所以无法提供基于位置的访问。其查询操作也必须从从到尾遍历,复杂度为 O(n)**。
所以链表最大的优势在于插入,而查询的表现很一般。
那有没有一种结构能够结合数组和链表的优点,使得查询和插入都具有优秀的表现呢?答案是肯定的,这就是散列表。
散列表 散列表就是Hash Table ,这种结构使用key-value形式存储数据,我们经常使用的HashMap、HashTable就基于它。
数组和链表在查询时表现一般的原因在于它们并不记得数据的位置,所以只能用待查询的数据和存储的数据依次比对。散列表使用一种巧妙的方式来减少甚至避免这种依次比对,它的原理是通过一个函数把任何的key 转为int ,每次查找时只需要执行一次这个函数便可以迅速定位。这个过程是不是像查字典呢?
散列表并不像上述那般完美,因为并不会有一个函数,能够保证所有的key 转换结果都不同,也就是会发生所谓的哈希碰撞,而且它必须依赖于其他的数据结构,这部分知识会在后续文章中详细介绍。
良好设计的散列表可以使增 、删 、查 等操作的时间复杂度均为**O(1)**。
二叉排序树 二叉排序树是解决查询问题的另一方案,如果数据在插入时是有序的,在查询时就可以使用二分法 。二分法 的原理很简单,比如猜一个在0-100之间的数,第一次猜50就可以直接排除一半的数据,每次按照这个规则就可以很快的获取正确答案。二分法 的时间复杂度为**O(lg n)**。
树的结构对二分法有天然的支持(但这不是树最重要的用途)。二叉排序树牺牲了一部分插入的时间,但提高了查询的速度,同时有序的数据也可以做些其他的操作。如果查询的操作重要性超过了插入,我们应该考虑这种结构。二叉排序树也存在一些不平衡导致效率下降的问题,所以有了AVL树 、红黑树 ,以及用于数据库索引的B树 、B+树 等概念,关于二叉排序树的知识也会在后续文章中介绍。
分析过程 以上介绍的数据结构的知识是我们理解Java集合类的基础,掌握这些核心原理,我们分析集合类源码时才不会吃力,我们会先对这些数据结构进行简要介绍,其他和本系列文章无关的概念不会涉及,大家可以查阅相关专业书籍进行系统学习。
由于集合类的源码十分庞大,从接口抽象设计到具体实现涉及到数十个类,我们不可能每行代码都进行分析,一些在前面分析过的点在后续部分也会略过,但对于我们应该注意的点都会详细解读。有一些过于复杂的代码,还会用图示进行直观的演示,以帮助理解整个运行机制。
本文的源码全部基于JDK1.8 ,不同版本的实现代码可能稍有差别。
Java集合类分为两大部分:Collection 和Map 。Collection 又主要由List 、Queue 和Set 三大模块组成。本系列文章也会基于这样的结构进行,我们会先了解一些用到的数据结构,然后按照从接口抽象到具体实现的顺序来一步步揭开集合的神秘面纱。
由于Set 的结构与Map 完全一致,且Set 的内部都是基于对应的Map 实现的,所以只需要知道Set 是什么即可,其具体实现如果感兴趣可以自行阅读源码。
Iterable 当我们想要遍历集合时,Java为我们提供了多种选择,通常有以下三种写法:
1
2
3
for (int i = 0 , len = strings.size(); i < len; i++) { System.out.println(strings.get(i)); }
1
2
3
for (String var : strings) { System.out.println(var ); }
1
2
3
4
Iterator iterator = strings.iterator(); while (iterator.hasNext()) { System.out.println(iterator.next()); }
Iterable 是迭代器的意思,作用是为集合类提供for-each 循环的支持。由于使用for 循环需要通过位置获取元素,而这种获取方式仅有数组支持,其他许多数据结构,比如链表,只能通过查询获取数据,这会大大的降低效率。Iterable 就可以让不同的集合类自己提供遍历的最佳方式。
Iterable 的文档声明仅有一句:
Implementing this interface allows an object to be the target of the “for-each loop” statement.
它的作用就是为Java对象提供foreach循环,其主要方法是返回一个Iterator对象:
也就是说,如果想让一个Java对象支持foreach,只要实现Iterable 接口,然后就可以像集合那样,通过Iterator iterator = strings.iterator()方式,或者使用foreach,进行遍历了。
Iterator Iterator是foreach遍历的主体,它的代码实现如下:
1 2 3 4 5 6 7 8 9 10 11 boolean hasNext () E next () ;default void remove () default void forEachRemaining (Consumer<? super E> action)
Iterator还有一个子接口,是为需要双向遍历数据时准备的,在后续分析ArrayList和LinkedList时都会看到它。它主要增加了以下几个方法:
1 2 3 4 5 6 7 8 9 10 11 12 13 14 15 16 17 boolean hasPrevious () E previous () ;int nextIndex () int previousIndex () void add (E e) void set (E e)
总结 在Java中有许多特性都是通过接口来实现的,foreach循环也是。foreach主要是解决for循环依赖下标的问题,为高效遍历更多的数据结构提供了支持。
Collection Collection Collection 是List 、Queue 和Set 的超集,它直接继承于Iterable,也就是所有的Collection 集合类都支持for-each 循环。除此之外,Collection 也是面向接口编程的典范,通过它可以在多种实现类间转换,这也是面向对象编程的魅力之一。
方法定义 在阅读源码前,我们可以先自行想象一下,如果我们想封装下数组或链表以方便操作,我们需要封装哪些功能呢?比如:统计大小、插入或删除数据、清空、是否包含某条数据,等等。而Collection就是对这些常用操作进行提取,只是其很全面、很通用。下面我们看看它都提供了哪些方法。
1 2 3 4 5 6 7 8 9 10 11 12 13 14 15 16 17 18 19 20 21 22 23 24 25 26 27 28 29 30 31 32 33 34 35 36 37 38 39 40 41 42 43 44 45 46 47 48 49 50 51 52 53 54 55 int size () boolean isEmpty () boolean contains (Object o) Object[] toArray(); <T> T[] toArray(T[] a); boolean add (E e) boolean remove (Object o) boolean containsAll (Collection<?> c) boolean addAll (Collection<? extends E> c) boolean removeAll (Collection<?> c) boolean retainAll (Collection<?> c) void clear () boolean equals (Object o) int hashCode () default boolean removeIf (Predicate<? super E> filter) Objects.requireNonNull(filter); boolean removed = false ; final Iterator<E> each = iterator(); while (each.hasNext()) { if (filter.test(each.next())) { each.remove(); removed = true ; } } return removed; }
超实现类:AbstractCollection 在Collection中定义的许多方法,根据现有的定义以及继承的Iterable,都可以在抽象类中实现,这样可以减少实现类需要实现的方法,这个抽象类就是AbstractCollection。
首先我们关注下其文档,里面有两句说明可能会影响我们的继承:
To implement an unmodifiable collection, the programmer needs only to extend this class and provide implementations for the iterator and size methods. (The iterator returned by the iterator method must implement hasNext and next .)
To implement a modifiable collection, the programmer must additionally override this class’s add method (which otherwise throws an UnsupportedOperationException ), and the iterator returned by the iterator method must additionally implement its remove method.
大体意思是说,如果要实现一个不可修改的集合,只需要重写iterator和size接口就可以,并且返回的Iterator需要实现hasNext和next。而要实现一个可以修改的集合,还必须重写add方法(默认会抛出异常),返回的Iterator还需要实现remove方法。
方法定义 1 2 3 4 5 6 7 8 9 10 11 12 13 14 15 16 17 18 19 20 21 22 23 24 public boolean isEmpty () return size() == 0 ; } public boolean contains (Object o) Iterator<E> it = iterator(); if (o==null ) { while (it.hasNext()) if (it.next()==null ) return true ; } else { while (it.hasNext()) if (o.equals(it.next())) return true ; } return false ; } public boolean remove (Object o) }
类似的方法还有containsAll(Collection<?> c)、addAll(Collection<? extends E> c)、removeAll(Collection<?> c)、retainAll(Collection<?> c)和clear()等,都需要利用到Iterator的特性,这里就不再一一赘述了。
另外还有一个toArray()的方法实现略微不同,可以看看其具体实现。
1 2 3 4 5 6 7 8 9 10 11 12 13 14 15 16 17 18 19 20 21 22 23 24 25 26 27 28 29 30 31 32 33 34 35 36 37 38 39 40 41 42 43 44 45 46 47 48 49 50 51 52 53 54 55 public Object[] toArray() { Object[] r = new Object[size()]; Iterator<E> it = iterator(); for (int i = 0 ; i < r.length; i++) { if (! it.hasNext()) return Arrays.copyOf(r, i); r[i] = it.next(); } return it.hasNext() ? finishToArray(r, it) : r; } private static <T> T[] finishToArray(T[] r, Iterator<?> it) { int i = r.length; while (it.hasNext()) { int cap = r.length; if (i == cap) { int newCap = cap + (cap >> 1 ) + 1 ; if (newCap - MAX_ARRAY_SIZE > 0 ) newCap = hugeCapacity(cap + 1 ); r = Arrays.copyOf(r, newCap); } r[i++] = (T)it.next(); } return (i == r.length) ? r : Arrays.copyOf(r, i); } private static int hugeCapacity (int minCapacity) if (minCapacity < 0 ) throw new OutOfMemoryError ("Required array size too large" ); return (minCapacity > MAX_ARRAY_SIZE) ? Integer.MAX_VALUE : MAX_ARRAY_SIZE; } public <T> T[] toArray(T[] a) { }
除了以上这些方法,AbstractCollection还实现了toString方法,其是通过StringBuilder拼接了每个元素的toString完成的,也并不复杂。这里可以看下其源码:
1 2 3 4 5 6 7 8 9 10 11 12 13 14 15 public String toString () Iterator<E> it = iterator(); if (! it.hasNext()) return "[]" ; StringBuilder sb = new StringBuilder(); sb.append('[' ); for (;;) { E e = it.next(); sb.append(e == this ? "(this Collection)" : e); if (! it.hasNext()) return sb.append(']' ).toString(); sb.append(',' ).append(' ' ); } }
超接口List List是Collection三大直接子接口之一,其中的数据可以通过位置检索,用户可以在指定位置插入数据。List的数据可以为空,可以重复。以下是其文档注释,只看前两段:
An ordered collection (also known as a *sequence* ). The user of this interface has precise control over where in the list each element is inserted. The user can access elements by their integer index (position in the list), and search for elements in the list.
Unlike sets, lists typically allow duplicate elements. More formally, lists typically allow pairs of elements e1 and e2 such that e1.equals(e2) , and they typically allow multiple null elements if they allow null elements at all. It is not inconceivable that someone might wish to implement a list that prohibits duplicates, by throwing runtime exceptions when the user attempts to insert them, but we expect this usage to be rare.
List特有的方法 其不同于Collection的方法,主要有以下这些:
1 2 3 4 5 6 7 8 9 10 11 12 13 14 15 16 17 18 19 20 21 22 23 24 25 26 27 28 29 30 31 32 33 34 35 36 37 38 39 40 41 42 43 44 45 46 47 48 49 50 boolean addAll (int index, Collection<? extends E> c) default void replaceAll (UnaryOperator<E> operator) Objects.requireNonNull(operator); final ListIterator<E> li = this .listIterator(); while (li.hasNext()) { li.set(operator.apply(li.next())); } } default void sort (Comparator<? super E> c) Object[] a = this .toArray(); Arrays.sort(a, (Comparator) c); ListIterator<E> i = this .listIterator(); for (Object e : a) { i.next(); i.set((E) e); } } E get (int index) ;E set (int index, E element) ;void add (int index, E element) E remove (int index) ;int indexOf (Object o) int lastIndexOf (Object o) ListIterator<E> listIterator () ;ListIterator<E> listIterator (int index) ;List<E> subList (int fromIndex, int toIndex) ;
通过以上对接口的分析可以发现,Collection主要提供一些通用的方法,而List则针对线性表的结构,提供了对位置以及子表的操作。
超实现类:AbstractList 有了分析AbstractCollection的经验,我们分析AbstractList就更容易了。首先也看下其文档中强调的部分:
To implement an unmodifiable list, the programmer needs only to extend this class and provide implementations for the *get(int)* and *size()* methods.
To implement a modifiable list, the programmer must additionally override the *set(int, E)* method (which otherwise throws an UnsupportedOperationException ). If the list is variable-size the programmer must additionally override the *add(int, E)* and *remove(int)* methods.
大致意思是说,要实现一个不可修改的集合,只需要复写get和size就可以了。要实现一个可以修改的集合,还需要复写set方法,如果要动态调整大小,就必须再实现add和remove方法。
然后看下其源码实现了哪些功能吧:
1 2 3 4 5 6 7 8 9 10 11 12 public boolean add (E e) add(size(), e); return true ; } public boolean addAll (int index, Collection<? extends E> c) }
接下来,还有几个方法和Iterator与ListIterator息息相关,在AbstractList中有具体的实现,我们先看看它是如何把集合转变成Iterator对象并支持foreach循环的吧。
我们追踪源码发现,在iterator()方法中直接返回了一个Itr对象
1 2 3 public Iterator<E> iterator () return new Itr(); }
这样我们就明白了,它是实现了一个内部类,这个内部类实现了Iterator接口,合理的处理hasNext、next、remove方法。这个源码就不粘贴啦,其中仅仅在remove时考虑了一下多线程问题,有兴趣的可以自己去看看。
另外一个就是ListIterator,
1 2 3 public ListIterator<E> listIterator () return listIterator(0 ); }
可以看到,listIterator方法依赖于listIterator(int index)方法。有了上边的经验,我们可以推测,它也是通过一个内部类完成的。
1 2 3 4 5 public ListIterator<E> listIterator (final int index) rangeCheckForAdd(index); return new ListItr(index); }
事实证明,和我们想的一样,AbstractList内部还定义了一个ListItr,实现了ListIterator接口,其实现也很简单,就不粘贴源码啦。
接下来我们看看,利用这两个实现类,AbstractList都做了哪些事情。
1 2 3 4 5 6 7 8 9 10 11 12 13 14 15 16 17 18 19 20 21 22 23 24 25 26 27 28 29 30 public int indexOf (Object o) ListIterator<E> it = listIterator(); if (o==null ) { while (it.hasNext()) if (it.next()==null ) return it.previousIndex(); } else { while (it.hasNext()) if (o.equals(it.next())) return it.previousIndex(); } return -1 ; } public int lastIndexOf (Object o) } protected void removeRange (int fromIndex, int toIndex) ListIterator<E> it = listIterator(fromIndex); for (int i=0 , n=toIndex-fromIndex; i<n; i++) { it.next(); it.remove(); } }
接下来还有两块内容比较重要,一个是关于SubList的,一个是关于equals和hashcode的。
我们先看看SubList相关的内容。SubList并不是新建了一个集合,只是持有了当前集合的引用,然后控制一下用户可以操作的范围,所以在接口定义时就说明了其更改会直接反应到原集合中。SubList定义在AbstractList内部,并且是AbstractList的子类。在AbstractList的基础上增加了对可选范围的控制。
equals和hashcode的实现,也关乎我们的使用。在AbstractList中,这两个方法不仅与其实例有关,也和其内部包含的元素有关,所以在定义数据元素时,也应该复写这两个方法,以保证程序的正确运行。这里看下其源码加深一下印象吧。
1 2 3 4 5 6 7 8 9 10 11 12 13 14 15 16 17 public boolean equals (Object o) if (o == this ) return true ; if (!(o instanceof List)) return false ; ListIterator<E> e1 = listIterator(); ListIterator<?> e2 = ((List<?>) o).listIterator(); while (e1.hasNext() && e2.hasNext()) { E o1 = e1.next(); Object o2 = e2.next(); if (!(o1==null ? o2==null : o1.equals(o2))) return false ; } return !(e1.hasNext() || e2.hasNext()); }
1 2 3 4 5 6 7 public int hashCode () int hashCode = 1 ; for (E e : this ) hashCode = 31 *hashCode + (e==null ? 0 : e.hashCode()); return hashCode; }
ArrayList ArrayList是Vector的翻版,只是去除了线程安全。Vector因为种种原因不推荐使用了,这里我们就不对其进行分析了。ArrayList是一个可以动态调整大小的List实现,其数据的顺序与插入顺序始终一致,其余特性与List中定义的一致。
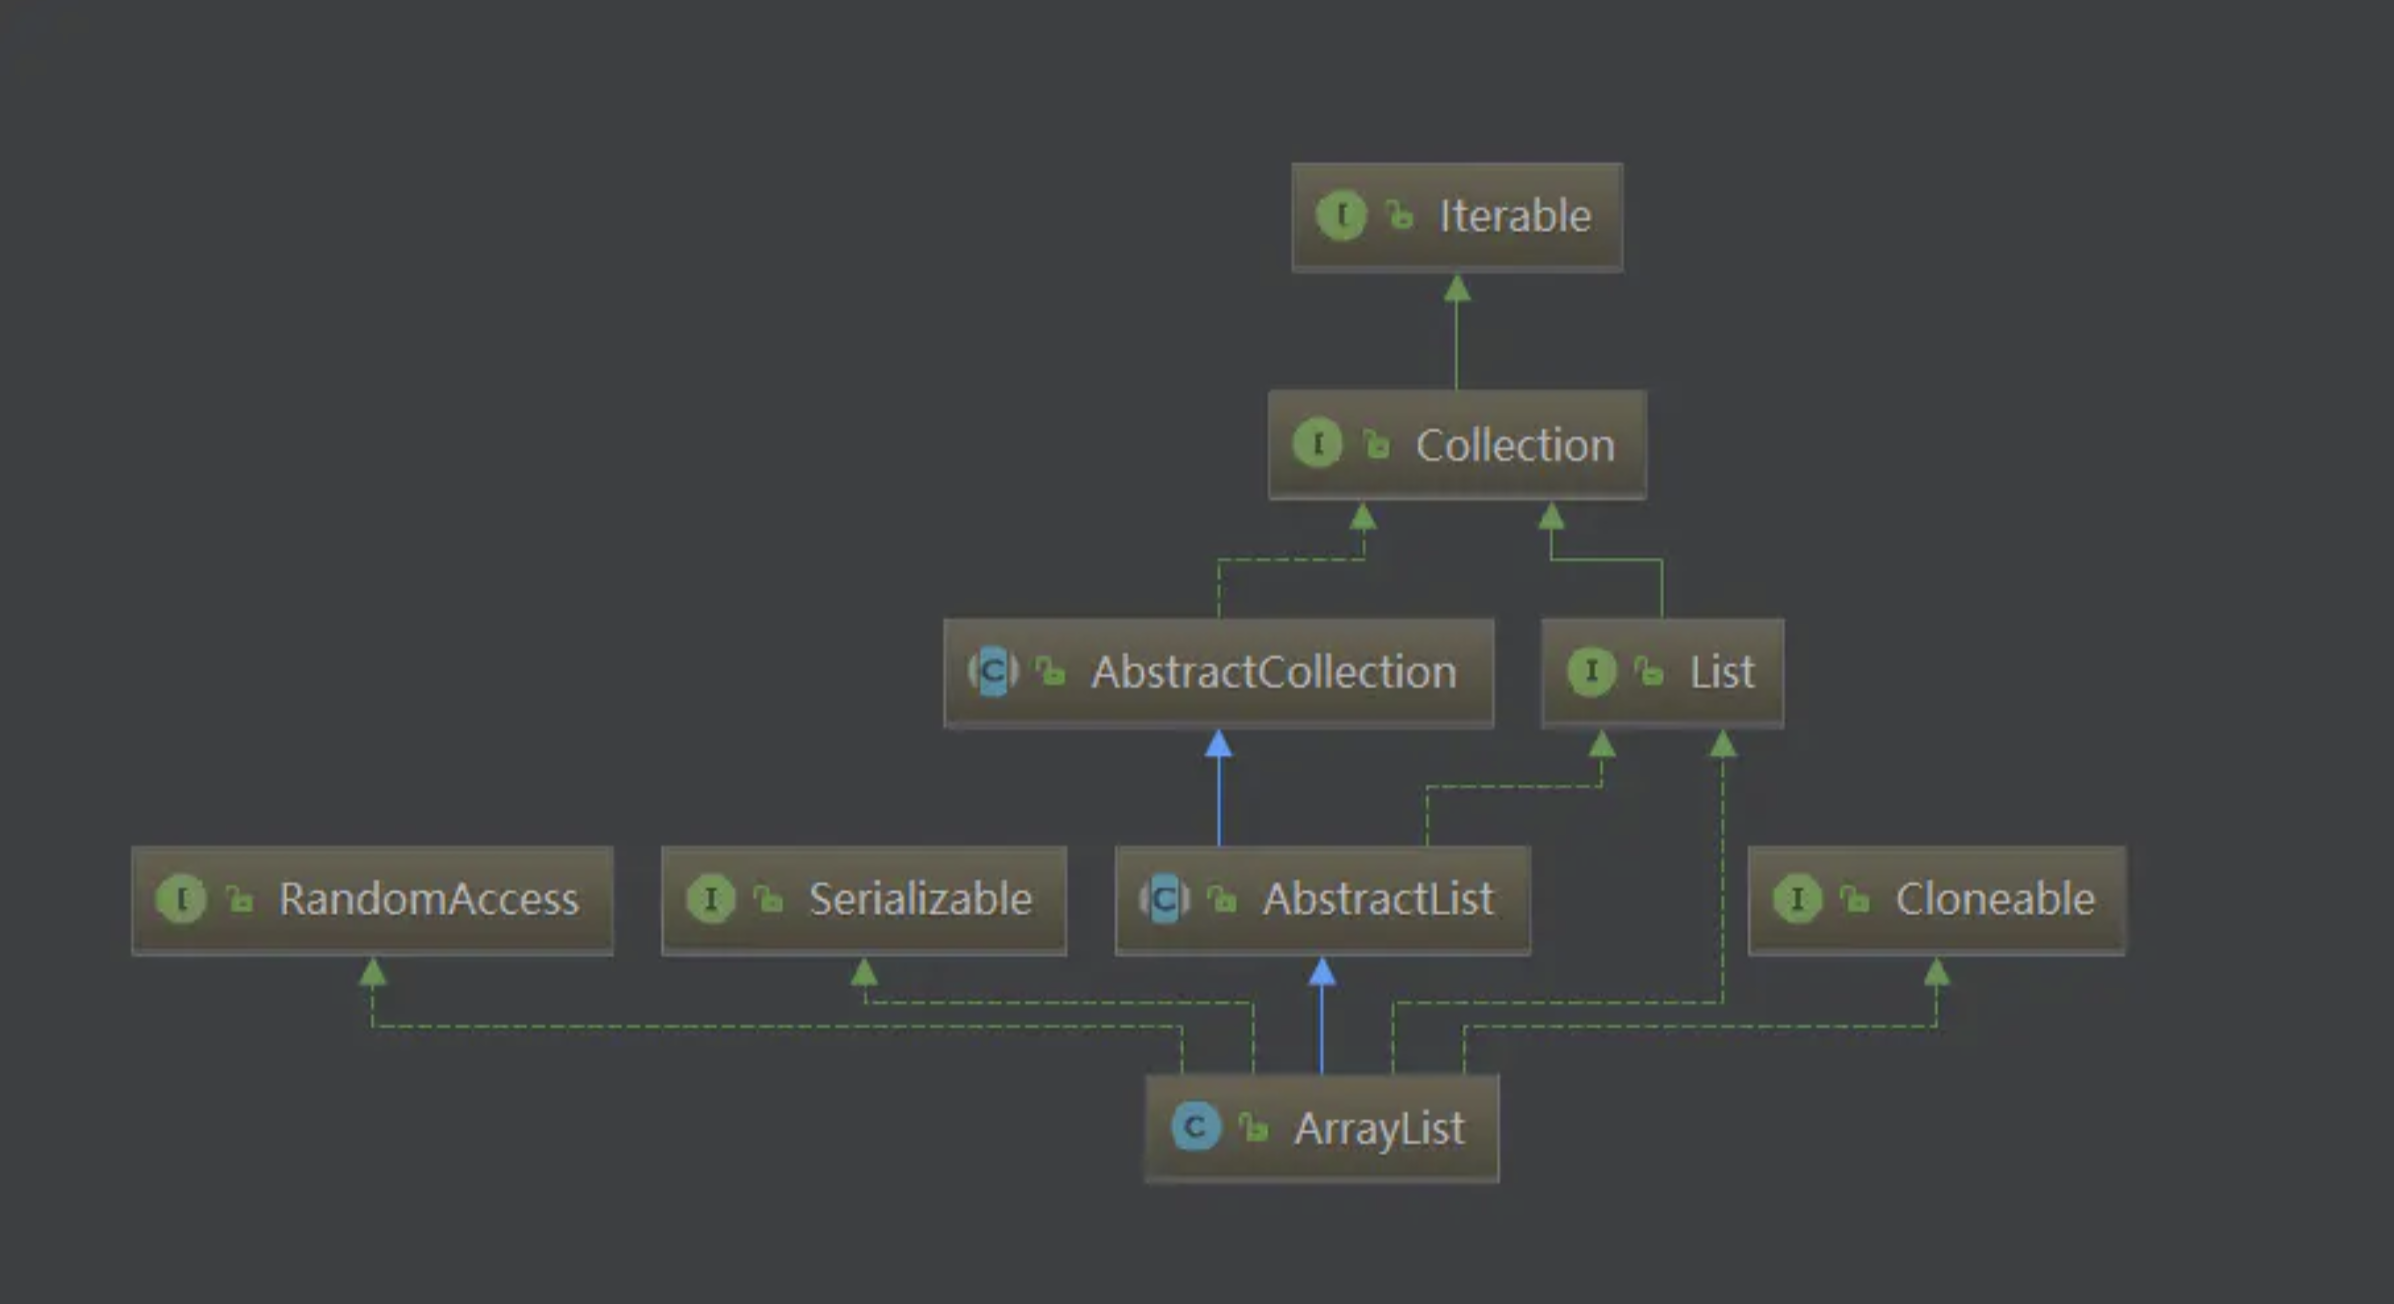
ArrayList继承结构
ArrayList结构图
可以看到,ArrayList是AbstractList的子类,同时实现了List接口。除此之外,它还实现了三个标识型接口,这几个接口都没有任何方法,仅作为标识表示实现类具备某项功能。RandomAccess表示实现类支持快速随机访问,Cloneable表示实现类支持克隆,具体表现为重写了clone方法,java.io.Serializable则表示支持序列化,如果需要对此过程自定义,可以重写writeObject与readObject方法。
一般面试问到与ArrayList相关的问题时,可能会问ArrayList的初始大小是多少?很多人在初始化ArrayList时,可能都是直接调用无参构造函数,从未关注过此问题。例如,这样获取一个对象:
1 ArrayList<String> strings = new ArrayList<>();
我们都知道,ArrayList是基于数组的,而数组是定长的。那ArrayList为何不需要指定长度,就能使我们既可以插入一条数据,也可以插入一万条数据?回想刚刚文档的第一句话:
Resizable-array implementation of the List interface.
ArrayList可以动态调整大小,所以我们才可以无感知的插入多条数据,这也说明其必然有一个默认的大小。而要想扩充数组的大小,只能通过复制。这样一来,默认大小以及如何动态调整大小会对使用性能产生非常大的影响。我们举个例子来说明此情形:
比如默认大小为5,我们向ArrayList中插入5条数据,并不会涉及到扩容。如果想插入100条数据,就需要将ArrayList大小调整到100再进行插入,这就涉及一次数组的复制。如果此时,还想再插入50条数据呢?那就得把大小再调整到150,把原有的100条数据复制过来,再插入新的50条数据。自此之后,我们每向其中插入一条数据,都要涉及一次数据拷贝,且数据量越大,需要拷贝的数据越多,性能也会迅速下降。
其实,ArrayList仅仅是对数组操作的封装,里面采取了一定的措施来避免以上的问题,如果我们不利用这些措施,就和直接使用数组没有太大的区别。那我们就看看ArrayList用了哪些措施,并且如何使用它们吧。我们先从初始化说起。
构造方法与初始化 ArrayList一共有三个构造方法,用到了两个成员变量。
1 2 3 4 5 6 7 8 transient Object[] elementData;private int size;
除了以上两个成员变量,我们还需要掌握一个变量,它是
1 protected transient int modCount = 0 ;
这个变量主要作用是防止在进行一些操作时,改变了ArrayList的大小,那将使得结果不可预测。
下面我们看看构造函数:
1 2 3 4 5 6 7 8 9 10 11 12 13 14 15 16 17 18 19 20 21 22 23 24 25 26 27 28 29 30 31 32 public ArrayList () this .elementData = DEFAULTCAPACITY_EMPTY_ELEMENTDATA; } public ArrayList (int initialCapacity) if (initialCapacity > 0 ) { this .elementData = new Object[initialCapacity]; } else if (initialCapacity == 0 ) { this .elementData = EMPTY_ELEMENTDATA; } else { throw new IllegalArgumentException("Illegal Capacity: " + initialCapacity); } } public ArrayList (Collection<? extends E> c) elementData = c.toArray(); if ((size = elementData.length) != 0 ) { if (elementData.getClass() != Object[].class) elementData = Arrays.copyOf(elementData, size, Object[].class); } else { this .elementData = EMPTY_ELEMENTDATA; } }
重要方法 ArrayList已经是一个具体的实现类了,所以在List接口中定义的所有方法在此都做了实现。其中有些在AbstractList中实现过的方法,在这里再次被重写,我们稍后就可以看到它们的区别。
先看一些简单的方法:
1 2 3 4 5 6 7 8 9 10 11 12 13 14 15 16 17 18 19 20 21 22 23 24 25 26 27 28 29 30 31 32 33 34 35 36 37 public int indexOf (Object o) if (o == null ) { for (int i = 0 ; i < size; i++) if (elementData[i]==null ) return i; } else { for (int i = 0 ; i < size; i++) if (o.equals(elementData[i])) return i; } return -1 ; } public int lastIndexOf (Object o) } public Object[] toArray() { return Arrays.copyOf(elementData, size); } public <T> T[] toArray(T[] a) { if (a.length < size) return (T[]) Arrays.copyOf(elementData, size, a.getClass()); System.arraycopy(elementData, 0 , a, 0 , size); if (a.length > size) a[size] = null ; return a; }
数据操作最重要的就是增删改查,改查都不涉及长度的变化,而增删就涉及到动态调整大小的问题,我们先看看改和查是如何实现的:
1 2 3 4 5 6 7 8 9 10 11 12 13 14 15 16 17 18 19 20 private void rangeCheck (int index) if (index >= size) throw new IndexOutOfBoundsException(outOfBoundsMsg(index)); } public E get (int index) rangeCheck(index); return elementData(index); } public E set (int index, E element) rangeCheck(index); E oldValue = elementData(index); elementData[index] = element; return oldValue; }
增和删是ArrayList最重要的部分,这部分代码需要我们细细研究,我们看看它是如何处理我们例子中的问题的:
1 2 3 4 5 6 7 8 9 10 11 12 13 14 15 16 17 18 19 public boolean add (E e) ensureCapacityInternal(size + 1 ); elementData[size++] = e; return true ; } public void add (int index, E element) rangeCheckForAdd(index); ensureCapacityInternal(size + 1 ); System.arraycopy(elementData, index, elementData, index + 1 , size - index); elementData[index] = element; size++; }
以上两种添加数据的方式都调用到了ensureCapacityInternal这个方法,我们看看它是如何完成工作的:
1 2 3 4 5 6 7 8 9 10 11 12 13 14 15 16 17 18 19 20 21 22 23 24 25 26 27 28 29 30 31 32 33 34 35 private void ensureCapacityInternal (int minCapacity) if (elementData == DEFAULTCAPACITY_EMPTY_ELEMENTDATA) { minCapacity = Math.max(DEFAULT_CAPACITY, minCapacity); } ensureExplicitCapacity(minCapacity); } private void ensureExplicitCapacity (int minCapacity) modCount++; if (minCapacity - elementData.length > 0 ) grow(minCapacity); } private void grow (int minCapacity) int oldCapacity = elementData.length; int newCapacity = oldCapacity + (oldCapacity >> 1 ); if (newCapacity - minCapacity < 0 ) newCapacity = minCapacity; if (newCapacity - MAX_ARRAY_SIZE > 0 ) newCapacity = hugeCapacity(minCapacity); elementData = Arrays.copyOf(elementData, newCapacity); }
至此,我们彻底明白了ArrayList的扩容机制了。首先创建一个空数组*elementData*,第一次插入数据时直接扩充至10,然后如果* elementData**的长度不足,就扩充1.5倍,如果扩充完还不够,就使用需要的长度作为 elementData***的长度。
这样的方式显然比我们例子中好一些,但是在遇到大量数据时还是会频繁的拷贝数据。那么如何缓解这种问题呢,ArrayList为我们提供了两种可行的方案:
使用ArrayList(int initialCapacity)这个有参构造,在创建时就声明一个较大的大小,这样解决了频繁拷贝问题,但是需要我们提前预知数据的数量级,也会一直占有较大的内存。
除了添加数据时可以自动扩容外,我们还可以在插入前先进行一次扩容。只要提前预知数据的数量级,就可以在需要时直接一次扩充到位,与ArrayList(int initialCapacity)相比的好处在于不必一直占有较大内存,同时数据拷贝的次数也大大减少了。这个方法就是**ensureCapacity(int minCapacity)**,其内部就是调用了ensureCapacityInternal(int minCapacity)。
其他还有一些比较重要的函数,其实现的原理也大同小异,这里我们不一一分析了,但还是把它们列举出来,以便使用。
1 2 3 4 5 6 7 8 9 10 11 12 13 14 15 16 17 18 19 20 21 22 23 24 25 26 27 28 29 30 31 32 33 34 35 36 37 38 39 public void trimToSize () } public E remove (int index) } public boolean remove (Object o) } public boolean addAll (Collection<? extends E> c) } public boolean addAll (int index, Collection<? extends E> c) } protected void removeRange (int fromIndex, int toIndex) } public boolean removeAll (Collection<?> c) } public boolean retainAll (Collection<?> c) }
ArrayList还对父级实现的ListIterator以及SubList进行了优化,主要是使用位置访问元素,我们就不再研究了。
其他实现方法 ArrayList不仅实现了List中定义的所有功能,还实现了equals、hashCode、clone、writeObject与readObject等方法。这些方法都需要与存储的数据配合,否则结果将是错误的或者克隆得到的数据只是浅拷贝,或者数据本身不支持序列化等,这些我们定义数据时注意到即可。我们主要看下其在序列化时自定义了哪些东西。
1 2 3 4 5 6 7 8 9 10 11 12 13 14 15 16 17 18 19 20 21 private void writeObject (java.io.ObjectOutputStream s) throws java.io.IOException { int expectedModCount = modCount; s.defaultWriteObject(); s.writeInt(size); for (int i=0 ; i<size; i++) { s.writeObject(elementData[i]); } if (modCount != expectedModCount) { throw new ConcurrentModificationException(); } }
readObject是一个相反的过程,就是把数据正确的恢复回来,并将elementData设置好即可,感兴趣可以自行阅读源码。
总结 总体而言,ArrayList还是和数组一样,更适合于数据随机访问,而不太适合于大量的插入与删除,如果一定要进行插入操作,要使用以下三种方式:
使用ArrayList(int initialCapacity)这个有参构造,在创建时就声明一个较大的大小。
使用**ensureCapacity(int minCapacity)**,在插入前先扩容。
使用LinkedList ,这个无可厚非哈,我们很快就会介绍这个适合于增删的集合类。
超接口Queue 队列在软件开发中担任着重要的职责,java函数的调用用到了栈的技术,在处理并发问题时,BlockingQueue很好的解决了数据传输的问题。接下来我们看看Java是如何定义队列的吧。
首先,Queue也继承自Collection,说明它是集合家族的一员。Queue接口主要提供了以下方法:
1 2 3 4 5 6 7 8 9 10 11 12 13 14 15 16 17 boolean add (E e) boolean offer (E e) E remove () ;E poll () ;E element () ;E peek () ;
超实现类AbstractQueue Queue的定义很简单,所以其实现类也很简单,用简单的代码做复杂的事情,值得我们学习。
AbstractQueue仅实现了add、remove和element三个方法,并且分别调用了另外一个仅细微区别的方法,我们这里只看其一
1 2 3 4 5 6 7 public boolean add (E e) if (offer(e)) return true ; else throw new IllegalStateException("Queue full" ); }
此外,它还实现了clear与addAll方法,重写这些方法可以使其更符合当前场景。
1 2 3 4 5 6 7 8 9 10 11 12 13 14 15 16 public void clear () while (poll() != null ) ; } public boolean addAll (Collection<? extends E> c) if (c == null ) throw new NullPointerException(); if (c == this ) throw new IllegalArgumentException(); boolean modified = false ; for (E e : c) if (add(e)) modified = true ; return modified; }
接口Deque Deque全称为double ended queue,即双向队列,它允许在两侧插入或删除元素,同时也建议我们不要向其中插入null值。除此之外,其余特性则和父级Queue类似。Deque大多数情况下不会限制元素的数量,但这不是必须的。
Deque中定义的方法主要分为四部分,第一部分就如Deque定义所言,提供两侧插入或删除的方法。第二部分是继承自Queue的实现。第三部分表示如果要基于此实现一个Stack,需要实现的方法。最后一部分是继承自Collection的方法。
两侧插入、删除 这里方法和Queue定义方式一致,但却是针对两侧插入删除的。
1 2 3 4 5 6 7 8 9 10 11 12 13 14 15 16 17 18 19 20 21 22 23 24 25 26 27 28 29 void addFirst (E e) boolean offerFirst (E e) void addLast (E e) boolean offerLast (E e) E removeFirst () ;E pollFirst () ;E removeLast () ;E pollLast () ;E getFirst () ;E peekFirst () ;E getLast () ;E peekLast () ;boolean removeFirstOccurrence (Object o) boolean removeLastOccurrence (Object o)
与Queue对应的方法 因为Queue遵循FIFO,所以其方法在Deque中对应关系有所改变,结合Deque的定义,我们很容易就想到它们的对应关系:
1 2 3 4 5 6 7 8 9 10 11 12 13 14 15 16 17 boolean add (E e) boolean offer (E e) E remove () ;E poll () ;E element () ;E peek () ;
实现Stack Stack仅在一侧支持插入删除操作等操作,遵循LIFO原则。
1 2 3 4 5 void push (E e) E pop () ;
继承于Collection的方法 这里主要关注两个方法。
1 2 3 4 5 Iterator<E> iterator () ;Iterator<E> descendingIterator () ;
ArrayDeque 先看下其文档:
Resizable-array implementation of the Deque interface. Array deques have no capacity restrictions; they grow as necessary to support usage. They are not thread-safe; in the absence of external synchronization, they do not support concurrent access by multiple threads. Null elements are prohibited. This class is likely to be faster than *Stack* when used as a stack, and faster than *LinkedList* when used as a queue.
文档中并没有过多的介绍实现细节,但说它是Resizable-array implementation of the Deque interface,也就是用可动态调整大小的数组来实现了Deque,听起来是不是像ArrayList?但ArrayDeque对数组的操作方式和ArrayList有较大的差别。下面我们就深入其源码看看它是如何巧妙的使用数组的,以及为何说
faster than *Stack* when used as a stack, and faster than *LinkedList* when used as a queue.
构造函数与重要成员变量 ArrayDeque共有四个成员变量,其中两个我们在分析ArrayList时已经见过了,还有两个我们需要认真研究一下:
1 2 3 4 5 6 7 8 9 10 11 12 transient Object[] elements; private static final int MIN_INITIAL_CAPACITY = 8 ;transient int head;transient int tail;
其构造函数共有三个:
1 2 3 4 5 6 7 8 9 10 11 12 13 14 15 public ArrayDeque () elements = new Object[16 ]; } public ArrayDeque (int numElements) allocateElements(numElements); } public ArrayDeque (Collection<? extends E> c) allocateElements(c.size()); addAll(c); }
这里看到有两个构造函数都用到了allocateElements方法,这是一个非常经典的方法,我们接下来就先重点研究它。
寻找最近的2次幂 在定义elements变量时说,其长度总是2的次幂,但用户传入的参数并不一定符合规则,所以就需要根据用户的输入,找到比它大的最近的2次幂。比如用户输入13,就把它调整为16,输入31,就调整为32,等等。考虑下,我们有什么方法可以实现呢?
来看下ArrayDeque是怎么做的吧:
1 2 3 4 5 6 7 8 9 10 11 12 13 14 15 16 17 18 private void allocateElements (int numElements) int initialCapacity = MIN_INITIAL_CAPACITY; if (numElements >= initialCapacity) { initialCapacity = numElements; initialCapacity |= (initialCapacity >>> 1 ); initialCapacity |= (initialCapacity >>> 2 ); initialCapacity |= (initialCapacity >>> 4 ); initialCapacity |= (initialCapacity >>> 8 ); initialCapacity |= (initialCapacity >>> 16 ); initialCapacity++; if (initialCapacity < 0 ) initialCapacity >>>= 1 ; } elements = new Object[initialCapacity]; }
看到这段迷之代码了吗?在HashMap中也有一段类似的实现。但要读懂它,我们需要先掌握以下几个概念:
在java中,int的长度是32位,有符号int可以表示的值范围是 -$2^31$ 到 $2^31$-1,其中最高位是符号位,0表示正数,1表示负数。
>>>:无符号右移,忽略符号位,空位都以0补齐。|:位或运算,按位进行或操作,逢1为1。
我们知道,计算机存储任何数据都是采用二进制形式,所以一个int值为80的数在内存中可能是这样的:
0000 0000 0000 0000 0000 0000 0101 0000
比80大的最近的2次幂是128,其值是这样的:
0000 0000 0000 0000 0000 0000 1000 0000
我们多找几组数据就可以发现规律:
每个2的次幂用二进制表示时,只有一位为 1,其余位均为 0(不包含符合位)
要找到比一个数大的2的次幂(在正数范围内),只需要将其最高位左移一位(从左往右第一个 1 出现的位置),其余位置 0 即可。
但从实践上讲,没有可行的方法能够进行以上操作,即使通过&操作符可以将某一位置 0 或置 1,也无法确认最高位出现的位置,也就是基于最高位进行操作不可行。
但还有一个很整齐的数字可以被我们利用,那就是 2n-1,我们看下128-1=127的表示形式:
0000 0000 0000 0000 0000 0000 0111 1111
把它和80对比一下:
0000 0000 0000 0000 0000 0000 0101 0000 //80
可以发现,我们只要把80从最高位起每一位全置为1,就可以得到离它最近且比它大的 2n-1,最后再执行一次+1操作即可。具体操作步骤为(为了演示,这里使用了很大的数字):
0011 0000 0000 0000 0000 0000 0000 0010
无符号右移1位
0001 1000 0000 0000 0000 0000 0000 0001
与原值|操作:
0011 1000 0000 0000 0000 0000 0000 0011
可以看到最高2位都是1了,也仅能保证前两位为1,这时就可以直接移动两位
无符号右移2位
0000 1110 0000 0000 0000 0000 0000 0000
与原值|操作:
0011 1110 0000 0000 0000 0000 0000 0011
此时就可以保证前4位为1了,下一步移动4位
无符号右移4位
0000 0011 1110 0000 0000 0000 0000 0000
与原值|操作:
0011 1111 1110 0000 0000 0000 0000 0011
此时就可以保证前8位为1了,下一步移动8位
无符号右移8位
0000 0000 0011 1111 1110 0000 0000 0000
与原值|操作:
0011 1111 1111 1111 1110 0000 0000 0011
此时前16位都是1,只需要再移位操作一次,即可把32位都置为1了。
无符号右移16位
0000 0000 0000 0000 0011 1111 1111 1111
与原值|操作:
0011 1111 1111 1111 1111 1111 1111 1111
进行+1操作:
0100 0000 0000 0000 0000 0000 0000 0000
如此经过11步操作后,我们终于找到了合适的2次幂。写成代码就是:
1 2 3 4 5 6 initialCapacity |= (initialCapacity >>> 1 ); initialCapacity |= (initialCapacity >>> 2 ); initialCapacity |= (initialCapacity >>> 4 ); initialCapacity |= (initialCapacity >>> 8 ); initialCapacity |= (initialCapacity >>> 16 ); initialCapacity++;
不过为了防止溢出,导致出现负值(如果把符号位置为1,就为负值了)还需要一次校验:
1 2 if (initialCapacity < 0 ) initialCapacity >>>= 1 ;
至此,初始化的过程就完毕了。
重要操作方法 add分析 Deque主要定义了一些关于First和Last的操作,如add、remove、get等。我们看看它是如何实现的吧。
1 2 3 4 5 6 7 8 9 10 11 12 13 14 15 16 17 public void addFirst (E e) if (e == null ) throw new NullPointerException(); elements[head = (head - 1 ) & (elements.length - 1 )] = e; if (head == tail) doubleCapacity(); } public void addLast (E e) if (e == null ) throw new NullPointerException(); elements[tail] = e; if ( (tail = (tail + 1 ) & (elements.length - 1 )) == head) doubleCapacity(); }
这里,又有一段迷之代码需要我们认真研究了,这也是ArrayDeque值得我们研究的地方之一,通过位运算提升效率。
1 elements[head = (head - 1 ) & (elements.length - 1 )] = e;
很明显这是一个赋值操作,而且应该是给head之前的位置赋值,所以head = (head - 1)是合理的操作,那这个& (elements.length - 1)又表示什么呢?
在之前的定义与初始化中,elements.length要求为2的次幂,也就是 2n 形式,那这个& (elements.length - 1)也就是 2n-1 了,在内存中用二进制表示就是从最高位起每一位都是1。我们还以之前的127为例:
0000 0000 0000 0000 0000 0000 0111 1111
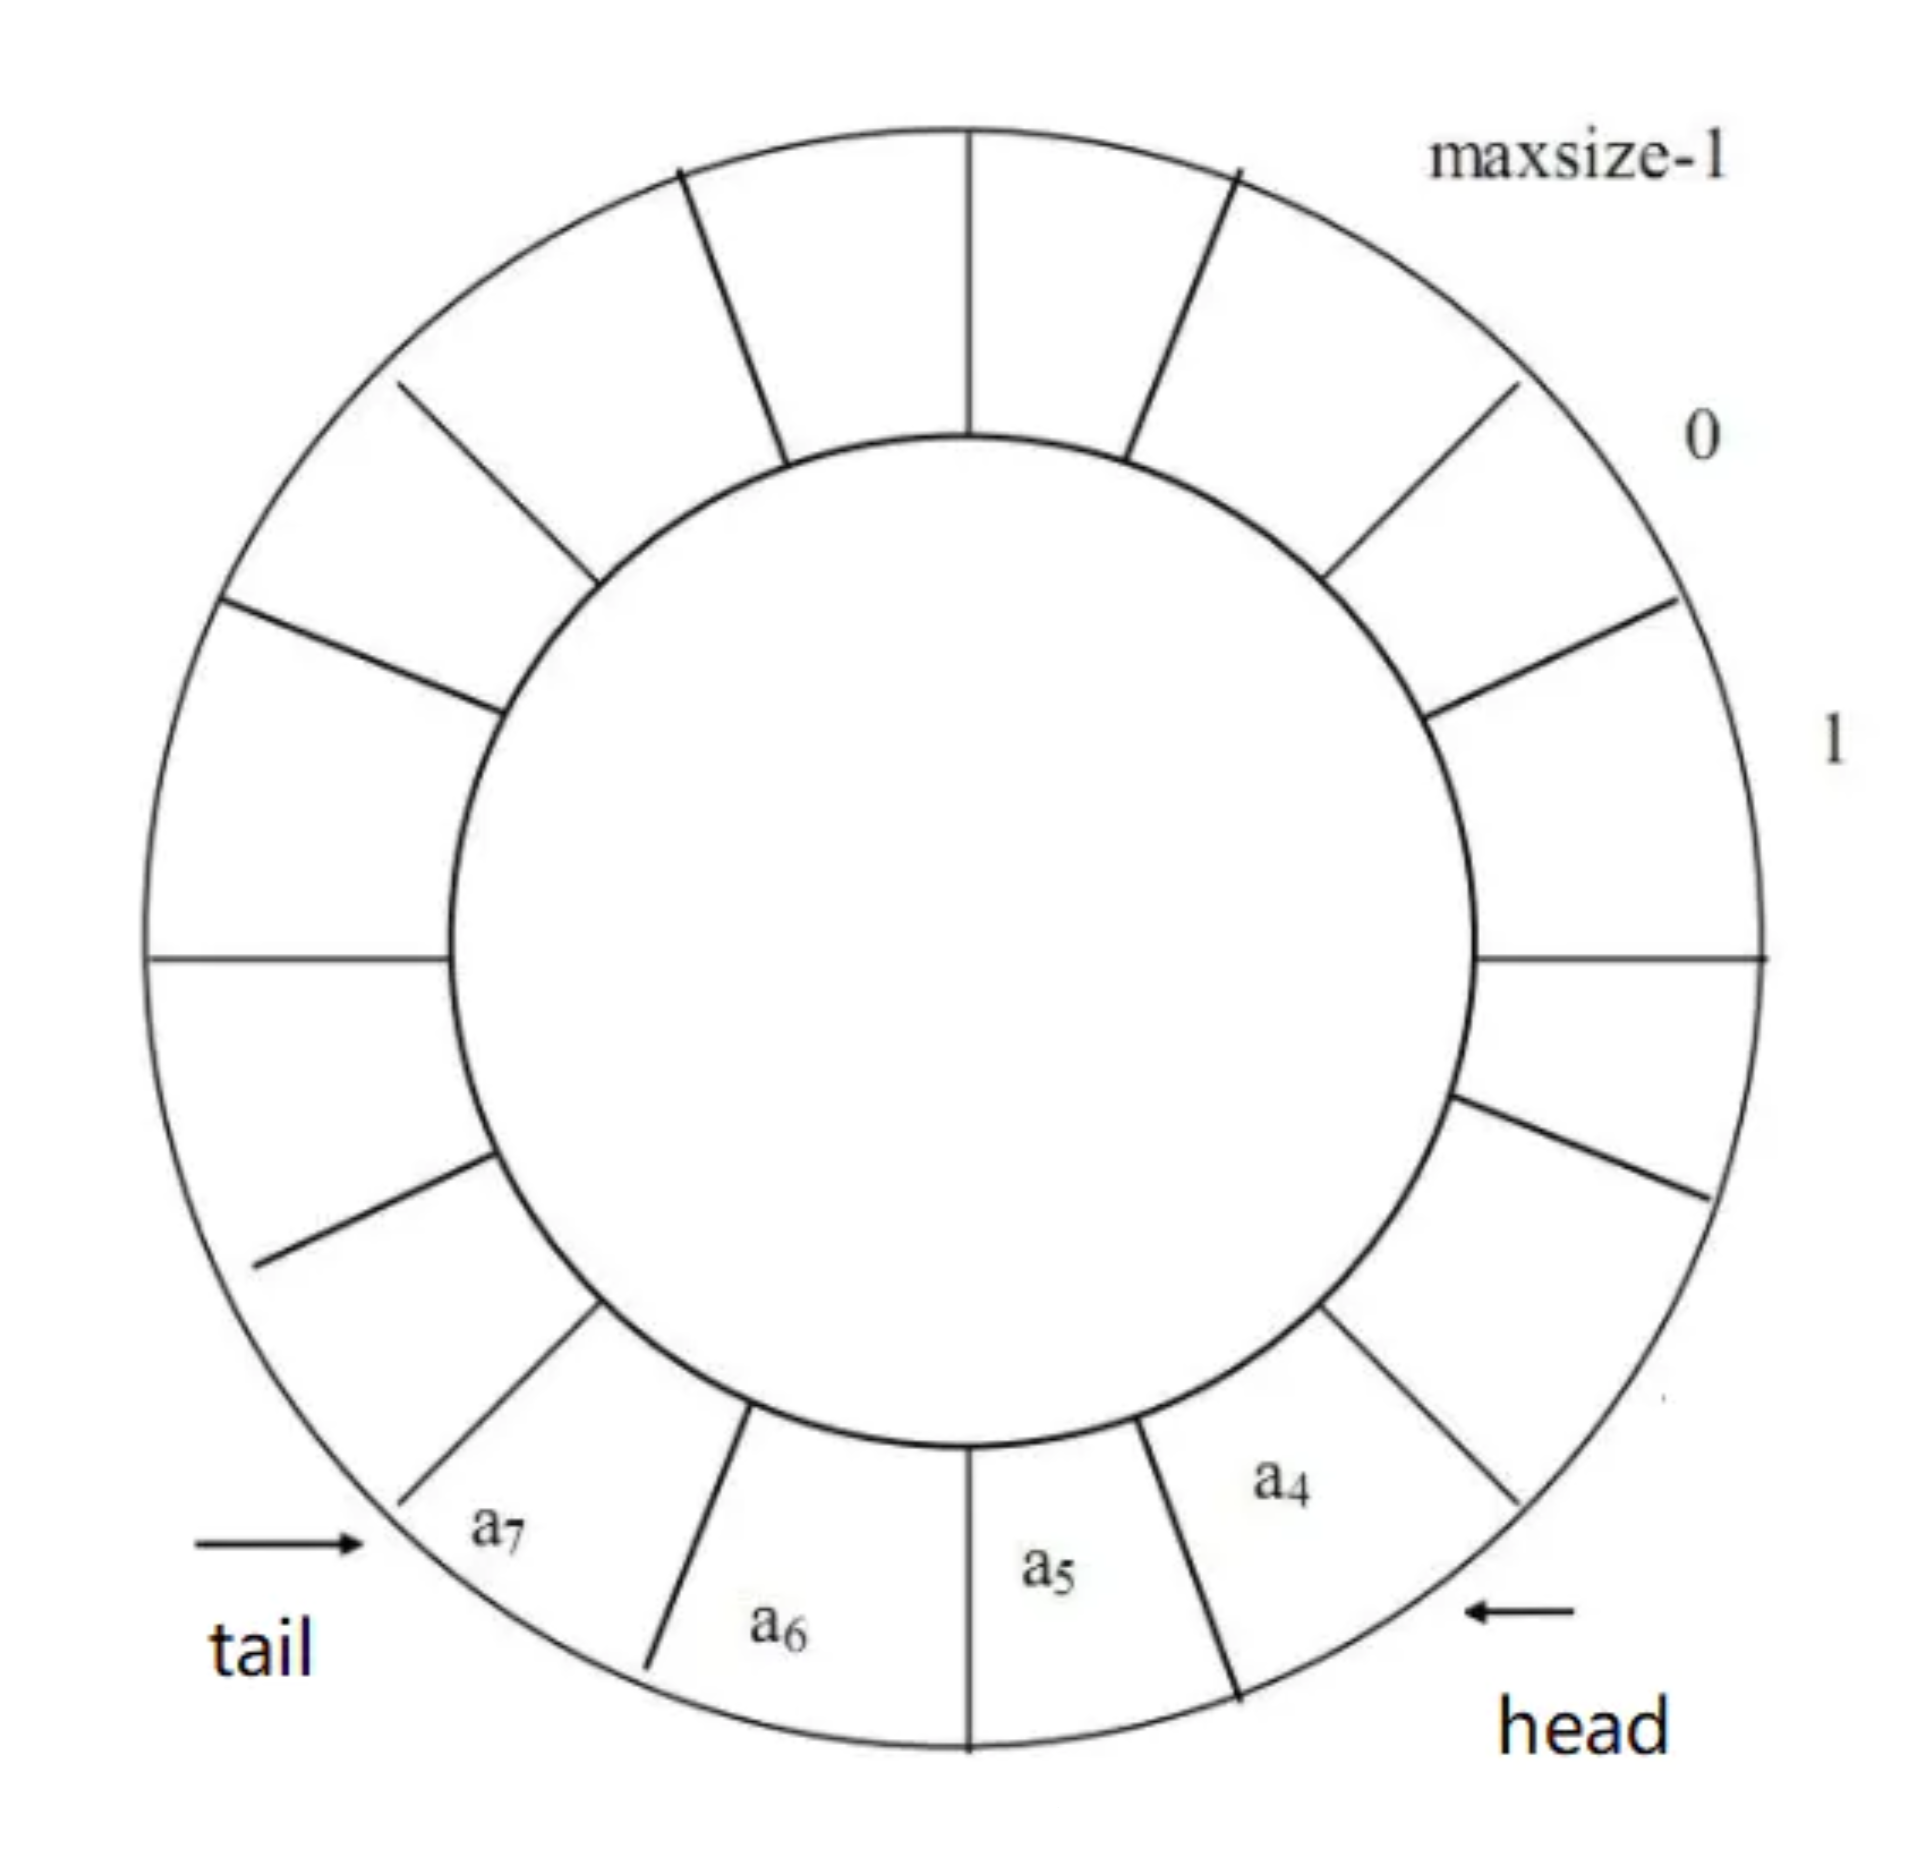
&就是按位与,全1才为1。那么任意一个正数和127进行按位与操作后,都只有最右侧7位被保留了下来,其他位全部置0(除符号位),而对一个负数而言,则会把它的符号位置为0,&操作后会变成正数。比如-1的值是1111 … 1111(32个1),和127按位操作后结果就变成了127 。所以,对于正数它就是取模,对于负数,它就是把元素插入了数组的结尾。所以,这个数组并不是向前添加元素就向前扩展,向后添加就向后扩展,它是循环的,类似这样:
循环队列示意图
初始时,head与tail都指向a[0],这时候数组是空的。当执行addFirst()方法时,head指针移动一位,指向a[elements.length-1],并赋值,也就是给a[elements.length-1]赋值。当执行addLast()操作时,先给a[0]赋值,再将tail指针移动一位,指向a[1]。所以执行完之后head指针位置是有值的,而tail位置是没有值的。
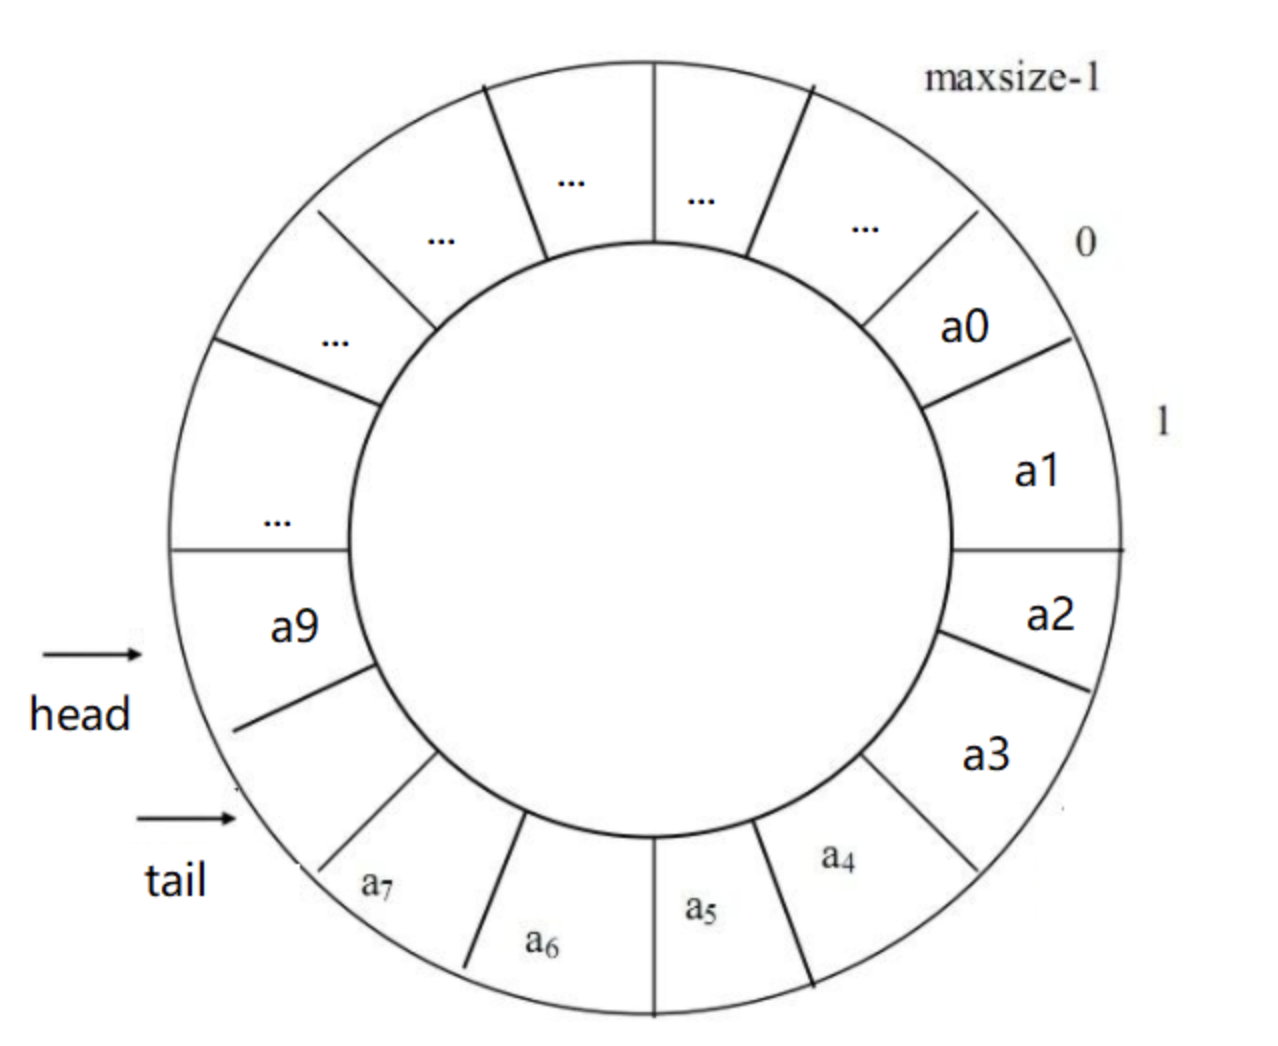
随着添加操作执行,数组总会占满,那么怎么判断它满了然后扩容呢?首先,如果head==tail,则说明数组是空的,所以在添加元素时必须保证head与tail不相等。假如现在只有一个位置可以添加元素了,类似下图:
循环队列即将充满示意图
此时,tail指向了a[8],head已经填充到a[9]了,只有a[8]是空闲的。很显然,不管是addFirst还是addLast,再添加一个元素后都会导致 head== tail。这时候就不得不扩容了,因为head == tail 是判断是否为空的条件。扩容就比较简单了,直接翻倍,我们看代码:
1 2 3 4 5 6 7 8 9 10 11 12 13 14 15 16 17 18 19 20 private void doubleCapacity () assert head == tail; int p = head; int n = elements.length; int r = n - p; int newCapacity = n << 1 ; if (newCapacity < 0 ) throw new IllegalStateException("Sorry, deque too big" ); Object[] a = new Object[newCapacity]; System.arraycopy(elements, p, a, 0 , r); System.arraycopy(elements, 0 , a, r, p); elements = a; head = 0 ; tail = n; }
分析完add,那么get以及remove等都大同小异,感兴趣可以查看源码。我们还要看看在Deque中定义的removeFirstOccurrence和removeLastOccurrence方法的具体实现。
Occurrence相关 removeFirstOccurrence和removeLastOccurrence分别用于找到元素在队首或队尾第一次出现的位置并删除。其实现原理是一致的,我们分析一个即可:
1 2 3 4 5 6 7 8 9 10 11 12 13 14 15 public boolean removeFirstOccurrence (Object o) if (o == null ) return false ; int mask = elements.length - 1 ; int i = head; Object x; while ( (x = elements[i]) != null ) { if (o.equals(x)) { delete(i); return true ; } i = (i + 1 ) & mask; } return false ; }
这里就是遍历所有元素,然后通过delete方法删除,我们看看delete实现:
1 2 3 4 5 6 7 8 9 10 11 12 13 14 15 16 17 18 19 20 21 22 23 24 25 26 27 28 29 30 31 32 33 34 35 36 37 38 39 40 41 42 43 44 45 46 private boolean delete (int i) checkInvariants(); final Object[] elements = this .elements; final int mask = elements.length - 1 ; final int h = head; final int t = tail; final int front = (i - h) & mask; final int back = (t - i) & mask; if (front >= ((t - h) & mask)) throw new ConcurrentModificationException(); if (front < back) { if (h <= i) { System.arraycopy(elements, h, elements, h + 1 , front); } else { System.arraycopy(elements, 0 , elements, 1 , i); elements[0 ] = elements[mask]; System.arraycopy(elements, h, elements, h + 1 , mask - h); } elements[h] = null ; head = (h + 1 ) & mask; return false ; } else { if (i < t) { System.arraycopy(elements, i + 1 , elements, i, back); tail = t - 1 ; } else { System.arraycopy(elements, i + 1 , elements, i, mask - i); elements[mask] = elements[0 ]; System.arraycopy(elements, 1 , elements, 0 , t); tail = (t - 1 ) & mask; } return true ; } }
总结 ArrayDeque通过循环数组的方式实现的循环队列,并通过位运算来提高效率,容量大小始终是2的次幂。当数据充满数组时,它的容量将翻倍。作为Stack,因为其非线程安全所以效率高于java.util.Stack,而作为队列,因为其不需要结点支持所以更快(LinkedList使用Node存储数据,这个对象频繁的new与clean,使得其效率略低于ArrayDeque)。但队列更多的用来处理多线程问题,所以我们更多的使用BlockingQueue,关于多线程的问题,以后再认真研究。
LinkedList LinkedList弥补了ArrayList增删较慢的问题,但在查找方面又逊色于ArrayList,所以在使用时需要根据场景灵活选择。对于这两个频繁使用的集合类,掌握它们的源码并正确使用,可以让我们的代码更高效。
LinkedList既实现了List,又实现了Deque,前者使它能够像使用ArrayList一样使用,后者又使它能够承担队列的职责。LinkedList内部结构是一个双向链表,我们在分析ArrayDeque时提到过这个概念,就是扩充单链表的指针域,增加一个指向前一个元素的指针previous 。
AbstractSequentialList AbstractSequentialList是LinkedList的父级,它继承自AbstractList,并且是一个抽象类,它主要为顺序表的链式实现提供一个骨架:
This class provides a skeletal implementation of the List interface to minimize the effort required to implement this interface backed by a “sequential access” data store (such as a linked list). For random access data (such as an array), AbstractList should be used in preference to this class.
意思是它的主要作用是提供一个实现List接口的骨架,来减少我们实现基于链式存储的实现类时所需的工作量。AbstractSequentialList并没有做很多特殊的事情,其中最主要的是提供一个方法的默认实现,并将以下方法抽象,以期有更符合场景的实现:
1 public abstract ListIterator<E> listIterator (int index)
其他一些方法的实现都利用了这个listIterator方法,我们不再一一查看了。下面我们分析LinkedList的实现
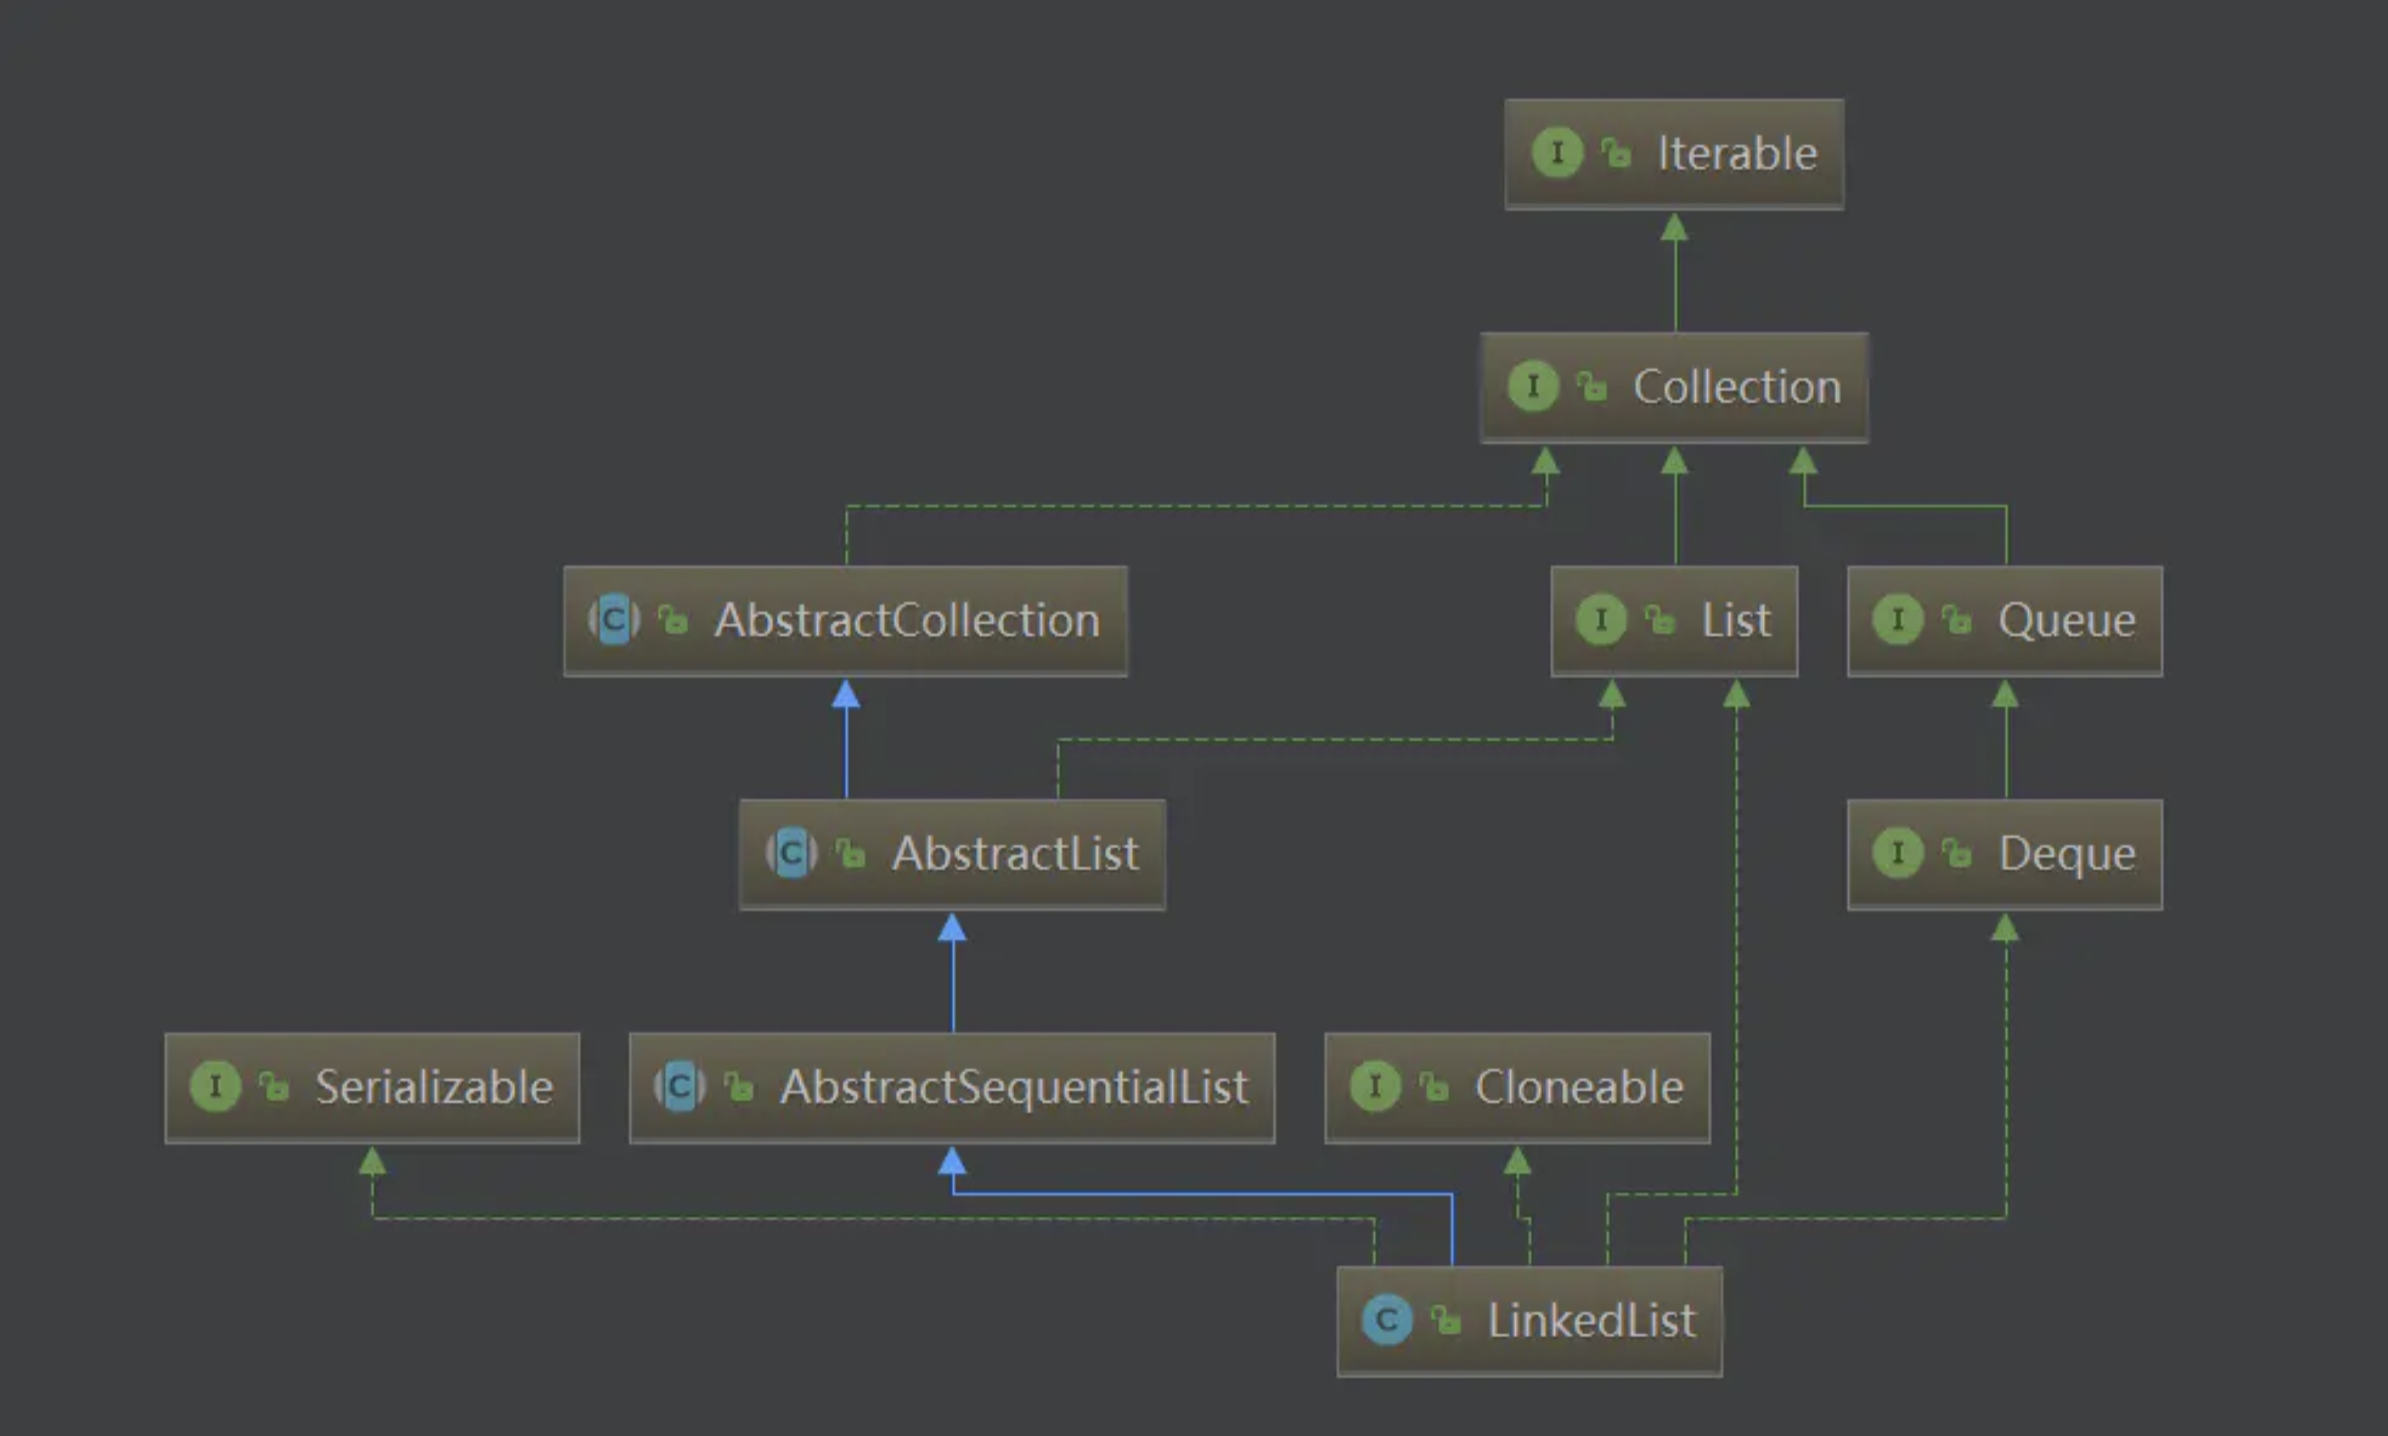
LinkedList的结构 LinkedList的继承结构如下所示:
LinkedList结构图
可以看到,LinkedList也实现了Cloneable、java.io.Serializable等方法,借鉴于ArrayList的经验,我们可以想到它的Clone也是浅克隆,在序列化方法也采用了同样的方式,我们就不再赘述了。
构造方法与成员变量 数据单元Node 在介绍链表结构时提到过,其数据单元分为数据域和指针域,分别存储数据和指向下一个元素的位置,在java中只要定义一个实体类就可以解决了。
1 2 3 4 5 6 7 8 9 10 11 private static class Node <E > E item; Node<E> next; Node<E> prev; Node(Node<E> prev, E element, Node<E> next) { this .item = element; this .next = next; this .prev = prev; } }
成员变量 LinkedList成员变量主要有三个,而且其意义清晰可见。
1 2 3 4 5 6 7 8 transient int size = 0 ;transient Node<E> first;transient Node<E> last;
构造函数 因为链表没有长度方面的问题,所以也不会涉及到扩容等问题,其构造函数也十分简洁了。
1 2 3 4 5 6 7 public LinkedList () } public LinkedList (Collection<? extends E> c) this (); addAll(c); }
一个默认的构造函数,什么都没有做,一个是用其他集合初始化,调用了一下addAll方法。addAll方法我们就不再分析了,它应该是和添加一个元素的方法是一致的。
重要方法 LinkedList既继承了List,又继承了Deque,那它必然有一堆add、remove、addFirst、addLast等方法。这些方法的含义也相差不大,实现也是类似的,因此LinkedList又提取了新的方法,来简化这些问题。我们看看这些私有方法,以及它们是如何与上述函数对应的。
1 2 3 4 5 6 7 8 9 10 11 12 13 14 15 16 17 18 19 20 21 22 23 24 25 26 27 28 29 30 31 32 33 34 35 36 37 38 39 40 41 42 43 44 45 46 47 48 49 50 51 52 53 54 55 56 57 58 59 60 61 62 63 64 65 66 67 68 69 private void linkFirst (E e) final Node<E> f = first; final Node<E> newNode = new Node<>(null , e, f); first = newNode; if (f == null ) last = newNode; else f.prev = newNode; size++; modCount++; } void linkLast (E e) } void linkBefore (E e, Node<E> succ) final Node<E> pred = succ.prev; final Node<E> newNode = new Node<>(pred, e, succ); succ.prev = newNode; if (pred == null ) first = newNode; else pred.next = newNode; size++; modCount++; } private E unlinkFirst (Node<E> f) final E element = f.item; final Node<E> next = f.next; f.item = null ; f.next = null ; first = next; if (next == null ) last = null ; else next.prev = null ; size--; modCount++; return element; } private E unlinkLast (Node<E> l) } E unlink (Node<E> x) { }
可以看到,LinkedList提供了一系列方法用来插入和删除,但是却没有再实现一个方法来进行查询,因为对链表的查询是比较慢的,所以它是通过另外的方法来实现的,我们看一下:
1 2 3 4 5 6 7 8 9 10 11 12 13 14 15 16 17 18 19 20 21 22 23 public E get (int index) checkElementIndex(index); return node(index).item; } Node<E> node (int index) { if (index < (size >> 1 )) { Node<E> x = first; for (int i = 0 ; i < index; i++) x = x.next; return x; } else { Node<E> x = last; for (int i = size - 1 ; i > index; i--) x = x.prev; return x; } }
最后,我们看下它如何对应那些继承来的方法:
1 2 3 4 5 6 7 8 9 10 11 12 13 14 15 16 17 18 19 20 21 22 23 24 25 26 27 28 29 30 31 32 33 34 35 36 37 38 39 40 41 42 43 44 45 46 47 48 49 50 51 52 53 public E set (int index, E element) checkElementIndex(index); Node<E> x = node(index); E oldVal = x.item; x.item = element; return oldVal; } public void add (int index, E element) checkPositionIndex(index); if (index == size) linkLast(element); else linkBefore(element, node(index)); } public E remove (int index) checkElementIndex(index); return unlink(node(index)); } public E peek () final Node<E> f = first; return (f == null ) ? null : f.item; } public E element () return getFirst(); } public E poll () final Node<E> f = first; return (f == null ) ? null : unlinkFirst(f); } public E remove () return removeFirst(); } public boolean offer (E e) return add(e); } public boolean offerFirst (E e) addFirst(e); return true ; }
总结 LinkedList非常适合大量数据的插入与删除,但其对处于中间位置的元素,无论是增删还是改查都需要折半遍历,这在数据量大时会十分影响性能。在使用时,尽量不要涉及查询与在中间插入数据,另外如果要遍历,也最好使用foreach,也就是Iterator提供的方式。
超接口Map 数组与链表在处理数据时各有优缺点,数组查询速度很快而插入很慢,链表在插入时表现优秀但查询无力。哈希表则整合了数组与链表的优点,能在插入和查找等方面都有不错的速度。我们之后要分析的HashMap就是基于哈希表实现的,不过在JDK1.8中还引入了红黑树 ,其性能进一步提升了。本文主要分析JDK中关于Map的定义。
接口Map Map的定义为:
An object that maps keys to values. A map cannot contain duplicate keys; each key can map to at most one value.
也就是基于key-value的数据格式,并且key值不可以重复,每个key对应的value唯一。Map的key也可以为null,也不可重。
在分析其定义的方法前,我们要先了解一下Map.Entry这个接口。
接口Map.Entry 存储在Map中的数据需要实现此接口,主要提供对key和value的操作,也是我们使用最多的操作。我们先分析它:
1 2 3 4 5 6 7 8 9 10 11 12 13 14 15 16 17 18 K getKey () ;V getValue () ;V setValue (V value) ;boolean equals (Object o) int hashCode () public static <K extends Comparable<? super K>, V> Comparator<Map.Entry<K,V>> comparingByKey() { return (Comparator<Map.Entry<K, V>> & Serializable) (c1, c2) -> c1.getKey().compareTo(c2.getKey()); }
重要方法 1 2 3 4 5 6 7 8 9 10 11 12 13 14 15 16 17 18 19 20 21 22 23 24 25 26 27 28 29 30 31 32 33 34 35 36 37 38 39 int size () boolean isEmpty () boolean containsKey (Object key) boolean containsValue (Object value) V get (Object key) ;V put (K key, V value) ;V remove (Object key) ;void putAll (Map<? extends K, ? extends V> m) void clear () Set<K> keySet () ;Collection<V> values () ;Set<Map.Entry<K, V>> entrySet(); boolean equals (Object o) int hashCode ()
此外,还有一些Java8相关的default方法,就不一一展示了。
1 2 3 4 5 6 default V getOrDefault (Object key, V defaultValue) V v; return (((v = get(key)) != null ) || containsKey(key)) ? v : defaultValue; }
超实现类:AbstractMap 对应于AbstractCollection,AbstractMap的作用也是类似的,主要是提供一些方法的实现,可以方便继承。下面我们看看它都实现了哪些方法:
1 2 3 4 5 6 7 8 9 10 11 12 13 14 15 16 17 18 19 20 21 22 23 24 25 26 27 28 29 30 31 32 33 34 35 36 37 38 39 40 41 42 43 public int size () return entrySet().size(); } public boolean isEmpty () return size() == 0 ; } public boolean containsKey (Object key) Iterator<Map.Entry<K,V>> i = entrySet().iterator(); if (key==null ) { while (i.hasNext()) { Entry<K,V> e = i.next(); if (e.getKey()==null ) return true ; } } else { while (i.hasNext()) { Entry<K,V> e = i.next(); if (key.equals(e.getKey())) return true ; } } return false ; } public boolean containsValue (Object value) } public V get (Object key) } public V remove (Object key) } public void clear () entrySet().clear(); }
除此以外,还定义了两个变量:
1 2 transient Set<K> keySet;transient Collection<V> values;
还提供了默认的实现方法,我们只看其中一个吧:
1 2 3 4 5 6 7 8 9 10 11 12 13 14 15 16 17 18 19 20 21 22 23 24 25 26 27 28 29 30 31 32 33 34 35 36 37 38 39 40 41 42 public Set<K> keySet () Set<K> ks = keySet; if (ks == null ) { ks = new AbstractSet<K>() { public Iterator<K> iterator () return new Iterator<K>() { private Iterator<Entry<K,V>> i = entrySet().iterator(); public boolean hasNext () return i.hasNext(); } public K next () return i.next().getKey(); } public void remove () i.remove(); } }; } public int size () return AbstractMap.this .size(); } public boolean isEmpty () return AbstractMap.this .isEmpty(); } public void clear () AbstractMap.this .clear(); } public boolean contains (Object k) return AbstractMap.this .containsKey(k); } }; keySet = ks; } return ks; }
除了以上相关方法以外,AbstractMap还实现了equals、hashCode、toString、clone等方法,这样在具体实现时可以省去很多工作。
接口SortedMap 由于乱序的数据对查找不利,例如无法使用二分法等降低算法的时间复杂度,如果数据在插入时就排好顺序,查找的性能就会提升很多。SortedMap接口就是为这种有序数据服务的。
SortedMap接口需要数据的key支持Comparable,或者可以被指定的Comparator接受。SortedMap主要提供了以下方法:
1 2 3 4 5 6 7 8 9 10 11 12 13 14 15 16 17 Comparator<? super K> comparator(); SortedMap<K,V> subMap (K fromKey, K toKey) ;SortedMap<K,V> headMap (K toKey) ;SortedMap<K,V> tailMap (K fromKey) ;K firstKey () ;K lastKey () ;
SortedMap主要提供了获取子集,以及获取最大值(最后一个值)和最小值(第一个值)的方法。
接口NavigableMap SortedMap提供了获取最大值与最小值的方法,但对于一个已经排序的数据集,除了最大值与最小值之外,我们可以对任何一个元素,找到比它小的值和比它大的值,还可以按照按照原有的顺序倒序排序等。NavigableMap就为我们提供了这些功能。
NavigableMap主要有以下方法:
1 2 3 4 5 6 7 8 9 10 11 12 13 14 15 16 17 18 19 20 21 22 23 24 25 26 27 28 29 30 31 32 33 34 35 36 37 38 39 40 41 42 Map.Entry<K,V> lowerEntry (K key) ; K lowerKey (K key) ;Map.Entry<K,V> floorEntry (K key) ; K floorKey (K key) ;Map.Entry<K,V> ceilingEntry (K key) ; K ceilingKey (K key) ;Map.Entry<K,V> higherEntry (K key) ; K higherKey (K key) ;Map.Entry<K,V> firstEntry () ; Map.Entry<K,V> lastEntry () ; Map.Entry<K,V> pollFirstEntry () ; Map.Entry<K,V> pollLastEntry () ; NavigableMap<K,V> descendingMap () ;NavigableSet<K> navigableKeySet () ;NavigableSet<K> descendingKeySet () ;
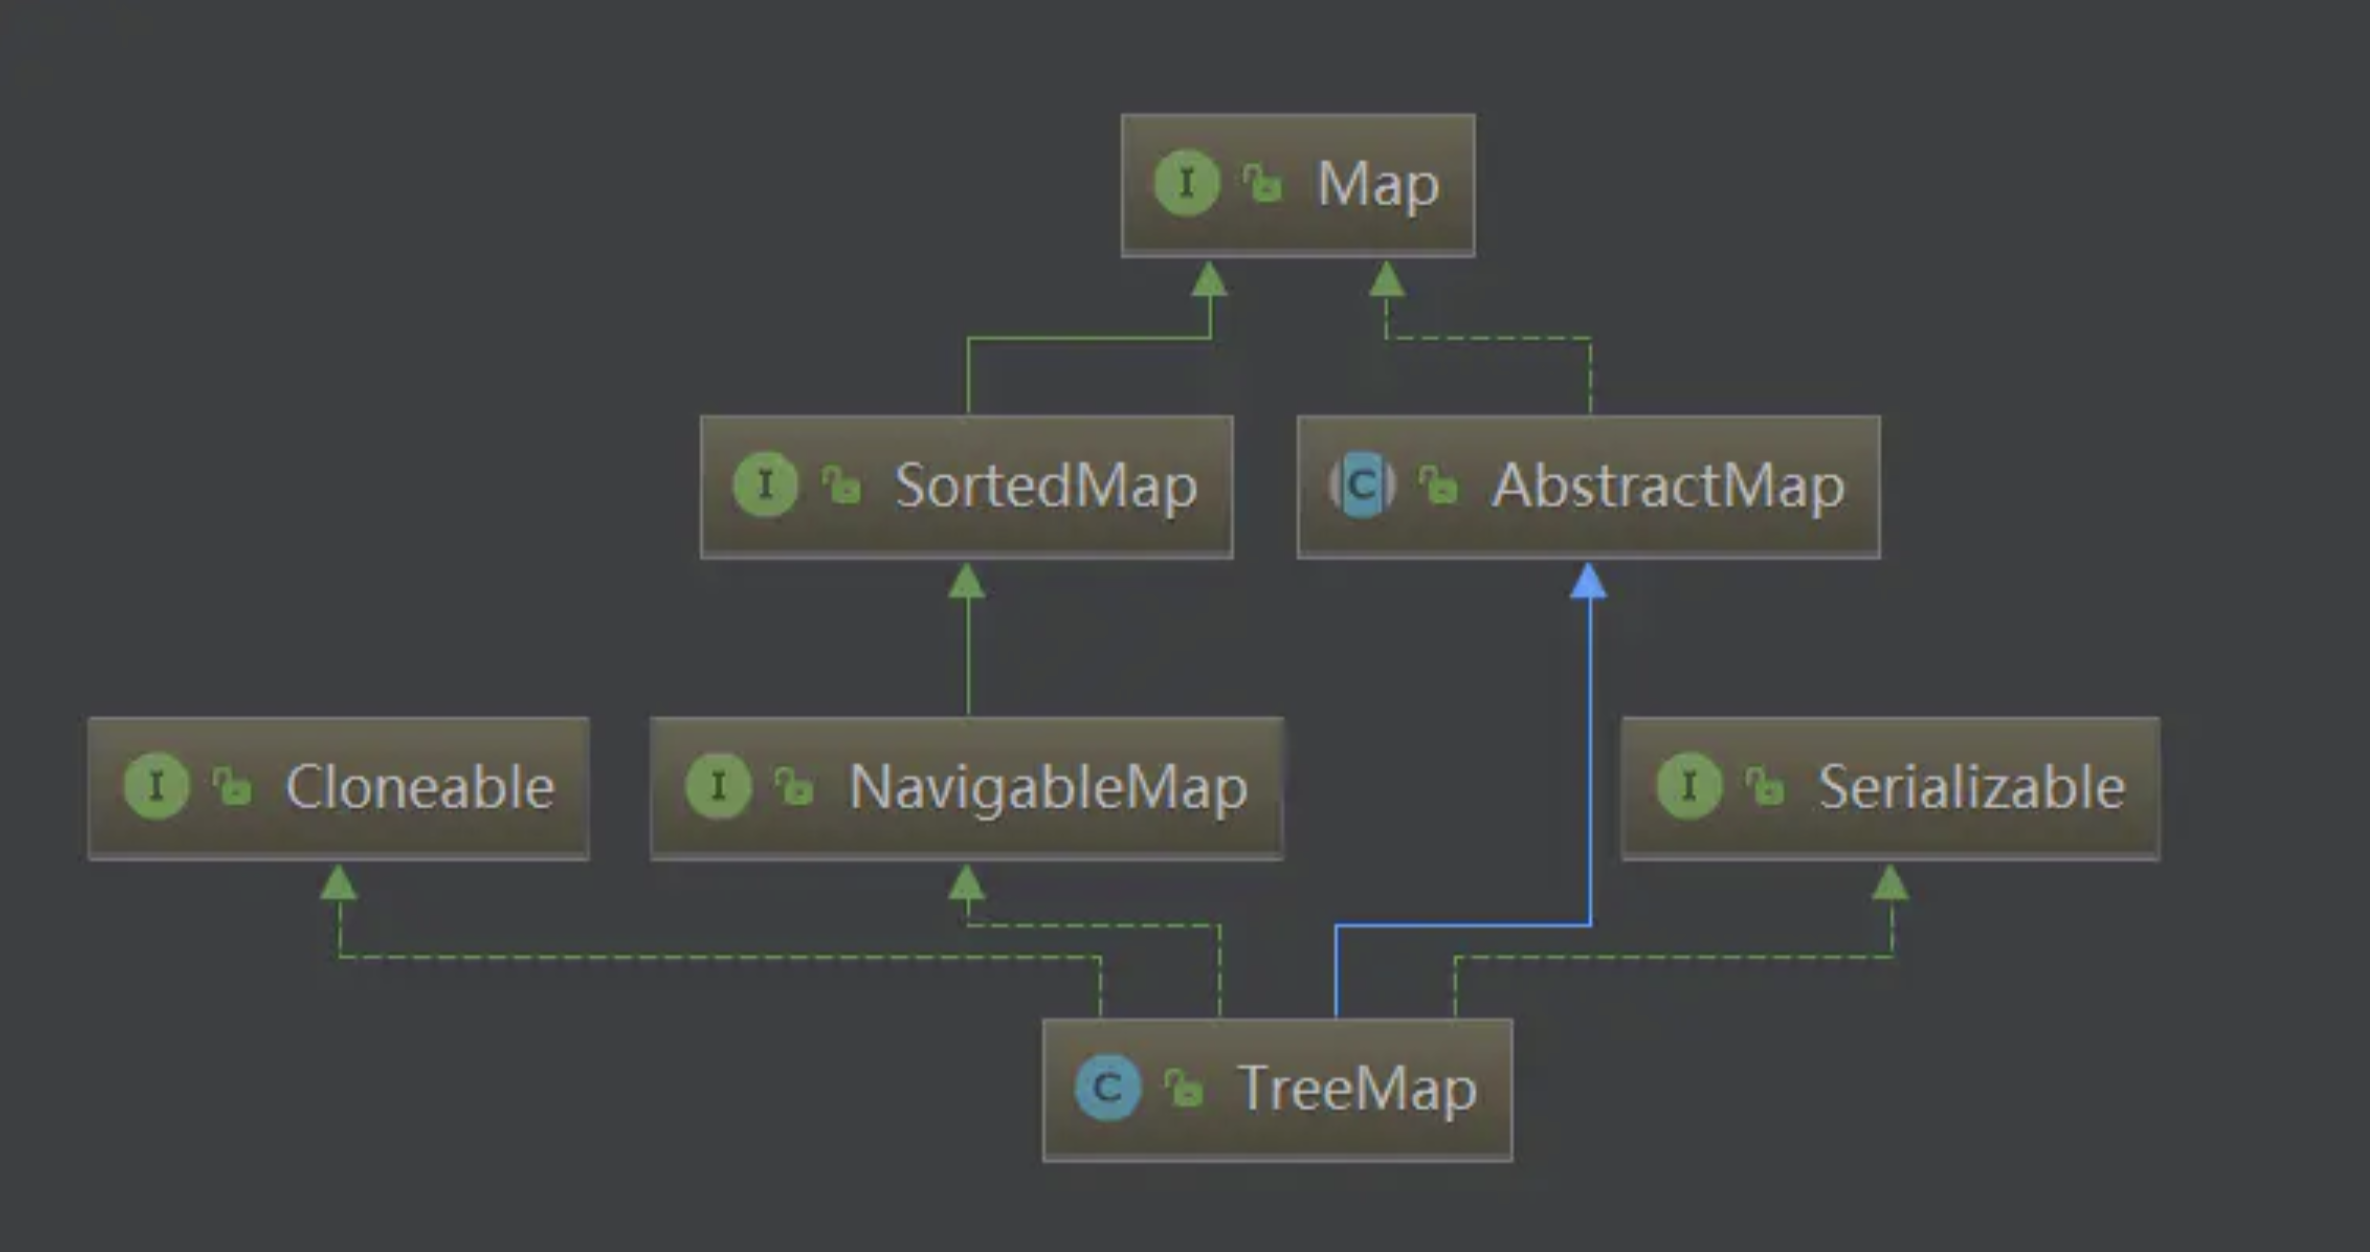
TreeMap TreeMap是红黑树 的java实现,对红黑树不太了解的可以查阅这篇文章红黑树 。红黑树 能保证增、删、查等基本操作的时间复杂度为**O(lgN)**。本文将对TreeMap的源码进行分析。
TreeMap结构图
Entry定义 1 2 3 4 5 6 7 8 9 10 11 12 13 14 15 static final class Entry <K ,V > implements Map .Entry <K ,V > K key; V value; Entry<K,V> left; Entry<K,V> right; Entry<K,V> parent; boolean color = BLACK; Entry(K key, V value, Entry<K,V> parent) { this .key = key; this .value = value; this .parent = parent; } }
构造函数与成员变量 成员变量 1 2 3 4 5 6 7 8 private final Comparator<? super K> comparator;private transient Entry<K,V> root;private transient int size = 0 ;
构造函数 1 2 3 4 5 6 7 8 9 10 11 12 13 14 15 16 17 18 19 20 21 22 23 24 25 public TreeMap () comparator = null ; } public TreeMap (Comparator<? super K> comparator) this .comparator = comparator; } public TreeMap (Map<? extends K, ? extends V> m) comparator = null ; putAll(m); } public TreeMap (SortedMap<K, ? extends V> m) comparator = m.comparator(); try { buildFromSorted(m.size(), m.entrySet().iterator(), null , null ); } catch (java.io.IOException cannotHappen) { } catch (ClassNotFoundException cannotHappen) { } }
这里用到的putAll和buildFromSorted方法,在分析完增删查等重要方法之后再进行分析。
重要方法 增加一个元素 红黑树最复杂的地方就在于增删了,我们就从增加一个元素开始分析:
1 2 3 4 5 6 7 8 9 10 11 12 13 14 15 16 17 18 19 20 21 22 23 24 25 26 27 28 29 30 31 32 33 34 35 36 37 38 39 40 41 42 43 44 45 46 47 48 49 50 51 52 53 54 55 56 57 58 59 60 61 62 63 64 65 66 67 68 69 public V put (K key, V value) Entry<K,V> t = root; if (t == null ) { compare(key, key); root = new Entry<>(key, value, null ); size = 1 ; modCount++; return null ; } int cmp; Entry<K,V> parent; Comparator<? super K> cpr = comparator; if (cpr != null ) { do { parent = t; cmp = cpr.compare(key, t.key); if (cmp < 0 ) t = t.left; else if (cmp > 0 ) t = t.right; else return t.setValue(value); } while (t != null ); } else { if (key == null ) throw new NullPointerException(); @SuppressWarnings("unchecked") Comparable<? super K> k = (Comparable<? super K>) key; do { parent = t; cmp = k.compareTo(t.key); if (cmp < 0 ) t = t.left; else if (cmp > 0 ) t = t.right; else return t.setValue(value); } while (t != null ); } Entry<K,V> e = new Entry<>(key, value, parent); if (cmp < 0 ) parent.left = e; else parent.right = e; fixAfterInsertion(e); size++; modCount++; return null ; }
fixAfterInsertion是实现的重难点,我们主要java是如何实现的,在这篇文章红黑树 中有详细的解释
1 2 3 4 5 6 7 8 9 10 11 12 13 14 15 16 17 18 19 20 21 22 23 24 25 26 27 28 29 30 31 32 33 34 35 36 37 38 39 40 41 42 43 44 45 46 47 48 49 50 51 52 53 54 55 56 57 58 private void fixAfterInsertion (Entry<K,V> x) x.color = RED; while (x != null && x != root && x.parent.color == RED) { if (parentOf(x) == leftOf(parentOf(parentOf(x)))) { Entry<K,V> y = rightOf(parentOf(parentOf(x))); if (colorOf(y) == RED) { setColor(parentOf(x), BLACK); setColor(y, BLACK); setColor(parentOf(parentOf(x)), RED); x = parentOf(parentOf(x)); } else { if (x == rightOf(parentOf(x))) { x = parentOf(x); rotateLeft(x); } setColor(parentOf(x), BLACK); setColor(parentOf(parentOf(x)), RED); rotateRight(parentOf(parentOf(x))); } } else { Entry<K,V> y = leftOf(parentOf(parentOf(x))); if (colorOf(y) == RED) { setColor(parentOf(x), BLACK); setColor(y, BLACK); setColor(parentOf(parentOf(x)), RED); x = parentOf(parentOf(x)); } else { if (x == leftOf(parentOf(x))) { x = parentOf(x); rotateRight(x); } setColor(parentOf(x), BLACK); setColor(parentOf(parentOf(x)), RED); rotateLeft(parentOf(parentOf(x))); } } } root.color = BLACK; }
左旋和右旋代码如下:
1 2 3 4 5 6 7 8 9 10 11 12 13 14 15 16 17 18 19 20 21 22 23 24 25 26 27 28 29 30 private void rotateLeft (Entry<K,V> p) if (p != null ) { Entry<K,V> r = p.right; p.right = r.left; if (r.left != null ) r.left.parent = p; r.parent = p.parent; if (p.parent == null ) root = r; else if (p.parent.left == p) p.parent.left = r; else p.parent.right = r; r.left = p; p.parent = r; } } private void rotateRight (Entry<K,V> p) }
获取元素 TreeMap中的元素是有序的,当使用中序遍历时就可以得到一个有序的Set集合,所以获取元素可以采用二分法:
1 2 3 4 5 6 7 8 9 10 11 12 13 14 15 16 17 18 19 20 final Entry<K,V> getEntry (Object key) if (comparator != null ) return getEntryUsingComparator(key); if (key == null ) throw new NullPointerException(); @SuppressWarnings("unchecked") Comparable<? super K> k = (Comparable<? super K>) key; Entry<K,V> p = root; while (p != null ) { int cmp = k.compareTo(p.key); if (cmp < 0 ) p = p.left; else if (cmp > 0 ) p = p.right; else return p; } return null ; }
除了获取某个元素外,还可以获取它的前一个元素与后一个元素:
1 2 3 4 5 6 7 8 9 10 11 12 13 14 15 16 17 18 19 20 21 22 23 24 25 26 27 28 static <K,V> Entry<K,V> predecessor (Entry<K,V> t) { if (t == null ) return null ; else if (t.left != null ) { Entry<K,V> p = t.left; while (p.right != null ) p = p.right; return p; } else { Entry<K,V> p = t.parent; Entry<K,V> ch = t; while (p != null && ch == p.left) { ch = p; p = p.parent; } return p; } } static <K,V> TreeMap.Entry<K,V> successor (Entry<K,V> t) { }
删除一个元素 从红黑树中删除一个元素,比增加一个元素还要复杂。我们看看java的实现:
1 2 3 4 5 6 7 8 9 10 public V remove (Object key) Entry<K,V> p = getEntry(key); if (p == null ) return null ; V oldValue = p.value; deleteEntry(p); return oldValue; }
1 2 3 4 5 6 7 8 9 10 11 12 13 14 15 16 17 18 19 20 21 22 23 24 25 26 27 28 29 30 31 32 33 34 35 36 37 38 39 40 41 42 43 44 45 46 47 48 49 50 51 52 53 54 55 56 57 58 59 private void deleteEntry (Entry<K,V> p) modCount++; size--; if (p.left != null && p.right != null ) { Entry<K,V> s = successor(p); p.key = s.key; p.value = s.value; p = s; } Entry<K,V> replacement = (p.left != null ? p.left : p.right); if (replacement != null ) { replacement.parent = p.parent; if (p.parent == null ) root = replacement; else if (p == p.parent.left) p.parent.left = replacement; else p.parent.right = replacement; p.left = p.right = p.parent = null ; if (p.color == BLACK) fixAfterDeletion(replacement); } else if (p.parent == null ) { root = null ; } else { if (p.color == BLACK) fixAfterDeletion(p); if (p.parent != null ) { if (p == p.parent.left) p.parent.left = null ; else if (p == p.parent.right) p.parent.right = null ; p.parent = null ; } } }
修正的方法如下所示:
1 2 3 4 5 6 7 8 9 10 11 12 13 14 15 16 17 18 19 20 21 22 23 24 25 26 27 28 29 30 31 32 33 34 35 36 37 38 39 40 41 42 43 44 45 46 47 48 49 50 51 52 53 54 55 56 57 58 59 60 61 62 63 64 65 66 private void fixAfterDeletion (Entry<K,V> x) while (x != root && colorOf(x) == BLACK) { if (x == leftOf(parentOf(x))) { Entry<K,V> sib = rightOf(parentOf(x)); if (colorOf(sib) == RED) { setColor(sib, BLACK); setColor(parentOf(x), RED); rotateLeft(parentOf(x)); sib = rightOf(parentOf(x)); } if (colorOf(leftOf(sib)) == BLACK && colorOf(rightOf(sib)) == BLACK) { setColor(sib, RED); x = parentOf(x); } else { if (colorOf(rightOf(sib)) == BLACK) { setColor(leftOf(sib), BLACK); setColor(sib, RED); rotateRight(sib); sib = rightOf(parentOf(x)); } setColor(sib, colorOf(parentOf(x))); setColor(parentOf(x), BLACK); setColor(rightOf(sib), BLACK); rotateLeft(parentOf(x)); x = root; } } else { Entry<K,V> sib = leftOf(parentOf(x)); if (colorOf(sib) == RED) { setColor(sib, BLACK); setColor(parentOf(x), RED); rotateRight(parentOf(x)); sib = leftOf(parentOf(x)); } if (colorOf(rightOf(sib)) == BLACK && colorOf(leftOf(sib)) == BLACK) { setColor(sib, RED); x = parentOf(x); } else { if (colorOf(leftOf(sib)) == BLACK) { setColor(rightOf(sib), BLACK); setColor(sib, RED); rotateLeft(sib); sib = leftOf(parentOf(x)); } setColor(sib, colorOf(parentOf(x))); setColor(parentOf(x), BLACK); setColor(leftOf(sib), BLACK); rotateRight(parentOf(x)); x = root; } } } setColor(x, BLACK); }
删除元素的过程相对简单些,在分析红黑树的文章里已经做了示例,这里就不再画图展示了。
遗留问题 在前面分析构造函数时,有两个函数putAll和buildFromSorted当时忽略了,现在我们来看看它们的实现。
1 2 3 4 5 6 7 8 9 10 11 public void putAll (Map<? extends K, ? extends V> map) int mapSize = map.size(); if (size==0 && mapSize!=0 && map instanceof SortedMap) { buildFromSorted(mapSize, map.entrySet().iterator(), null , null ); return ; } super .putAll(map); }
putAll当Map是一个SortedMap实例时,依赖于buildFromSorted,其他情况则是由AbstractMap实现的。所以这里重点看下buildFromSorted的实现。
buildFromSorted有两个,一个是供putAll等调用的,另外一个则是具体的实现。
1 2 3 4 5 6 7 8 9 private void buildFromSorted (int size, Iterator<?> it, java.io.ObjectInputStream str, V defaultVal) throws java.io.IOException, ClassNotFoundException { this .size = size; root = buildFromSorted(0 , 0 , size - 1 , computeRedLevel(size), it, str, defaultVal); }
这里调用了一个computeRedLevel的方法,是这里的关键。
1 2 3 4 5 6 7 private static int computeRedLevel (int sz) int level = 0 ; for (int m = sz - 1 ; m >= 0 ; m = m / 2 - 1 ) level++; return level; }
这个方法和染色为红色有关,其实现和二分法看似有一定联系,其文档说明它是:
Find the level down to which to assign all nodes BLACK. This is the last ‘full’ level of the complete binary tree produced by buildTree. The remaining nodes are colored RED. (This makes a `nice’ set of color assignments wrt future insertions.) This level number is computed by finding the number of splits needed to reach the zeroeth node. (The answer is ~lg(N), but in any case must be computed by same quick O(lg(N)) loop.)
大概意思是讲通过这种方式可以构建一个优秀的红黑树,能够为以后插入更多数据提供便利。
最后我们看下buildFromSorted的实现:
1 2 3 4 5 6 7 8 9 10 11 12 13 14 15 16 17 18 19 20 21 22 23 24 25 26 27 28 29 30 31 32 33 34 35 36 37 38 39 40 41 42 43 44 45 46 47 48 49 50 51 52 53 54 55 56 57 58 private final Entry<K,V> buildFromSorted (int level, int lo, int hi, int redLevel, Iterator<?> it, java.io.ObjectInputStream str, V defaultVal) throws java.io.IOException, ClassNotFoundException { if (hi < lo) return null ; int mid = (lo + hi) >>> 1 ; Entry<K,V> left = null ; if (lo < mid) left = buildFromSorted(level+1 , lo, mid - 1 , redLevel, it, str, defaultVal); K key; V value; if (it != null ) { if (defaultVal==null ) { Map.Entry<?,?> entry = (Map.Entry<?,?>)it.next(); key = (K)entry.getKey(); value = (V)entry.getValue(); } else { key = (K)it.next(); value = defaultVal; } } else { key = (K) str.readObject(); value = (defaultVal != null ? defaultVal : (V) str.readObject()); } Entry<K,V> middle = new Entry<>(key, value, null ); if (level == redLevel) middle.color = RED; if (left != null ) { middle.left = left; left.parent = middle; } if (mid < hi) { Entry<K,V> right = buildFromSorted(level+1 , mid+1 , hi, redLevel, it, str, defaultVal); middle.right = right; right.parent = middle; } return middle; }
HashMap HashMap可能是我们使用最多的键值对型的集合类了,它的底层基于哈希表,采用数组存储数据,使用链表来解决哈希碰撞。在JDK1.8中还引入了红黑树来解决链表长度过长导致的查询速度下降问题。以下是文档对它的介绍中我们重点关注的部分:
Hash table based implementation of the Map interface. This implementation provides all of the optional map operations, and permits *null* values and the *null* key. (The HashMap class is roughly equivalent to Hashtable , except that it is unsynchronized and permits nulls.) This class makes no guarantees as to the order of the map; in particular, it does not guarantee that the order will remain constant over time.
An instance of HashMap has two parameters that affect its performance: *initial capacity* and *load factor* . The *capacity* is the number of buckets in the hash table, and the initial capacity is simply the capacity at the time the hash table is created. The *load factor* is a measure of how full the hash table is allowed to get before its capacity is automatically increased.
As a general rule, the default load factor (.75) offers a good tradeoff between time and space costs.
Because TreeNodes are about twice the size of regular nodes, we use them only when bins contain enough nodes to warrant use. And when they become too small (due to removal or resizing) they are converted back to plain bins. In usages with well-distributed user hashCodes, tree bins are rarely used.
HashMap的结构如下所示:
构造函数与成员变量 在看构造函数和成员变量前,我们要先看下其数据单元,因为HashMap有普通的元素,还有红黑树的元素,所以其数据单元定义有两个:
1 2 3 4 5 6 7 8 9 10 11 12 13 14 15 16 17 18 19 20 21 22 23 24 25 26 27 static class Node <K ,V > implements Map .Entry <K ,V > final int hash; final K key; V value; Node<K,V> next; } static final class TreeNode <K ,V > extends LinkedHashMap .Entry <K ,V > TreeNode<K,V> parent; TreeNode<K,V> left; TreeNode<K,V> right; TreeNode<K,V> prev; boolean red; } static class Entry <K ,V > extends HashMap .Node <K ,V > Entry<K,V> before, after; Entry(int hash, K key, V value, Node<K,V> next) { super (hash, key, value, next); } }
TreeNode定义了一些相关操作的方法,我们会在使用时进行分析。
成员变量 1 2 3 4 5 6 7 8 9 10 11 12 13 14 15 16 17 18 19 20 21 22 23 24 25 26 27 28 29 static final int DEFAULT_INITIAL_CAPACITY = 1 << 4 ;static final int MAXIMUM_CAPACITY = 1 << 30 ;static final float DEFAULT_LOAD_FACTOR = 0.75f ;static final int TREEIFY_THRESHOLD = 8 ;static final int UNTREEIFY_THRESHOLD = 6 ;static final int MIN_TREEIFY_CAPACITY = 64 ;transient Node<K,V>[] table;transient Set<Map.Entry<K,V>> entrySet;int threshold;final float loadFactor;
构造函数 HashMap有多个构造函数,主要支持配置容量capacity和load factor,以及从其他Map集合获取初始化数据。
1 2 3 4 5 6 7 8 9 10 11 12 13 14 15 16 17 18 public HashMap (int initialCapacity, float loadFactor) this .loadFactor = loadFactor; this .threshold = tableSizeFor(initialCapacity); } public HashMap (int initialCapacity) this (initialCapacity, DEFAULT_LOAD_FACTOR); } public HashMap () this .loadFactor = DEFAULT_LOAD_FACTOR; } public HashMap (Map<? extends K, ? extends V> m) this .loadFactor = DEFAULT_LOAD_FACTOR; putMapEntries(m, false ); }
这些构造函数都很简单,putMapEntries也是依次插入元素的,我们后续分析put方法时就能理解其操作了,这里我们还要看下tableSizeFor这个方法:
1 2 3 4 5 6 7 8 9 static final int tableSizeFor (int cap) int n = cap - 1 ; n |= n >>> 1 ; n |= n >>> 2 ; n |= n >>> 4 ; n |= n >>> 8 ; n |= n >>> 16 ; return (n < 0 ) ? 1 : (n >= MAXIMUM_CAPACITY) ? MAXIMUM_CAPACITY : n + 1 ; }
这里的方法和Deque中的一样
重要方法 无论是List还是Map,最重要的操作都是增删改查部分,我们还从增加一个元素开始分析。
增加一个元素 1 2 3 public V put (K key, V value) return putVal(hash(key), key, value, false , true ); }
这里我们先关注下hash函数,在HashMap中其实现如下:
1 2 3 4 static final int hash (Object key) int h; return (key == null ) ? 0 : (h = key.hashCode()) ^ (h >>> 16 ); }
这里用到的方法很简单,就是把key与其高16位异或。文档中有如下说明:
There is a tradeoff between speed, utility, and quality of bit-spreading.
因为没有完美的哈希算法可以彻底避免碰撞,所以只能尽可能减少碰撞,在各方面权衡之后得到一个折中方案,这里我们就不再追究了。
put方法的具体实现在putVal中,我们看下其实现:
1 2 3 4 5 6 7 8 9 10 11 12 13 14 15 16 17 18 19 20 21 22 23 24 25 26 27 28 29 30 31 32 33 34 35 36 37 38 39 40 41 42 43 44 45 46 47 48 49 50 51 52 53 54 55 56 57 58 59 60 61 62 63 64 final V putVal (int hash, K key, V value, boolean onlyIfAbsent, boolean evict) Node<K,V>[] tab; Node<K,V> p; int n, i; if ((tab = table) == null || (n = tab.length) == 0 ) n = (tab = resize()).length; if ((p = tab[i = (n - 1 ) & hash]) == null ) tab[i] = newNode(hash, key, value, null ); else { Node<K,V> e; K k; if (p.hash == hash && ((k = p.key) == key || (key != null && key.equals(k)))) e = p; else if (p instanceof TreeNode) e = ((TreeNode<K,V>)p).putTreeVal(this , tab, hash, key, value); else { for (int binCount = 0 ; ; ++binCount) { if ((e = p.next) == null ) { p.next = newNode(hash, key, value, null ); if (binCount >= TREEIFY_THRESHOLD - 1 ) treeifyBin(tab, hash); break ; } if (e.hash == hash && ((k = e.key) == key || (key != null && key.equals(k)))) break ; p = e; } } if (e != null ) { V oldValue = e.value; if (!onlyIfAbsent || oldValue == null ) e.value = value; afterNodeAccess(e); return oldValue; } } ++modCount; if (++size > threshold) resize(); afterNodeInsertion(evict); return null ; }
以上方法和我们开头看到的文档描述一致,在插入时可能会从链表变成红黑树。里面用到了TreeNode.putTreeVal方法向红黑树中插入元素,关于TreeNode的方法我们最后分析。除此之外,还有一个树化的方法是treeifyBin,我们现在看下其原理:
1 2 3 4 5 6 7 8 9 10 11 12 13 14 15 16 17 18 19 20 21 22 23 24 25 26 27 28 final void treeifyBin (Node<K,V>[] tab, int hash) int n, index; Node<K,V> e; if (tab == null || (n = tab.length) < MIN_TREEIFY_CAPACITY) resize(); else if ((e = tab[index = (n - 1 ) & hash]) != null ) { TreeNode<K,V> hd = null , tl = null ; do { TreeNode<K,V> p = replacementTreeNode(e, null ); if (tl == null ) hd = p; else { p.prev = tl; tl.next = p; } tl = p; } while ((e = e.next) != null ); if ((tab[index] = hd) != null ) hd.treeify(tab); } }
无论是在put还是treeify时,都依赖于resize,它的重要性不言而喻。它不仅可以调整大小,还能调整树化和反树化(从树变为链表)所带来的影响。我们看看它具体做了哪些工作:
1 2 3 4 5 6 7 8 9 10 11 12 13 14 15 16 17 18 19 20 21 22 23 24 25 26 27 28 29 30 31 32 33 34 35 36 37 38 39 40 41 42 43 44 45 46 47 48 49 50 51 52 53 54 55 56 57 58 59 60 61 62 63 64 65 66 67 68 69 70 71 72 73 74 75 76 77 78 79 80 81 82 83 84 85 86 87 88 final Node<K,V>[] resize() { Node<K,V>[] oldTab = table; int oldCap = (oldTab == null ) ? 0 : oldTab.length; int oldThr = threshold; int newCap, newThr = 0 ; if (oldCap > 0 ) { if (oldCap >= MAXIMUM_CAPACITY) { threshold = Integer.MAX_VALUE; return oldTab; } else if ((newCap = oldCap << 1 ) < MAXIMUM_CAPACITY && oldCap >= DEFAULT_INITIAL_CAPACITY) newThr = oldThr << 1 ; } else if (oldThr > 0 ) newCap = oldThr; else { newCap = DEFAULT_INITIAL_CAPACITY; newThr = (int )(DEFAULT_LOAD_FACTOR * DEFAULT_INITIAL_CAPACITY); } if (newThr == 0 ) { float ft = (float )newCap * loadFactor; newThr = (newCap < MAXIMUM_CAPACITY && ft < (float )MAXIMUM_CAPACITY ? (int )ft : Integer.MAX_VALUE); } threshold = newThr; @SuppressWarnings({"rawtypes","unchecked"}) Node<K,V>[] newTab = (Node<K,V>[])new Node[newCap]; table = newTab; if (oldTab != null ) { for (int j = 0 ; j < oldCap; ++j) { Node<K,V> e; if ((e = oldTab[j]) != null ) { oldTab[j] = null ; if (e.next == null ) newTab[e.hash & (newCap - 1 )] = e; else if (e instanceof TreeNode) ((TreeNode<K,V>)e).split(this , newTab, j, oldCap); else { Node<K,V> loHead = null , loTail = null ; Node<K,V> hiHead = null , hiTail = null ; Node<K,V> next; do { next = e.next; if ((e.hash & oldCap) == 0 ) { if (loTail == null ) loHead = e; else loTail.next = e; loTail = e; } else { if (hiTail == null ) hiHead = e; else hiTail.next = e; hiTail = e; } } while ((e = next) != null ); if (loTail != null ) { loTail.next = null ; newTab[j] = loHead; } if (hiTail != null ) { hiTail.next = null ; newTab[j + oldCap] = hiHead; } } } } } return newTab; }
删除一个元素 1 2 3 4 5 public V remove (Object key) Node<K,V> e; return (e = removeNode(hash(key), key, null , false , true )) == null ? null : e.value; }
和插入一样,其实际的操作在removeNode方法中完成,我们看下其实现:
1 2 3 4 5 6 7 8 9 10 11 12 13 14 15 16 17 18 19 20 21 22 23 24 25 26 27 28 29 30 31 32 33 34 35 36 37 38 39 40 41 42 43 44 45 46 47 final Node<K,V> removeNode (int hash, Object key, Object value, boolean matchValue, boolean movable) Node<K,V>[] tab; Node<K,V> p; int n, index; if ((tab = table) != null && (n = tab.length) > 0 && (p = tab[index = (n - 1 ) & hash]) != null ) { Node<K,V> node = null , e; K k; V v; if (p.hash == hash && ((k = p.key) == key || (key != null && key.equals(k)))) node = p; else if ((e = p.next) != null ) { if (p instanceof TreeNode) node = ((TreeNode<K,V>)p).getTreeNode(hash, key); else { do { if (e.hash == hash && ((k = e.key) == key || (key != null && key.equals(k)))) { node = e; break ; } p = e; } while ((e = e.next) != null ); } } if (node != null && (!matchValue || (v = node.value) == value || (value != null && value.equals(v)))) { if (node instanceof TreeNode) ((TreeNode<K,V>)node).removeTreeNode(this , tab, movable); else if (node == p) tab[index] = node.next; else p.next = node.next; ++modCount; --size; afterNodeRemoval(node); return node; } } return null ; }
获取一个元素 除了增删之外,重要的就是查询操作了。查询的get方法也是通过调用getNode方法完成的,我们看下其实现:
1 2 3 4 5 6 7 8 9 10 11 12 13 14 15 16 17 18 19 final Node<K,V> getNode (int hash, Object key) Node<K,V>[] tab; Node<K,V> first, e; int n; K k; if ((tab = table) != null && (n = tab.length) > 0 && (first = tab[(n - 1 ) & hash]) != null ) { if (first.hash == hash && ((k = first.key) == key || (key != null && key.equals(k)))) return first; if ((e = first.next) != null ) { if (first instanceof TreeNode) return ((TreeNode<K,V>)first).getTreeNode(hash, key); do { if (e.hash == hash && ((k = e.key) == key || (key != null && key.equals(k)))) return e; } while ((e = e.next) != null ); } } return null ; }
这里逻辑和我们分析的增删很类似,再读起来就很简单了。
TreeNode方法介绍 在前面分析增删时,可以发现与红黑树相关的操作都是通过TreeNode来实现的,下面我们就来看看TreeNode的具体实现:
TreeNode算上其继承来的成员变量,共有11个:
1 2 3 4 5 6 7 8 9 10 final int hash;final K key;V value; Node<K,V> next; Entry<K,V> before, after; TreeNode<K,V> parent; TreeNode<K,V> left; TreeNode<K,V> right; TreeNode<K,V> prev; boolean red;
这么多的变量,说明其功能十分强大。这主要是因为它需要在树和链表之间来回转换。下面按照本文中出现的方法顺序对其函数进行分析。
首先是在添加元素时使用到了TreeNode.putTreeVal:
1 2 3 4 5 6 7 8 9 10 11 12 13 14 15 16 17 18 19 20 21 22 23 24 25 26 27 28 29 30 31 32 33 34 35 36 37 38 39 40 41 42 43 44 45 46 47 48 49 50 51 52 53 54 55 56 57 58 59 60 61 62 63 64 65 66 67 68 final TreeNode<K,V> putTreeVal (HashMap<K,V> map, Node<K,V>[] tab, int h, K k, V v) Class<?> kc = null ; boolean searched = false ; TreeNode<K,V> root = (parent != null ) ? root() : this ; for (TreeNode<K,V> p = root;;) { int dir, ph; K pk; if ((ph = p.hash) > h) dir = -1 ; else if (ph < h) dir = 1 ; else if ((pk = p.key) == k || (k != null && k.equals(pk))) return p; else if ((kc == null && (kc = comparableClassFor(k)) == null ) || (dir = compareComparables(kc, k, pk)) == 0 ) { if (!searched) { TreeNode<K,V> q, ch; searched = true ; if (((ch = p.left) != null && (q = ch.find(h, k, kc)) != null ) || ((ch = p.right) != null && (q = ch.find(h, k, kc)) != null )) return q; } dir = tieBreakOrder(k, pk); } TreeNode<K,V> xp = p; if ((p = (dir <= 0 ) ? p.left : p.right) == null ) { Node<K,V> xpn = xp.next; TreeNode<K,V> x = map.newTreeNode(h, k, v, xpn); if (dir <= 0 ) xp.left = x; else xp.right = x; xp.next = x; x.parent = x.prev = xp; if (xpn != null ) ((TreeNode<K,V>)xpn).prev = x; moveRootToFront(tab, balanceInsertion(root, x)); return null ; } } }
除了putTreeVal之外,我们还调用过treeify以及removeTreeNode等方法。这些方法的过程都和putTreeVal类似,大家感兴趣可以自己去分析,这里就不再介绍了。
HashMap 到底有哪些线程安全问题 并发 put 可能导致元素的丢失 试验代码如下:(仅作为可能会产生这个问题的样例代码,直接运行不一定会产生问题)
1 2 3 4 5 6 7 8 9 10 11 12 13 14 15 16 17 18 19 20 21 22 23 24 25 public class ConcurrentIssueDemo1 private static Map<String, String> map = new HashMap<>(); public static void main (String[] args) new Thread(new Runnable() { @Override public void run () for (int i = 0 ; i < 99999999 ; i++) { map.put("thread1_key" + i, "thread1_value" + i); } } }).start(); new Thread(new Runnable() { @Override public void run () for (int i = 0 ; i < 99999999 ; i++) { map.put("thread2_key" + i, "thread2_value" + i); } } }).start(); } }
先回顾一下 put 方法。
1 2 3 4 5 6 7 8 9 10 11 12 13 14 15 16 17 18 19 20 21 22 23 24 25 26 27 28 29 30 31 32 33 34 35 36 37 38 39 40 41 42 43 44 45 46 47 48 49 50 public V put (K key, V value) return putVal(hash(key), key, value, false , true ); } final V putVal (int hash, K key, V value, boolean onlyIfAbsent, boolean evict) Node<K,V>[] tab; Node<K,V> p; int n, I; if ((tab = table) == null || (n = tab.length) == 0 ) n = (tab = resize()).length; if ((p = tab[i = (n - 1 ) & hash]) == null ) tab[i] = newNode(hash, key, value, null ); else { Node<K,V> e; K k; if (p.hash == hash && ((k = p.key) == key || (key != null && key.equals(k)))) e = p; else if (p instanceof TreeNode) e = ((TreeNode<K,V>)p).putTreeVal(this , tab, hash, key, value); else { for (int binCount = 0 ; ; ++binCount) { if ((e = p.next) == null ) { p.next = newNode(hash, key, value, null ); if (binCount >= TREEIFY_THRESHOLD - 1 ) treeifyBin(tab, hash); break ; } if (e.hash == hash && ((k = e.key) == key || (key != null && key.equals(k)))) break ; p = e; } } if (e != null ) { V oldValue = e.value; if (!onlyIfAbsent || oldValue == null ) e.value = value; afterNodeAccess(e); return oldValue; } } ++modCount; if (++size > threshold) resize(); afterNodeInsertion(evict); return null ; }
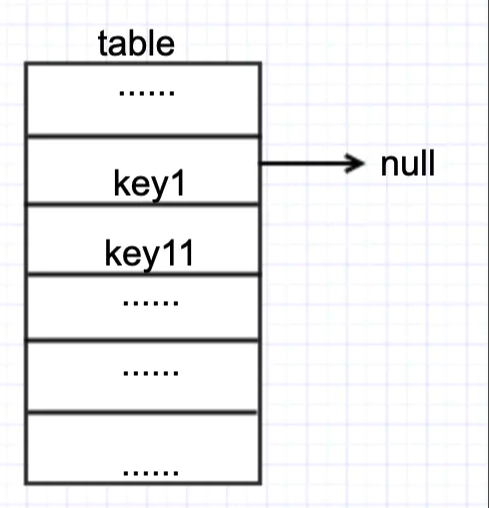
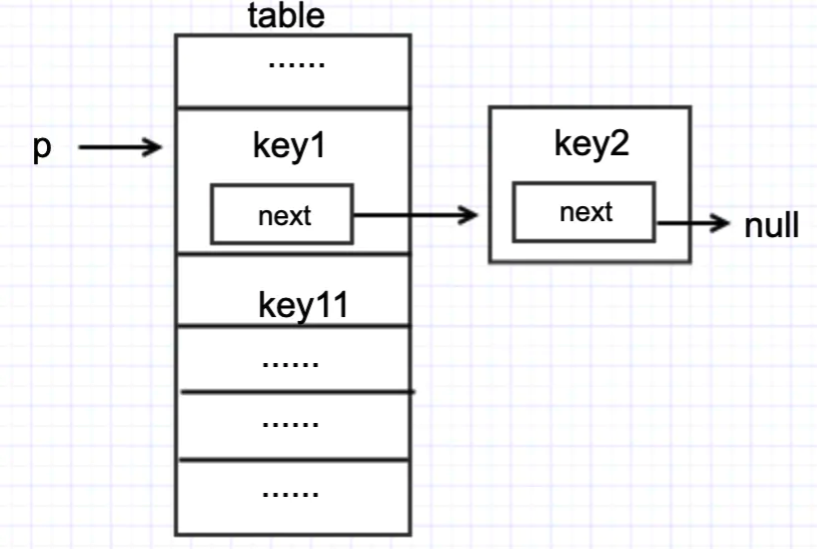
假设当前HashMap中的table状态如下:
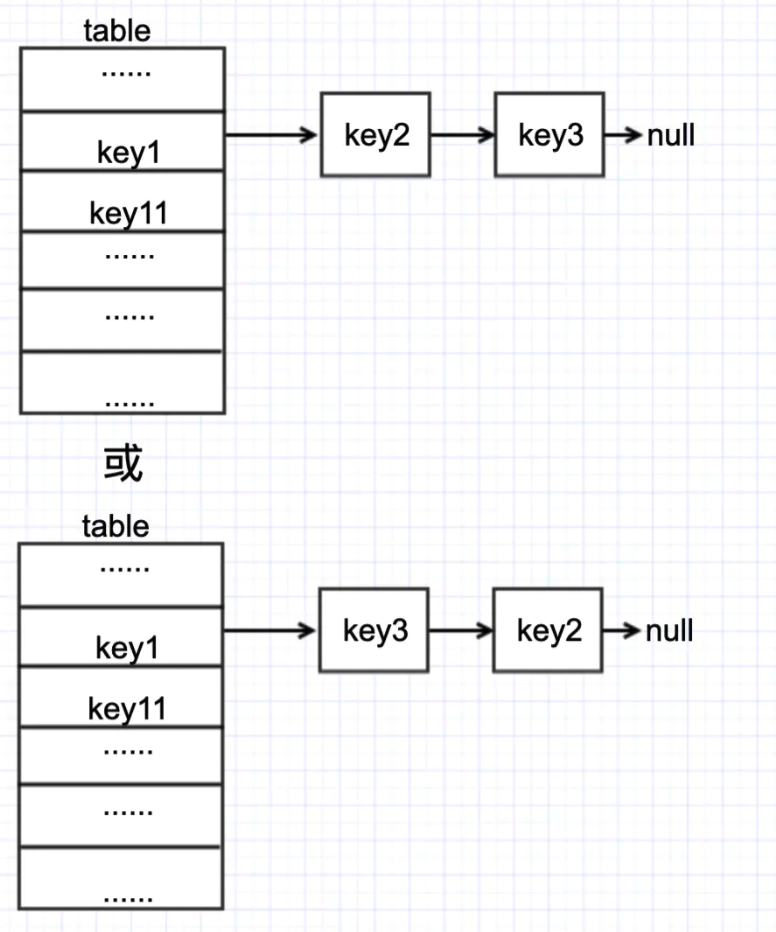
此时 t1 和 t2 同时执行 put,假设 t1 执行 put(“key2”, “value2”),t2 执行 put(“key3”, “value3”),并且 key2 和 key3 的 hash 值与图中的key1相同。
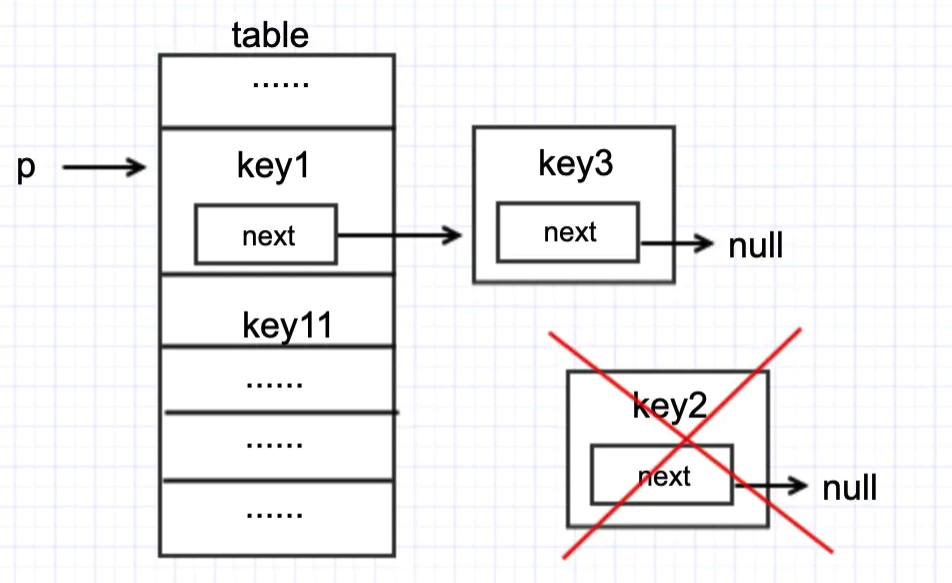
那么正常情况下,put 完成后,table 的状态应该是下图二者其一
下面来看看异常情况
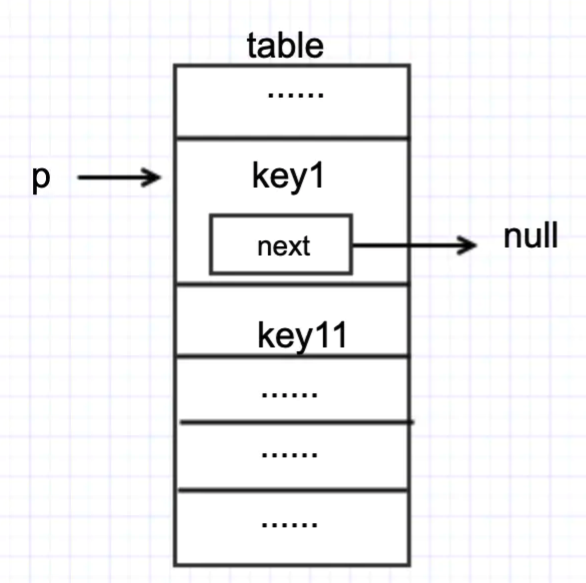
假设线程 1、线程 2 现在都执行到 put 源代码中 #1 的位置,且当前 table 状态如下
然后两个线程都执行了if ((e = p.next) == null)这句代码,来到了 #2 这行代码。此时假设 t1 先执行p.next = newNode(hash, key, value, null);那么 table 会变成如下状态
紧接着 t2 执行p.next = newNode(hash, key, value, null);
此时 table 会变成如下状态
这样一来,key2元素就丢了。
put 和 get 并发时,可能导致 get 为 null 场景:线程 1 执行 put 时,因为元素个数超出 threshold 而导致 rehash,线程 2 此时执行 get,有可能导致这个问题。
分析如下:
先看下 resize 方法源码:
1 2 3 4 5 6 7 8 9 10 11 12 13 14 15 16 17 18 19 20 21 22 23 24 25 26 27 28 29 30 31 32 33 34 35 36 37 38 39 40 41 42 43 44 45 46 47 48 49 50 51 52 53 54 55 56 57 58 59 60 61 62 63 64 65 66 67 68 69 70 71 72 73 74 75 76 77 78 79 80 81 transient Node<K,V>[] table;final Node<K,V>[] resize() { Node<K,V>[] oldTab = table; int oldCap = (oldTab == null ) ? 0 : oldTab.length; int oldThr = threshold; int newCap, newThr = 0 ; if (oldCap > 0 ) { if (oldCap >= MAXIMUM_CAPACITY) { threshold = Integer.MAX_VALUE; return oldTab; } else if ((newCap = oldCap << 1 ) < MAXIMUM_CAPACITY && oldCap >= DEFAULT_INITIAL_CAPACITY) newThr = oldThr << 1 ; } else if (oldThr > 0 ) newCap = oldThr; else { newCap = DEFAULT_INITIAL_CAPACITY; newThr = (int )(DEFAULT_LOAD_FACTOR * DEFAULT_INITIAL_CAPACITY); } if (newThr == 0 ) { float ft = (float )newCap * loadFactor; newThr = (newCap < MAXIMUM_CAPACITY && ft < (float )MAXIMUM_CAPACITY ? (int )ft : Integer.MAX_VALUE); } threshold = newThr; @SuppressWarnings({"rawtypes","unchecked”}) Node<K,V>[] newTab = (Node<K,V>[])new Node[newCap]; table = newTab; if (oldTab != null ) { for (int j = 0 ; j < oldCap; ++j) { Node<K,V> e; if ((e = oldTab[j]) != null ) { oldTab[j] = null ; if (e.next == null ) newTab[e.hash & (newCap - 1 )] = e; else if (e instanceof TreeNode) ((TreeNode<K,V>)e).split(this , newTab, j, oldCap); else { Node<K,V> loHead = null , loTail = null ; Node<K,V> hiHead = null , hiTail = null ; Node<K,V> next; do { next = e.next; if ((e.hash & oldCap) == 0 ) { if (loTail == null ) loHead = e; else loTail.next = e; loTail = e; } else { if (hiTail == null ) hiHead = e; else hiTail.next = e; hiTail = e; } } while ((e = next) != null ); if (loTail != null ) { loTail.next = null ; newTab[j] = loHead; } if (hiTail != null ) { hiTail.next = null ; newTab[j + oldCap] = hiHead; } } } } } return newTab; }
大致意思是,先计算新的容量和 threshold,在创建一个新 hash 表,最后将旧 hash 表中元素 rehash 到新的 hash 表中。
重点代码在于 #1 和 #2 两句:在代码 #1 位置,用新计算的容量 new 了一个新的 hash 表,#2 将新创建的空 hash 表赋值给实例变量 table。
注意此时实例变量 table 是空的。
那么,如果此时另一个线程执行 get 时,就会 get 出 null。
JDK7 中 HashMap 并发 put 会造成循环链表,导致 get 时出现死循环 此问题是由两个问题组成:循环链表和死循环
循环链表的形成:
1 2 3 4 5 6 7 8 9 10 11 12 13 14 15 16 17 18 19 20 21 22 23 24 25 26 27 28 29 30 31 32 33 34 35 36 37 38 void resize (int newCapacity) Entry[] oldTable = table; int oldCapacity = oldTable.length; if (oldCapacity == MAXIMUM_CAPACITY) { threshold = Integer.MAX_VALUE; return ; } Entry[] newTable = new Entry[newCapacity]; transfer(newTable, initHashSeedAsNeeded(newCapacity)); table = newTable; threshold = (int )Math.min(newCapacity * loadFactor, MAXIMUM_CAPACITY + 1 ); } void transfer (Entry[] newTable, boolean rehash) int newCapacity = newTable.length; for (Entry<K,V> e : table) { while (null != e) { Entry<K,V> next = e.next; if (rehash) { e.hash = null == e.key ? 0 : hash(e.key); } int i = indexFor(e.hash, newCapacity); e.next = newTable[I]; newTable[i] = e; e = next; } } }
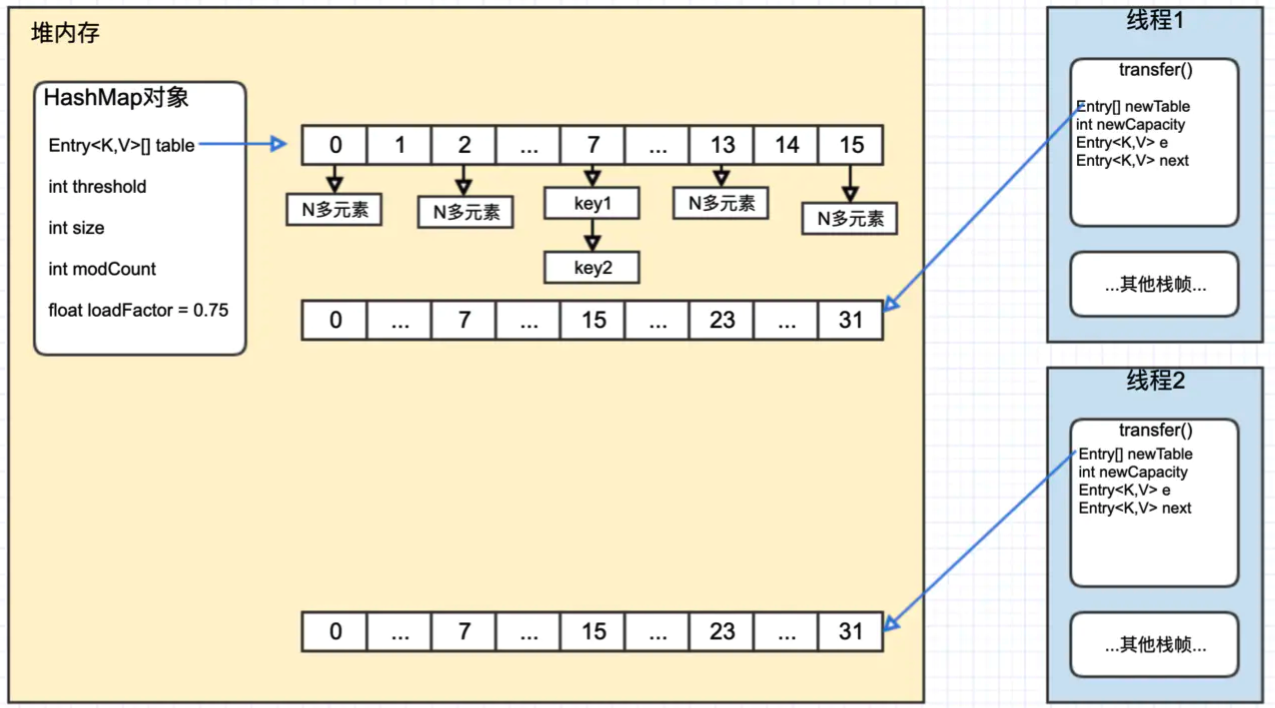
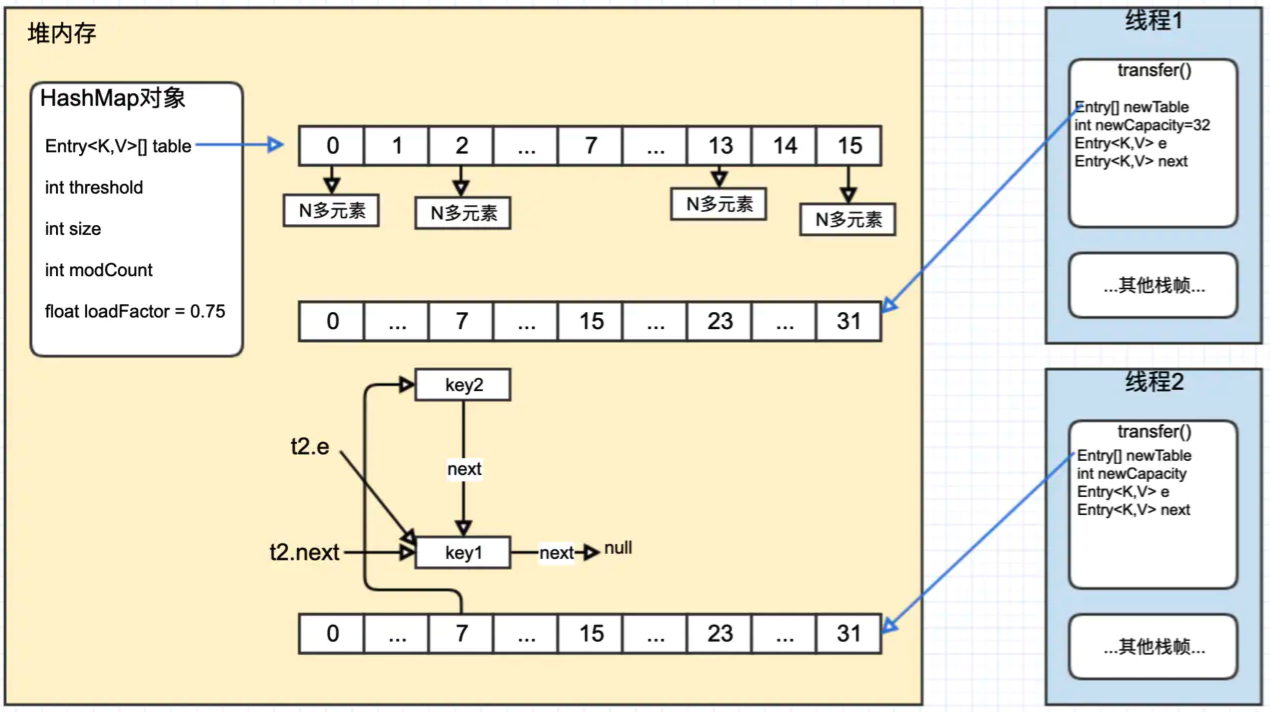
假设线程 1(t1) 和线程 2(t2) 同时 resize,两个线程 resize 前,两个线程及 hashmap 的状态如下:
堆内存中的 HashMap 对象中的 table 字段指向旧的 hash 表,其中 index 为 7 的位置有两个元素,我们以这两个元素的 rehash 为例,看看循环链表是如何形成的。
线程 1 和线程2分别 new 了一个 hash 表,用 newTable 字段表示。
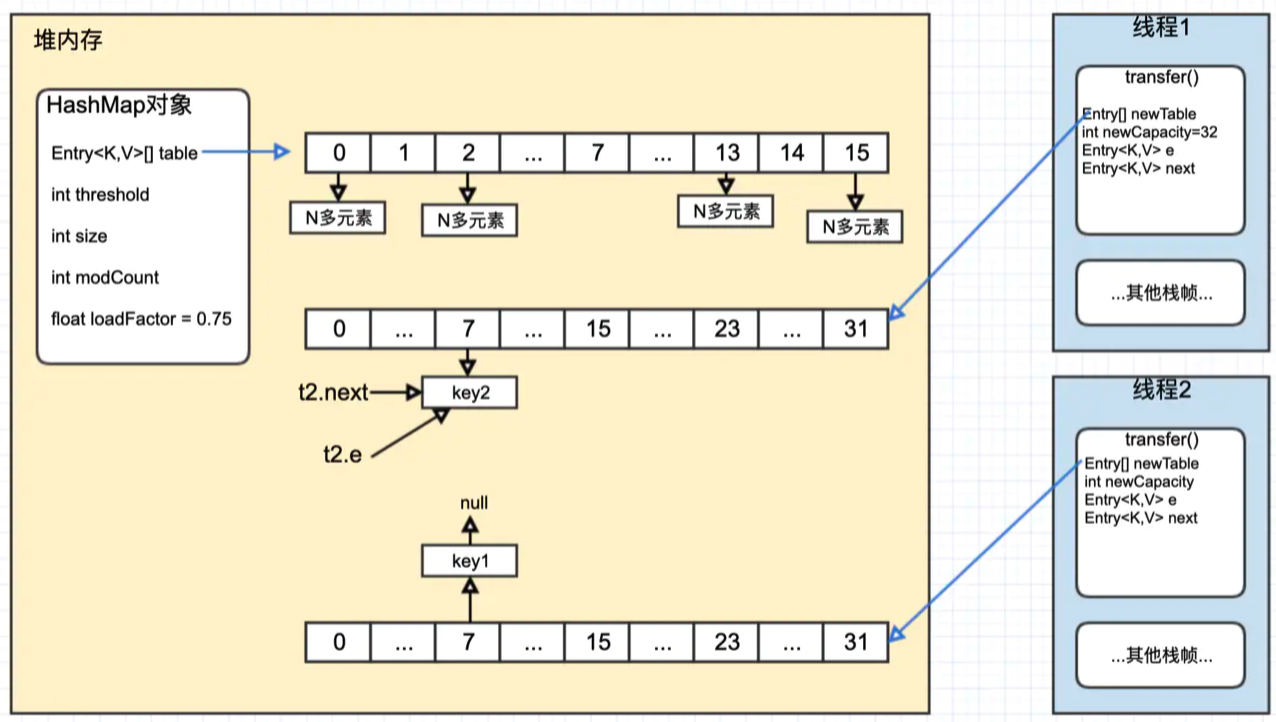
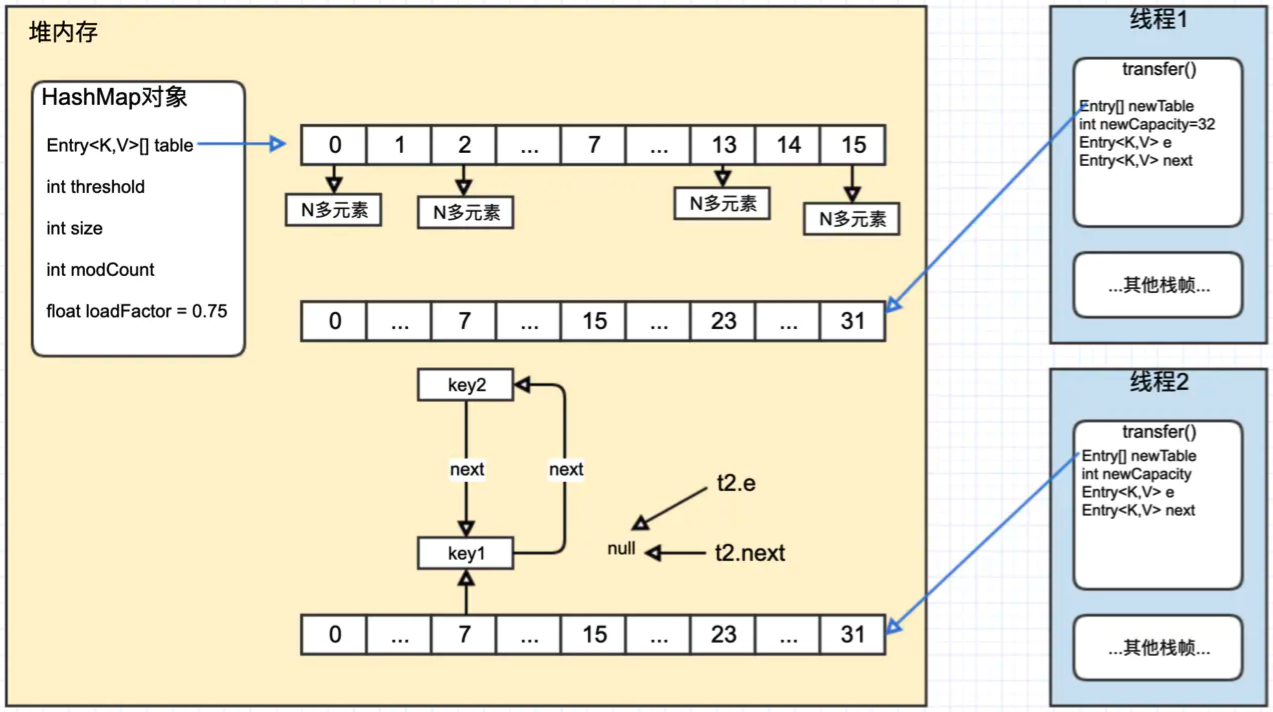
PS :如果将每一步的执行都以图的形式呈现出来,篇幅过大,这里提供一下每次循环结束时的状态,可以根据代码和每一步的解释一步一步推算。
Step1 : t2 执行完 #1 代码后,CPU 切走执行 t1,并且 t1 执行完成
这里可以根据上图推算一下,此时状态如下
用 t2.e 表示线程 2 中的局部变量 e,t2.nex t同理。
Step2 : t2 继续向下执行完本次循环
Step3 : t2 继续执行下一次循环
Step4 : t2 继续下一次循环,循环链表出现
死循环的出现:
HashMap.get 方法源码如下:
1 2 3 4 5 6 7 8 9 10 11 12 13 14 15 16 17 18 19 20 21 22 23 24 25 26 public V get (Object key) if (key == null ) return getForNullKey(); Entry<K,V> entry = getEntry(key); return null == entry ? null : entry.getValue(); } final Entry<K,V> getEntry (Object key) if (size == 0 ) { return null ; } int hash = (key == null ) ? 0 : hash(key); for (Entry<K,V> e = table[indexFor(hash, table.length)]; e != null ; e = e.next) { Object k; if (e.hash == hash && ((k = e.key) == key || (key != null && key.equals(k)))) return e; } return null ; }
由上图可知,for 循环中的 e = e.next 永远不会为空,那么,如果 get 一个在这个链表中不存在的 key 时,就会出现死循环了。
JDK1.7 和 JDK 1.8 的区别及常见问题
区别
JDK1.7
JDK1.8
说明
插入方法
头插法
尾插法
头插法逆序,且多线程容易出现循环死锁
扩容后位置计算方式
rehash
原位置|原位置+扩容大小
默认大小16,扩容 >> 1
数据结构
数组+链表
数组+链表+红黑树
树化阈值8,链化阈值6
为什么在JDK1.8中进行对HashMap优化的时候,把链表转化为红黑树的阈值是8
当hashCode离散性很好的时候,树型bin用到的概率非常小,因为数据均匀分布在每个bin中,几乎不会有bin中链表长度会达到阈值。但是在随机hashCode下,离散性可能会变差,然而JDK又不能阻止用户实现这种不好的hash算法,因此就可能导致不均匀的数据分布。不过理想情况下随机hashCode算法下所有bin中节点的分布频率会遵循泊松分布 ,我们可以看到,一个bin中链表长度达到8个元素的概率为0.00000006,几乎是不可能事件
总结 HashMap是目前分析的最复杂的集合类了。合理的使用它能够在增删改查等方面都有很好的表现。在使用时我们需要注意以下几点:
设计的key对象一定要实现hashCode方法,并尽可能保证均匀少重复。
由于树化过程会依次通过hash值、比较值和对象的hash值进行排序,所以key还可以实现Comparable,以方便树化时进行比较。
如果可以预先估计数量级,可以指定initial capacity,以减少rehash的过程。
虽然HashMap引入了红黑树,但它的使用是很少的,如果大量出现红黑树,说明数据本身设计的不合理,我们应该从数据源寻找优化方案。
LinkedHashMap LinkedHashMap是HashMap的子类,所以也具备HashMap的诸多特性。不同的是,LinkedHashMap还维护了一个双向链表,以保证通过Iterator遍历时顺序与插入顺序一致。除此之外,它还支持Access Order ,即按照元素被访问的顺序来排序,我们熟知的LRUCache底层就依赖于此。以下是文档中需要我们注意的点:
Hash table and linked list implementation of the Map interface, with predictable iteration order. This implementation differs from *HashMap* in that it maintains a doubly-linked list running through all of its entries. This linked list defines the iteration ordering, which is normally the order in which keys were inserted into the map (insertion-order ). Note that insertion order is not affected if a key is re-inserted into the map.
A special *LinkedHashMap(int,float,boolean)* constructor is provided to create a linked hash map whose order of iteration is the order in which its entries were last accessed, from least-recently accessed to most-recently (access-order ). This kind of map is well-suited to building LRU caches.
The *removeEldestEntry(Map.Entry)* method may be overridden to impose a policy for removing stale mappings automatically when new mappings are added to the map.
Note, however, that the penalty for choosing an excessively high value for initial capacity is less severe for this class than for HashMap , as iteration times for this class are unaffected by capacity.
下面我们就从构造函数和成员变量开始分析其具体实现。
构造函数与成员变量 成员变量 在分析成员变量前,我们先看下其存储元素的结构。
1 2 3 4 5 6 static class Entry <K ,V > extends HashMap .Node <K ,V > Entry<K,V> before, after; Entry(int hash, K key, V value, Node<K,V> next) { super (hash, key, value, next); } }
这个Entry在HashMap中被引用过,主要是为了能让LinkedHashMap也支持树化。在这里则是用来存储元素。
1 2 3 4 5 6 7 8 transient LinkedHashMap.Entry<K,V> head;transient LinkedHashMap.Entry<K,V> tail;final boolean accessOrder;
构造函数 关于LinkedHashMap的构造函数我们只关注一个,其他的都和HashMap类似,只是把accessOrder设置为了false。在上边的文档说过,initialCapacity并没有在HashMap中那般重要,因为链表不需要像数组那样必须先声明足够的空间。下面这个构造函数是支持访问顺序的。
1 2 3 4 5 6 public LinkedHashMap (int initialCapacity, float loadFactor, boolean accessOrder) super (initialCapacity, loadFactor); this .accessOrder = accessOrder; }
重要方法 LinkedHashMap并没有再实现一整套增删改查的方法,而是通过复写HashMap在此过程中定义的几个方法来实现的。对此不熟悉的可以查看文末关于HashMap分析的文章,或者对照HashMap的源码来看。
插入一个元素 HashMap在插入时,调用了newNode来新建一个节点,或者是通过replacementNode来替换值。在树化时也有两个对应的方法,分别是newTreeNode和replacementTreeNode。完成之后,还调用了afterNodeInsertion方法,这个方法允许我们在插入完成后做些事情,默认是空实现。
为了方便分析,我们会对比HashMap中的实现与LinkedHashMap的实现,来摸清它是如何做的。
1 2 3 4 5 6 7 8 9 10 11 12 13 14 15 16 17 18 19 20 21 22 23 24 25 26 27 28 Node<K, V> newNode (int hash, K key, V value, Node<K, V> next) { return new Node<>(hash, key, value, next); } Node<K,V> newNode (int hash, K key, V value, Node<K,V> e) { LinkedHashMap.Entry<K,V> p = new LinkedHashMap.Entry<K,V>(hash, key, value, e); linkNodeLast(p); return p; } Node<K, V> replacementNode (Node<K, V> p, Node<K, V> next) { return new Node<>(p.hash, p.key, p.value, next); } Node<K,V> replacementNode (Node<K,V> p, Node<K,V> next) { LinkedHashMap.Entry<K,V> q = (LinkedHashMap.Entry<K,V>)p; LinkedHashMap.Entry<K,V> t = new LinkedHashMap.Entry<K,V>(q.hash, q.key, q.value, next); transferLinks(q, t); return t; }
通过以上对比,可以发现,LinkedHashMap在新增时,调用了linkNodeLast,再替换时调用了transferLinks。以下是这两个方法的实现。
1 2 3 4 5 6 7 8 9 10 11 12 13 14 15 16 17 18 19 20 21 22 23 24 25 26 private void linkNodeLast (LinkedHashMap.Entry<K,V> p) LinkedHashMap.Entry<K,V> last = tail; tail = p; if (last == null ) head = p; else { p.before = last; last.after = p; } } private void transferLinks (LinkedHashMap.Entry<K,V> src, LinkedHashMap.Entry<K,V> dst) LinkedHashMap.Entry<K,V> b = dst.before = src.before; LinkedHashMap.Entry<K,V> a = dst.after = src.after; if (b == null ) head = dst; else b.after = dst; if (a == null ) tail = dst; else a.before = dst; }
最后我们看下afterNodeInsertion做了哪些事情吧:
1 2 3 4 5 6 7 8 9 10 void afterNodeInsertion (boolean evict) LinkedHashMap.Entry<K,V> first; if (evict && (first = head) != null && removeEldestEntry(first)) { K key = first.key; removeNode(hash(key), key, null , false , true ); } }
removeEldestEntry是当想要在插入元素时自动删除最老的元素时需要复写的方法。其默认实现如下:
1 2 3 protected boolean removeEldestEntry (Map.Entry<K,V> eldest) return false ; }
查询 因为要支持访问顺序,所以获取元素的方法和HashMap也有所不同。下面我们看下其实现:
1 2 3 4 5 6 7 8 9 public V get (Object key) Node<K,V> e; if ((e = getNode(hash(key), key)) == null ) return null ; if (accessOrder) afterNodeAccess(e); return e.value; }
getNode方法是在HashMap中实现的,所以这是包装了一下HashMap的方法,并添加了一个afterNodeAccess,其实现如下:
1 2 3 4 5 6 7 8 9 10 11 12 13 14 15 16 17 18 19 20 21 22 23 24 25 26 27 28 29 30 31 void afterNodeAccess (Node<K,V> e) LinkedHashMap.Entry<K,V> last; if (accessOrder && (last = tail) != e) { LinkedHashMap.Entry<K,V> p = (LinkedHashMap.Entry<K,V>)e, b = p.before, a = p.after; p.after = null ; if (b == null ) head = a; else b.after = a; if (a != null ) a.before = b; else last = b; if (last == null ) head = p; else { p.before = last; last.after = p; } tail = p; ++modCount; } }
关于LinkedHashMap的分析就到这里了,其他关于Iterator的内容都和Collection是大同小异的,感兴趣的可以去查看相关源码。
Set概述 因为Set 的结构及实现都和Map 保持高度一致,这里将不再对其进行分析了,感兴趣的朋友可以自行查看源码。但我们还是需要知道什么是Set ,Set 是一个包含不可重元素的集合,也就是所有的元素都是唯一的。还是看下文档说明吧:
A collection that contains no duplicate elements. More formally, sets contain no pair of elements e1 and e2 such that *e1.equals(e2)* , and at most one null element. As implied by its name, this interface models the mathematical set abstraction.
此外Set 系列也有SortedSet、NavigableSet这种基于排序的接口,它们的作用在分析Map 时都已经详细介绍过了。
总结 在Java的集合类中,大量的依赖于对象的equals、hashCode、clone方法,有些还需要我们实现Comparable接口。如果对数据结构有所理解,又清楚集合类用了哪些个数据结构,我想需要实现哪些方法是可以推测出来的。如果我们能把握这些细节,就能写出更优秀的代码。如果我们能掌握这些思想,就能超脱语言的束缚,理解软件设计的精髓。
该文图片及笔记整理自 简书 作者:大大纸飞机 链接:https://www.jianshu.com/p/d68eea1a3a8c
部分图片及文字整理自 掘金 作者:Mr羽墨青衫 链接:https://juejin.cn/post/6844903796225605640
